Getting Started with Macha
Create your account, walk through onboarding, connect your first integration, and set up your workspace in minutes.
What is an AI Agent on Macha
An AI agent on Macha is a workflow you can configure with three things: instructions (what you want it to do), tools (the actions it can take inside your connected apps), and triggers (the events that kick it off). You point it at the data sources it should reference, give it the right capabilities, and the agent decides on its own how to handle each situation it sees. Anytime the agent wants to make a change in chat — update a ticket, post a reply, edit a field — it pauses and asks you to confirm. In autonomous mode (running off a trigger), it acts immediately without that confirmation step.
Creating an Account
Getting started with Macha takes just a few minutes. Head to the signup page and enter your name and email address. You do not need to create a password — Macha uses passwordless authentication for better security.
OTP Verification
After submitting your email, you will receive a one-time passcode (OTP) delivered to your inbox. On the verification screen you will see six individual input boxes — one for each digit of the code. Type or paste the code and it will auto-submit once all six digits are filled in. A few things to note:
- Each box auto-advances to the next as you type.
- Press Backspace to move back to the previous box.
- You can paste the full 6-digit code and all boxes will fill at once.
- The code expires after a short window, so enter it promptly.
Tip
If you already have an account, use the login page instead. The login page will let you know if the email is not recognized and point you to sign up.
Onboarding Walkthrough
When you create a new organization, Macha walks you through a three-step onboarding flow so your workspace is ready to go from the start.
Step 1: Select Your Tools
You will see a grid of available integrations — Zendesk, Freshdesk, Gorgias, Front, Shopify, Slack, Stripe, Google Workspace, Notion, Airtable, and more. Helpdesks are listed first since they're the most common starting point. Select the tools your team uses; this helps Macha recommend the right agents and templates for your workflow.
Step 2: Recommended Agents
Based on the tools you selected, Macha suggests pre-built agent templates. These are ready-made configurations for common workflows like ticket triage, customer support replies, escalation handling, and pulling docs context from Confluence. You can pick up to three agents to start with — keeping the first run focused beats trying to enable everything at once. You can build more agents anytime after onboarding.
Step 3: Connect Integrations
For each tool you selected, you will be prompted to connect it. Depending on the integration, this is either an OAuth authorization flow (you click a button and approve access) or an API key entry (you paste credentials from the external service). You can skip any integration and connect it later from the Connectors page.
Tip
You can skip the entire onboarding if you prefer to set things up manually. Click "Skip" at any point and you will be taken to your workspace.
The welcome conversation
Once you finish onboarding with at least one connector connected, Macha drops you straight into a welcome conversation — not a static "you're all set" screen. Macha has already used your connected tools to pull a few real items (e.g. recent Zendesk tickets, recent Stripe payments, recent Front conversations) and the assistant message you see streams in with concrete references to what was found in your workspace.
Below the welcome message, three suggestion chips appear — AI-generated, tailored to the agents you just picked and the data you actually have. Click a chip and the suggested question sends as your first message; ignore them and just type your own.
The conversation carries a small "This chat costs no credits" badge near the model picker so it's clear this run is on the house. The badge disappears the moment you start a new conversation — only this one welcome chat is credit-free.
Why a free welcome chat?
The discovery reads and the streamed assistant message all use credits internally — Macha is covering them so you can see what the platform can actually do with your data before any of your plan credits get spent. One welcome conversation per organization.
Workspace Overview
Once onboarding is complete, you land in your Macha workspace. The sidebar on the left gives you access to everything you need:
- New Chat — Start a conversation with any of your agents.
- Agents — View, create, and configure your AI agents.
- Sources — Manage knowledge bases, file uploads, and connected data sources.
- Connectors — Connect and manage integrations with external tools.
- Custom Tools — Build your own API-based tools for agents to use.
- Templates — Browse pre-built agent configurations for common workflows.
Each section is designed to be self-contained — you can set up connectors independently of agents, and then wire them together when you are ready.
Quick Start: Your First Agent
Here is the fastest path from signup to a working AI agent:
- Build with AI (recommended). Go to the Agents page and click "Build with AI." Describe what you want — for example, "Create an agent that triages incoming Zendesk tickets." The AI will configure the name, instructions, tools, and trigger automatically based on your connected integrations.
- Or create manually. Click "Create Agent" to set up an agent step by step. Give it a name, write instructions, pick a model, and assign connectors and tools.
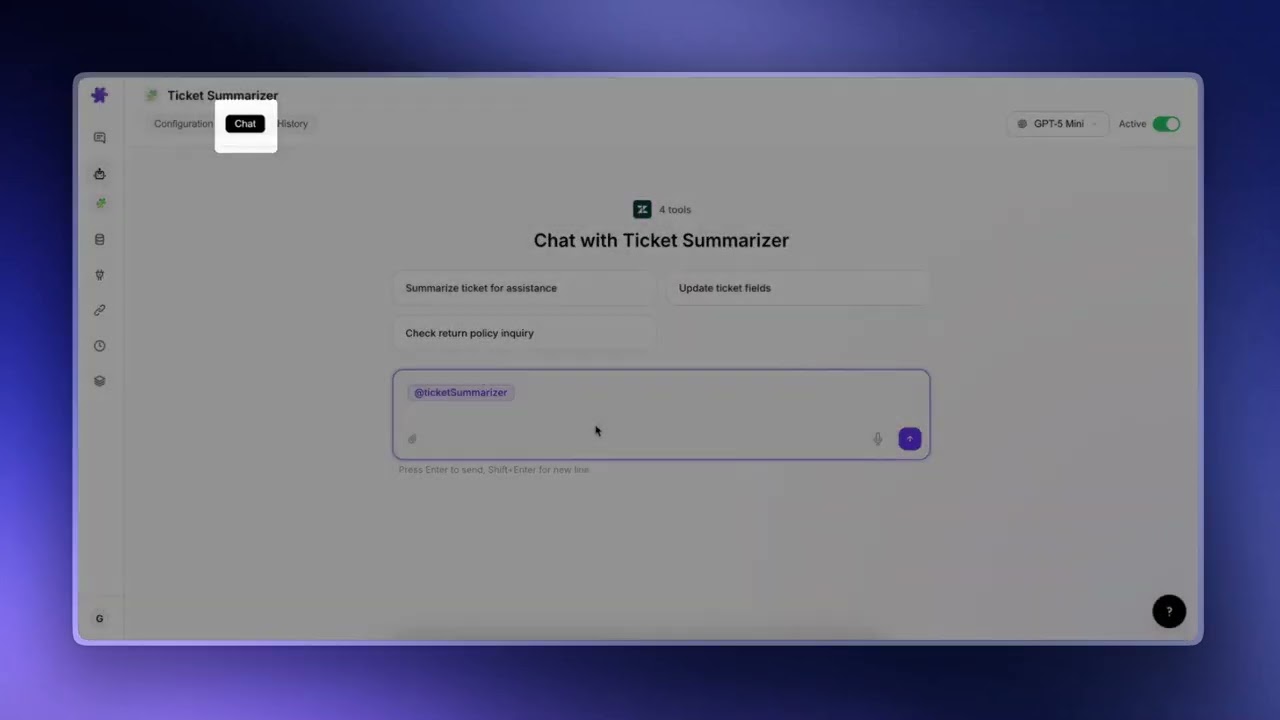
- Start a conversation. Click "New Chat" in the sidebar, select your agent, and type your first message. The agent will respond using the instructions and tools you configured.
From here you can iterate — refine the instructions, add data sources for the agent to reference, assign additional connectors, or set up triggers for automation. Each of these topics is covered in detail in the following pages.
Build an AI Agent — Full Walkthrough
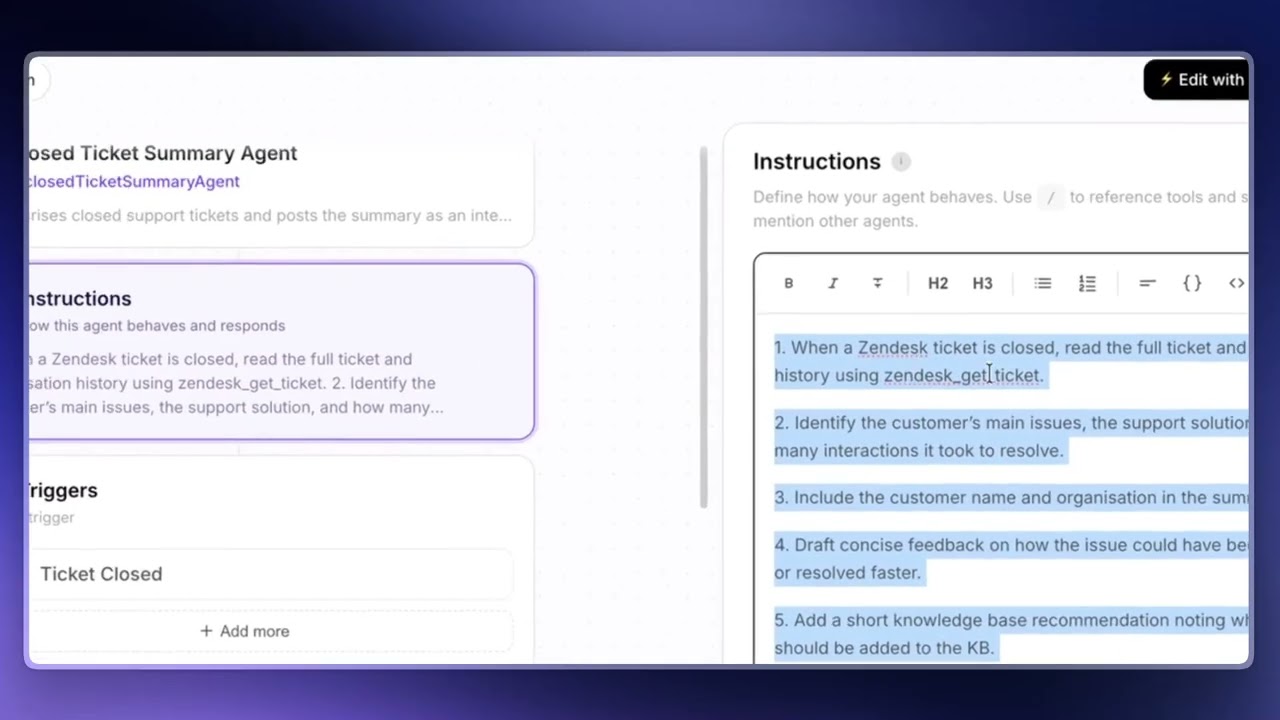
If you want to see the whole flow end-to-end — Build with AI, reviewing and editing the draft, adding tools, attaching a trigger, testing in chat — the walkthrough above runs through it on a real ticket-summarizer agent. A few takeaways from the video worth flagging:
- Always review what Build with AI generates. The AI gives you a strong starting point, but read through the instructions and tool list before saving. It does not know about your custom ticket fields or organization-specific rules — those you add yourself.
- The AI builder does not add triggers automatically. You decide when the agent should run. After the agent is configured, go to Triggers and pick the event that should kick it off (e.g., ticket closed, new comment, custom webhook).
- For complex instructions, draft them in ChatGPT or Claude first — paste your existing instructions, ask the model to tighten them, then copy the result back into Macha. Instructions are plain text, so this works well.
- Test before you go live. Use Chat to run the agent against a real or test ticket, watch what it does, then turn the trigger on once you're confident.
© 2026 AGZ Technologies Private Limited