Zendesk Setup & Best Practices
Pick the right trigger for your Zendesk workflow, set up custom Zendesk webhooks, avoid infinite loops on tickets, and understand the Zendesk tools that need explaining.
This page collects the Zendesk-specific guidance that doesn't fit cleanly into the general docs — choosing the right trigger for your workflow, setting up custom Zendesk webhooks, avoiding infinite loops, and the handful of Zendesk tools that need a closer look. If you're running Macha agents on Zendesk, this is the page to read after you've gone through Connectors, Data Sources, and Triggers.
Choosing the right trigger for your Zendesk workflow
Choosing the Right Trigger for Your Zendesk Workflow
Picking a Zendesk trigger comes down to three questions. Walk through them in order:
1. Should this run automatically, or does a human kick it off?
If a teammate is going to open Macha and chat with the agent, you don't need a trigger at all — that's just chat. Triggers are specifically for when you want the agent to start on its own when something happens in a connected app. If a human is in the loop, skip the trigger entirely.
2. Which connected app does the event live on?
Pick the trigger from the right connector. For Zendesk, you'll see options like new ticket, every customer ticket message, ticket status changed, ticket priority changed, ticket assigned, ticket closed, customer message on messaging, and more. Each one corresponds to a specific Zendesk event.
3. How specific can you be?
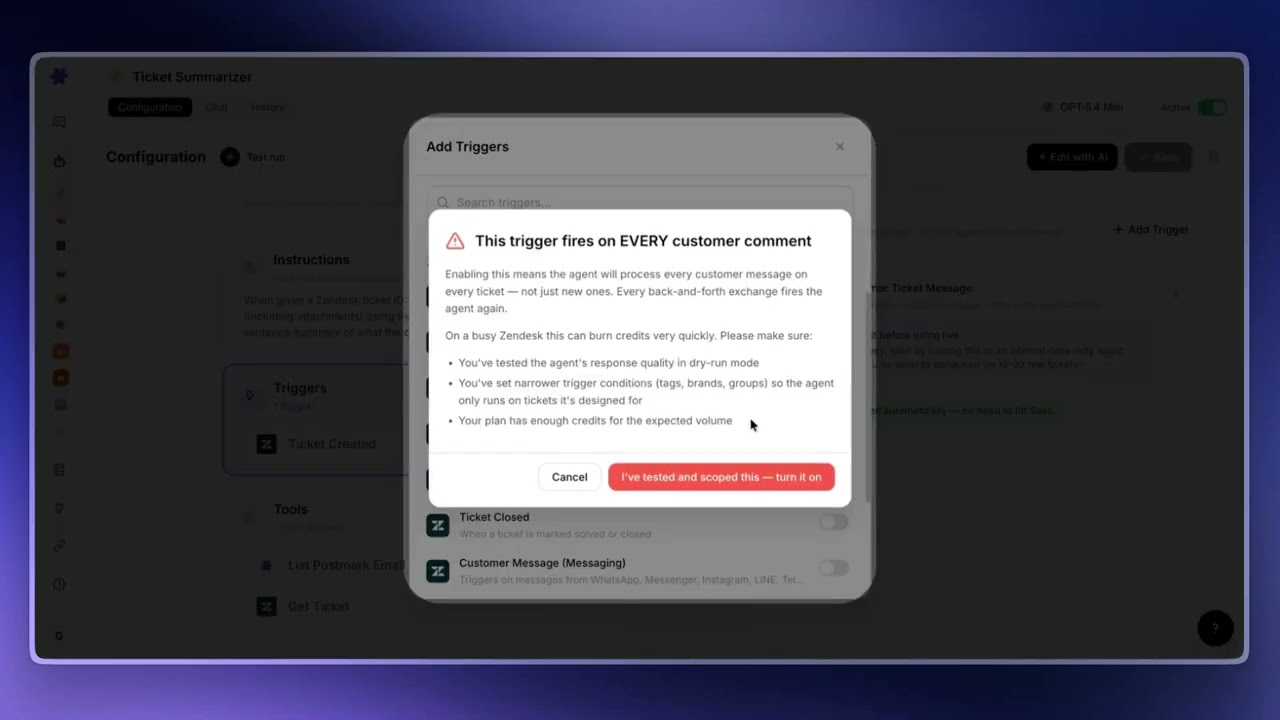
This is the most important question. Be as specific as possible. If you turn on a broad trigger like "every customer ticket message," it fires on every customer comment across every ticket — and consumes a credit for each one. You'll burn through credits without meaning to.
Pick the trigger that matches the exact moment that matters, not the broadest one available. For maximum specificity, use a custom Zendesk webhook trigger. With that, you set up the actual conditions inside Zendesk (e.g., "new ticket" + "high priority" + "from VIP customer") and only tickets that satisfy those conditions get sent to the agent.
Tip
When you switch on a high-volume trigger, Macha shows a warning ("this trigger fires on every new ticket — it will consume a credit per ticket") and asks you to confirm. Pay attention to those warnings — they exist precisely because broad triggers are easy to misuse.
Setting up a custom Zendesk webhook trigger
How to Set Up a Custom Zendesk Webhook Trigger
Custom Zendesk webhook triggers give you the most precise control over when an agent runs. The flow is:
- In Macha: open your agent → Triggers → Add trigger → select Custom Webhook. Macha automatically creates a webhook on your Zendesk instance.
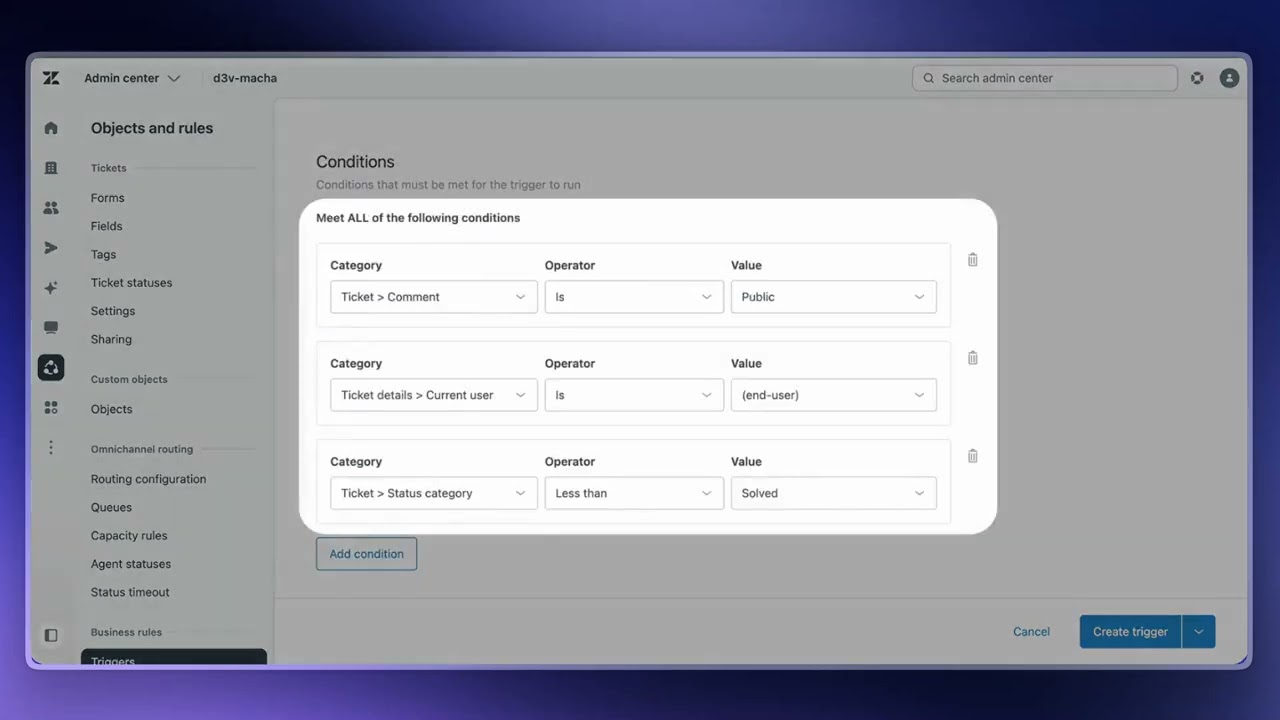
- In Zendesk: go to the admin panel and create a new ticket trigger. Set up the conditions for which tickets should be sent to your agent (e.g., "ticket has new public comment" + "commenter is end user" + "ticket status is less than solved").
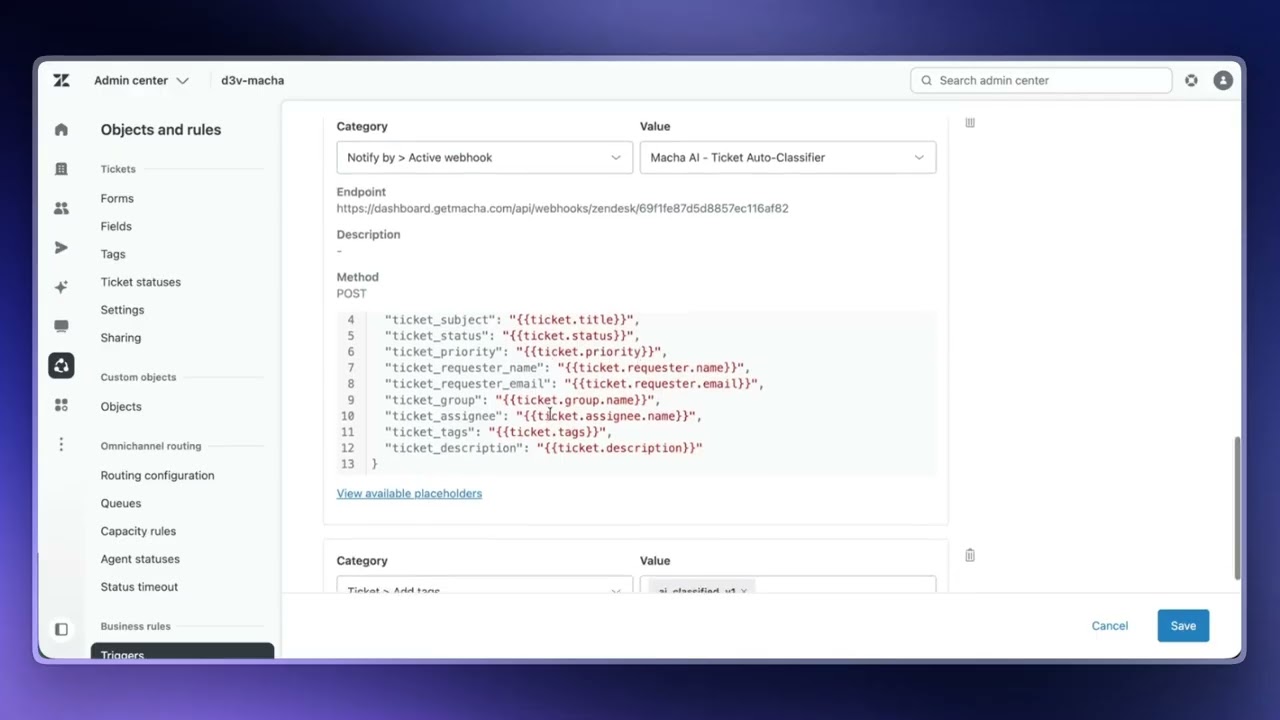
- Add an action to that Zendesk trigger: Notify by → Active webhook, then select the Macha webhook from the dropdown. It'll be named after your agent (e.g., "Macha AI Ticket - Auto Classifier").
- Copy the JSON payload Macha gave you in the popup and paste it into the Zendesk webhook body field. Click Create trigger.
From this point on, every Zendesk ticket that meets your trigger conditions will be sent to your Macha agent — and only those tickets. To verify it's working, create a test ticket that satisfies the conditions, then go to your agent's History tab. You should see the run appear there.
Tip
If something isn't firing, screenshot what you've set up so far on both sides (Macha trigger config + Zendesk trigger conditions + webhook action) and either ask ChatGPT/Claude to help debug or open a support ticket with us. Most issues are conditions on the Zendesk side that don't actually match any tickets.
Stopping infinite loops on Zendesk tickets
Stop Your AI Agent from Infinitely Looping on Zendesk Tickets
This is a classic Zendesk problem: an agent processes a ticket → updates it → that update fires the same trigger → which sends the ticket back to the agent → and so on. The fix is simple but easy to miss when you're setting things up.
The pattern: tag-and-exclude
Inside the Zendesk trigger that calls your Macha webhook, do two things:
- Add a tag in the trigger's actions. Alongside the webhook action, add an Add tags action with a unique tag name (e.g.,
ai_classified_v1). Every ticket that gets sent to your agent will now be tagged. - Exclude that same tag in the trigger's conditions. Add a condition: Tags → Contains none of the following → ai_classified_v1. Tickets that already have the tag are skipped.
The result: each ticket flows through the agent exactly once. The first time the trigger fires, the ticket gets tagged and sent. The next time the same trigger evaluates that ticket, the tag check excludes it.
Tip
Use a versioned tag name like ai_classified_v1 or ai_summarized_v2. If you ever change the agent's logic and want it to reprocess every ticket, just bump the version (v2) — the new tag won't match any existing tickets, so they'll all flow through once with the updated logic.
Zendesk tools that need explaining
Zendesk Tools in Macha — The Ones That Actually Need Explaining
Most Zendesk tools in Macha do exactly what their name says. A few are easy to confuse with each other or are more powerful than they look — those are worth a closer read.
The three "get" tools that confuse everyone
- Get Ticket — fetches the core ticket: subject, description, status, requester, comments. This is the main tool you'll use for most workflows.
- Get Ticket Custom Fields — fetches the actual values on a specific ticket for its custom fields. If you have a custom field called "Issue Category," this is how you read what's in it on a given ticket.
- Get Ticket Fields — fetches the field definitions — the structure of your Zendesk account: which custom fields exist and what their IDs are. Agents use this to understand your overall setup. (Different from Custom Fields, which reads values on one ticket.)
Search Tickets is more powerful than it looks
Search Tickets supports Zendesk's full search syntax. You can search by status, assignee, tags, date ranges, custom fields, and more. If you want the agent to find a specific group of tickets — not just one — this is the tool to use. Worth giving the agent if it ever needs to do bulk lookups or reporting-style work.
Add Internal Note vs Add Public Reply
An internal note is private — only your support agents see it. A public reply goes directly to the customer. Pick the right one for the job. If your agent runs autonomously, double-check this before going live — autonomous mode means the agent will post whatever you've configured without confirmation.
Update Ticket Fields writes custom fields too
Update Ticket Fields lets the agent write values into custom fields, not just system fields like status or priority. If you have custom dropdowns, text fields, or checkboxes, this is how the agent fills them.
Read Attachment
Easy to miss but very useful. If a customer attaches a file to a ticket, the agent can read it. Attachments can be images, PDFs, or documents — the agent extracts the content and uses it as context when forming a response or looking up customer information.
Tip
The rest of the Zendesk tools are pretty self-explanatory. If anything else is unclear, send us an email — we're happy to walk through it.
© 2026 AGZ Technologies Private Limited