


 Shopify
 Stripe
 Slack
Slack Notion
 Google Workspace
 Confluence
How to Connect a Custom Tool to Your Zendesk AI Agent (Any API)


Macha ships with connectors for the apps most support teams use — Zendesk, Shopify, Stripe, Slack, Notion, and more — and each one gives your agents a set of ready-made tools. But your stack has things Macha doesn't have a built-in connector for: an internal shipping API, a billing system, a homegrown service. Custom tools close that gap. If an app has an API endpoint, you can turn it into a tool your agent calls — so a Zendesk ticket can trigger an action in your systems, not just the ones with a logo in the catalog.

Here's how to connect one.
What a custom tool is
A connector is a pre-built integration Macha maintains. A custom tool is one you define: a single HTTP endpoint, wrapped so an agent can call it exactly like a built-in tool. Once it's saved, any agent you allow can use it — to look up a record, kick off a job, send a message, whatever the endpoint does.
It's an org-level resource: you build it once, then assign it to as many agents as you like.
Watch it in two minutes
Two ways to build one
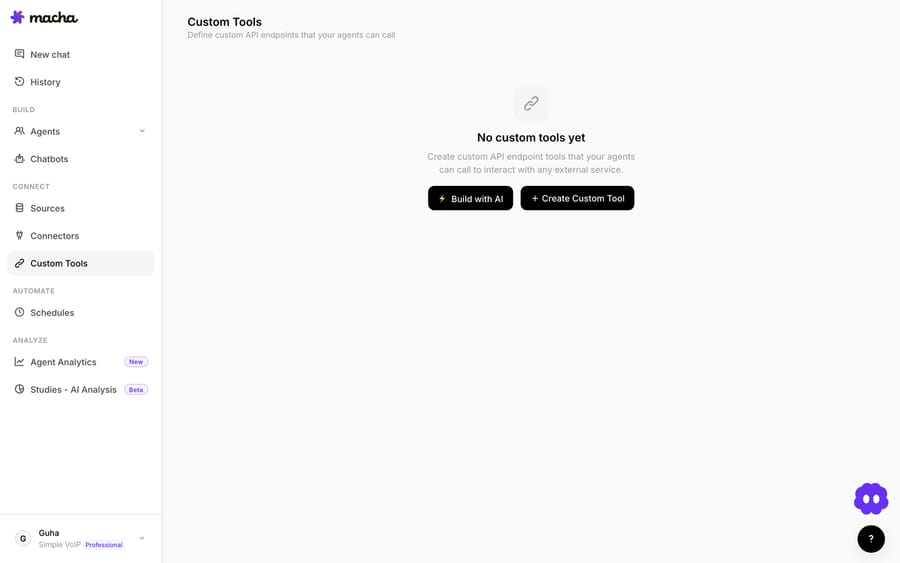
From the Custom Tools tab you have two options, both top-right:
- Create Custom Tool — configure it manually (full control).
- Build with AI — the AI Tool Builder (powered by Sidekick) walks you through it conversationally and tests it for you.
We'll cover the manual way in detail, then the AI way.
Building a custom tool manually
Click Create Custom Tool and you get a single form with everything the endpoint needs — Label, Description, Method and URL, Read vs. Write, Authentication, Static Headers, Response Mapping, and Parameters:
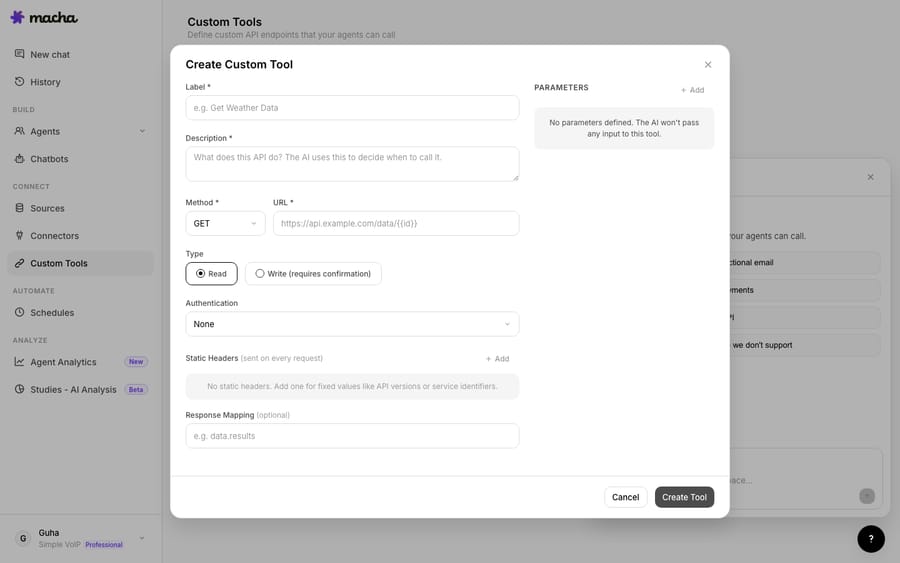
Fill in the pieces:
1. Label. The name the AI sees (e.g., get_shipping_status). Keep it clear and action-oriented.
2. Description. What the tool does — "Look up the shipping status and tracking link for an order by order number." This matters more than it looks: the agent reads the description to decide when to use the tool, so a vague description means the agent uses it at the wrong time (or not at all). Be specific about what it does and what it needs.
3. Method + URL. Choose the HTTP method (GET, POST, PUT, etc.) and enter the endpoint URL. You can drop {{placeholders}} into the URL for values the agent fills in at call time — e.g. https://api.yourco.com/orders/{{order_id}}/shipping.
4. Authentication. Pick the auth type — Bearer, API Key, Basic, or None — and enter the details (for an API key, the header name and the key). Credentials are encrypted at rest.
5. Request body (for POST/PUT). Provide a body template, again with {{placeholders}} for the values the agent supplies.
6. Response mapping. Tell Macha which parts of the response to hand back to the agent, so it gets clean data instead of a raw blob.
7. Group (optional). Give the tool a group with a name, icon, and color so your Custom Tools list stays organized as it grows.
8. Test it. Use the built-in test endpoint to fire a real call and confirm it works before an agent ever uses it. Get the test passing, then save.
That's the whole manual flow — label and describe it, point it at the endpoint, add auth, map the response, test, save.
The faster way: the AI Tool Builder
If wiring auth headers and response mappings by hand isn't your idea of fun, let Sidekick do it. Build with AI is Sidekick — clicking it opens the Sidekick panel scoped to building a tool, with starters like "Connect Postmark for transactional email" or "Hook up a custom internal API."
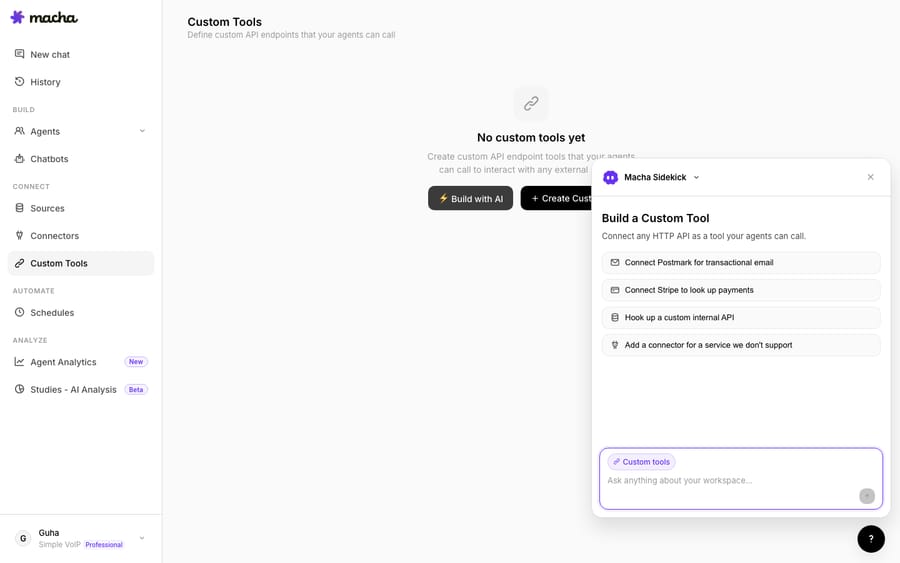
Describe the API in plain language — "Connect our Postmark account so agents can send email" — and the AI Tool Builder walks through the method, URL, auth, parameters, and body, tests it against the live API, and saves the tool. Because it captures the working configuration from a successful test, you skip the trial-and-error of getting headers and mappings exactly right. (The AI Tool Builder is available on Professional and Enterprise; see Sidekick.)
Adding the tool to your agent
A custom tool isn't doing anything until an agent can use it. Open the agent you want to give it to, go to its Tools section, and toggle on the new custom tool — it appears right alongside the built-in Zendesk, Shopify, and other tools. Now, when the agent decides it needs that capability (based on the description you wrote), it can call your endpoint as part of resolving a ticket.
For example: add get_shipping_status to your support agent, and a "where's my order?" ticket can now be answered with live data from your shipping system — not just the connectors Macha ships with.
A few real uses
- Internal systems — your order, billing, or account API, so agents answer with first-party data.
- Tools without a built-in connector — anything with a REST endpoint becomes available.
- Trigger jobs — POST to an internal endpoint to kick off a refund, a re-ship, or a provisioning task.
- Enrichment — call a data provider to add context before the agent replies.
A worked example: connect your shipping API
Say you have an internal endpoint GET https://api.yourco.com/orders/{{order_id}}/shipping that returns an order's status and tracking link. To let your support agent use it:
- Custom Tools → Create Custom Tool.
- Label:
get_shipping_status. Description: "Get the shipping status and tracking link for an order by its order number. Use this for 'where is my order' questions." - Method / URL:
GET,https://api.yourco.com/orders/{{order_id}}/shipping. - Auth: API Key — header
Authorization, your key. - Response mapping: return
statusandtracking_url. - Test with a real order ID, confirm it returns the right data, and Save.
- Open your support agent → Tools → toggle on
get_shipping_status.
Now a "where's my order?" ticket gets answered with live data from your own system: the agent reads the order number from the ticket, calls your endpoint, and replies with the status and tracking link — fully autonomously if you've set a trigger.
Plan availability
Custom tool slots are part of the paid plans — Professional includes 5 and Enterprise 20 (slots count per assignment, so the same tool on three agents uses three slots). The AI Tool Builder is on Professional and Enterprise. 7-day free trial, no credit card required.
Best practices
- Write the description for the AI. It's how the agent decides when to call the tool — be specific.
- Test before you ship. Use the built-in test endpoint and confirm a real call works.
- Scope auth tightly. Use a key with only the permissions the tool needs; credentials are encrypted, but least-privilege still matters.
- Be deliberate with write actions. A tool that changes something (a refund, a cancellation) deserves extra care — consider keeping it on agents that confirm before acting.
- Group your tools so the list stays manageable as you add more.
Frequently asked questions
What's the difference between a connector and a custom tool? A connector is a pre-built integration Macha maintains (Zendesk, Shopify, etc.). A custom tool is one you define from any API endpoint.
What do I need to connect a custom tool? An API endpoint, its method and URL, and the authentication details. That's it.
Do I have to configure it by hand? No — the AI Tool Builder (Build with AI) walks through it conversationally and tests it for you.
How does the agent know when to use the tool? From the description you write. A clear, specific description is the single most important field.
Can the same tool be used by multiple agents? Yes — it's an org-level resource; assign it to any agent via the Tools toggle (each assignment uses a slot).
The bottom line
Custom tools mean your agents aren't limited to the apps in Macha's catalog. If it has an API, your agent can use it — built by hand for full control, or by chat with the AI Tool Builder. Describe it well, test it, add it to your agent, and a Zendesk ticket can now reach straight into your own systems.
Give your agent a new capability: connect a custom tool from any API in minutes. 7-day free trial, no credit card required. Start free.
Add AI agents to your Zendesk
Macha resolves tickets end to end, right on top of Zendesk — no migration.


