 Zendesk
 Freshdesk
 Gorgias
 Front
Front Shopify
 Stripe
 Slack
Slack Notion
 Google Workspace
 Confluence
How to Configure Roles & Permissions in Zendesk (Step by Step)


Getting Zendesk roles setup right is the difference between a help desk where everyone can safely do their job and one where a new hire can accidentally delete a view, rewrite a trigger, or export your customer list. Roles are Zendesk's access-control system: they decide who can see which tickets, who can edit business rules, who can touch reporting, and who can change account settings. This guide walks through the whole thing step by step — the default roles you get out of the box, how to build a custom role with exactly the permissions you want, how plan gating works (this trips up almost everyone), and how to assign roles without over-granting access.

One thing to settle up front, because it's the single biggest source of confusion: custom roles are an Enterprise feature. Not Growth, not Professional — Enterprise. We'll cover what you can and can't do on every plan so you don't waste time hunting for a Roles page that your plan doesn't have. Every step below is verified against Zendesk's own documentation; Zendesk revises its UI periodically, so confirm labels in your own account.
First, the roles you already have
Before you build anything custom, it helps to know the standard roles Zendesk ships with. These exist on every Support and Suite plan, including Team:
- End user (customer). Anyone who submits a request through any channel. End users aren't team members and don't take a seat — they can see their own tickets in the help center, nothing internal.
- Agent. Your front-line support staff. Agents work tickets in their groups, add comments, build their own views and macros, and can moderate help center content. On most plans this is a single, fixed role.
- Administrator. An agent with the keys to the building: they manage business rules, channels, settings, team members, and — on Enterprise — custom roles. Admins can do almost everything an agent can, plus configuration.
- Account owner. A special type of administrator, and there's exactly one per account. The owner alone controls the subscription, billing, and plan — and ownership can be reassigned, but never duplicated.
That four-tier hierarchy (end user → agent → admin → account owner) is the backbone of Zendesk's ticketing system, and it's documented in Zendesk's guide to standard user roles.
On Team and Professional plans, that's essentially it — Admin and Agent are your two team-member roles, and you assign one or the other. The granular, build-your-own permission sets only unlock higher up.
The plan gating, stated plainly
This is where most "Zendesk roles setup" guides get vague or flat-out wrong, so here it is precisely:
| Capability | Plan required |
|---|---|
| Standard Admin / Agent / end-user / account owner | All plans (incl. Team) |
| Light agents (limited, low-cost role) | Suite Growth or above, or the Light agents / Collaboration add-on |
| Custom agent roles + the Roles page | Enterprise: Suite Enterprise, Suite Enterprise Plus, or Support Enterprise |
Two takeaways that save real time:
- Custom roles need Enterprise. If you're on Suite Growth or Professional and looking for "create role," it isn't there — that page only appears on Enterprise. Zendesk confirms this in the plan banner on both Creating custom roles and assigning agents and About the Roles page.
- Light agents are the Growth-tier feature people confuse with custom roles. You get light agents from Suite Growth up — see About team member product roles and access. They're a role type, not a custom permission set you design.
Keep those two straight and the rest of this falls into place.
Step 1 — Open the Roles page
Everything for custom roles lives in one place. On an Enterprise plan:
- Open Admin Center.
- Click the People icon in the left sidebar.
- Go to Team > Roles.
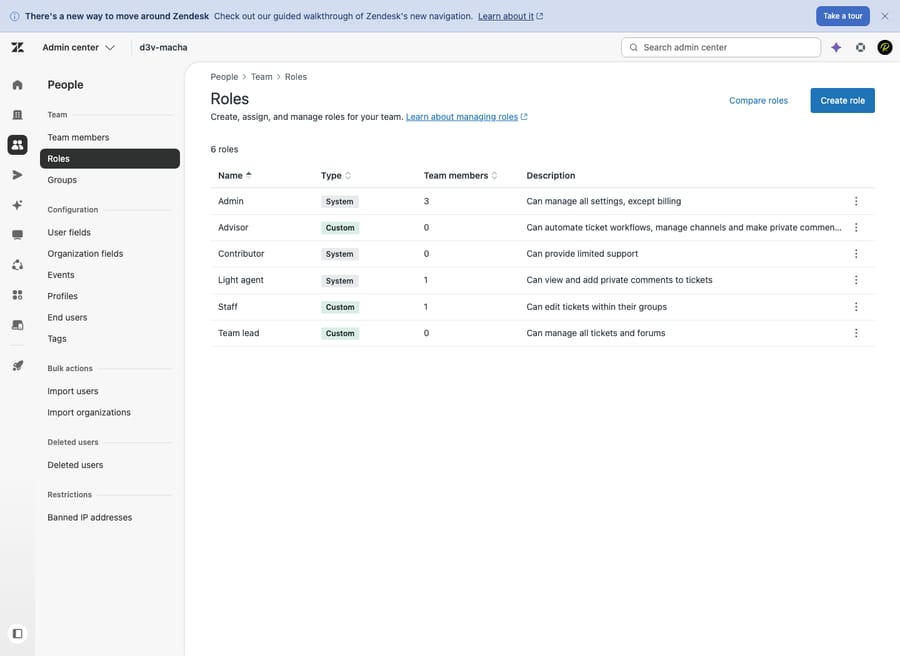
The full path is Admin Center → People → Team → Roles. This page lists every role on your account — the predefined ones Zendesk provides plus any you've built — and shows how many team members are assigned to each. (Not seeing a Roles entry? You're not on Enterprise, or you're not signed in as an admin.)
Step 2 — Start from a predefined role (or a clone)
You rarely need to build a role from a blank slate. Zendesk gives Enterprise accounts three predefined system roles that cover the most common shapes of access, and they're a smart starting point:
- Advisor — manages workflow and configuration but doesn't solve tickets. Advisors can create automations, macros, triggers, and views, and set up SLAs and channels. Think of them as your process owners.
- Staff — focused on resolving tickets, with editing scoped to their own groups. This is the closest analog to a "standard agent" and the right base for most front-line roles.
- Team lead — elevated access including visibility into all tickets plus user and group management. The base for supervisors and QA.
You have two ways to begin:
- Clone an existing role. On the Roles page, hover over the role nearest to what you want, click the options (•••) icon, and choose Clone. This copies every permission so you only adjust the deltas — far faster, and far less error-prone, than starting fresh.
- Create from scratch. Click Create role if none of the predefined roles is close.
Cloning Staff and tightening one or two permissions is, in practice, how most well-run accounts build their roles.
Step 3 — Name the role
Click into your new (or cloned) role and give it a unique Name and a clear Description.
Two rules worth knowing: the name can't be too similar to a reserved one like Admin or Administrator (Zendesk will reject it), and the description is not just decoration — six months from now, "Tier 1 — resolve own-group tickets, no deletes, no business rules" tells the next admin exactly what this role is for. Vague names like "Agent 2" are how role sprawl starts.
Step 4 — Set the permissions, category by category
This is the heart of Zendesk role based access control. A custom role's permissions are grouped into categories, and within each you toggle exactly what this role can see and do. The current categories you'll configure are:
- Tickets — the big one. Control which tickets the role can access (only their own, their groups', or all), whether they can edit ticket properties, assign, merge, delete, and what level of comment access they get (public replies vs. internal notes only).
- Custom objects — read/edit rights for any custom object records you've defined.
- Assets — access to manage shared views, macros, and similar shared assets versus only personal ones.
- People — whether the role can view and edit end-user and team-member profiles, and manage groups and organizations.
- Channels — permission to configure channels like Talk, messaging, and the help center, or just use them.
- Agent workflow — access to features like the agent workspace behaviors and workflow tools.
- Business rules — arguably the most sensitive after deletes: whether the role can create and edit automations, triggers, macros, and SLAs. A bad trigger can affect every ticket, so guard this.
- Omnichannel routing — whether the role can manage routing configuration.
- Security and privacy — sensitive controls such as redaction and related privacy actions.
- Help center — Guide management rights (note that Guide also has its own separate Knowledge roles — Viewer, Editor, Manager — layered on top).
- Analytics — access to Explore reporting: view dashboards only, or build and edit reports.
The full, current category list is documented in Creating custom roles and assigning agents. (Older third-party guides still list eight categories — Zendesk has since broken them out further, so go by the live UI.)
The classic worked example: a Tier 1 agent role might allow edit ticket properties and add public comments on their group's tickets, while denying delete tickets, merge tickets, and all of Business rules and People management. They resolve what they're assigned and can't reshape the workflow underneath them.
When the toggles match the job, click Save. Your role now appears on the Roles page, ready to assign. (You can create up to 197 custom roles per account, per Zendesk's Managing custom roles — far more than any team should actually need, which is the point of the best practices below.)
Step 5 — Assign the role to agents
A role does nothing until someone holds it. There are two ways to assign it, and they suit different moments:
From the role (best for bulk): On the Roles page, open the role, click Actions → Assign role, search for the team members, select them, and confirm. Ideal when you're rolling a new role out to a whole team at once.
From the team member (best for one person): Go to Admin Center → People → Team members, open the person, and set their Role from the drop-down. This is the natural flow when onboarding a single new hire.
One gotcha worth flagging: Zendesk notes in Setting roles and access in Admin Center that some roles can't be set from the drop-down because of product and plan dependencies — for instance, on Suite Enterprise, agent access is governed by Support custom roles. If a role you expect isn't selectable, that dependency is usually why.
Step 6 — Use light agents and contributors where they fit
Not everyone who touches a ticket needs a full agent license. Two limited role types handle the "I just need to weigh in" crowd:
- Light agents. A limited role that can be CC'd on tickets, view tickets in their groups, and add private (internal) comments — but cannot be assigned tickets or edit them. Perfect for subject-matter experts in engineering, finance, or legal who advise but don't run the queue. Available on Suite Growth and above (or via add-on). We go deep on exactly what they can and can't do in what is a Zendesk light agent.
- Contributors. Even more restricted than light agents — they can view and add private comments on tickets in their groups, and notably don't occupy a billable agent seat unless you upgrade them to a full agent role.
Reaching for these instead of full agent seats is both a security win (least access) and a cost win (fewer paid seats). Use them liberally for the people who only need to look and comment.
Best practices for Zendesk roles and permissions
The mechanics are easy; getting the model right is what keeps a help desk healthy as it grows.
- Default to least privilege. Start every role from the most restrictive base that still lets the person do their job, then add only what's needed. It's far easier to grant a missing permission than to discover, after an incident, who could delete tickets.
- **Build a role per function, not per person.** "Tier 1," "Tier 2," "Workflow admin," "QA lead" — roles that map to jobs scale; roles named after people ("Sarah's role") become unmaintainable the moment Sarah leaves. This is also how you stay well under that 197-role ceiling.
- Guard Business rules and Delete hardest. The permissions that affect every ticket — triggers, automations, SLAs, and ticket deletion/merging — should sit with a small, senior group. Most agents never need them.
- Use light agents and contributors for advisors. Don't hand a full agent seat to someone who only needs to read and comment. It's the cheapest, safest option.
- Review roles on a schedule. Permissions drift. Audit who holds what once a quarter, and prune roles no one is assigned to.
- Document each role's purpose in its description. Future-you, and every admin after you, will thank you.
Where AI fits into your role model
Once your roles are clean, a fair question is: which "team member" handles the repetitive tickets — and what permissions should it have? This is where an AI agent enters the picture, and it's worth being precise about what that means.
An AI agent like Macha isn't a help desk and it isn't a Zendesk replacement — it runs on top of your existing Zendesk. Think of it less as another seat to provision and more as an automation layer that operates within the boundaries you set. It reads an incoming ticket, pulls from your connected knowledge base and past conversations, and resolves the routine questions directly in the ticket — while still doing the housekeeping a good agent does (tagging, setting status, routing) and handing off to a human, with full context attached, whenever it isn't confident. You decide which queues it touches and what it's allowed to do, the same way you'd scope any role.
The honest framing: it's another integration to configure, and it's only as good as the knowledge you connect to it — a thin help center makes for a thin AI agent. On cost, Macha bills per AI action — any automated step it takes, whether drafting a reply, tagging, or routing — not per resolved ticket, because most of the value is the work done along the way, not a tidy "resolution" count. If a big share of your volume is repeatable questions your help center could already answer, that's the work you can take off your human agents' plates while your custom roles keep everyone scoped to exactly what they should touch. You can try it free — 7-day free trial, no credit card required.
Frequently asked questions
What plan do I need for custom roles in Zendesk? Custom agent roles — and the Roles page where you build them — require an Enterprise plan: Suite Enterprise, Suite Enterprise Plus, or Support Enterprise. On Team, Suite Growth, and Professional you get the standard Admin and Agent roles (plus light agents from Suite Growth up), but not the build-your-own custom roles.
Where do I create a role in Zendesk? In Admin Center → People → Team → Roles, click Create role (or clone an existing one via the ••• options menu). Give it a unique name and description, set the permissions across each category, and click Save.
What permissions can I control in a custom role? Permissions are grouped into categories: Tickets (view/edit/assign/merge/delete and comment access), Custom objects, Assets, People, Channels, Agent workflow, Business rules (automations, triggers, macros, SLAs), Omnichannel routing, Security and privacy, Help center, and Analytics (Explore reporting).
How do I assign a role to an agent? Two ways: from the role's settings (Actions → Assign role, then search and select members) for bulk assignment, or from the individual's profile under Admin Center → People → Team members using the Role drop-down for a single person.
What's the difference between an agent, a light agent, and a contributor? A full agent works and resolves tickets. A light agent can view tickets and add private comments within their groups but can't be assigned or edit tickets (Suite Growth and up). A contributor is even more limited and doesn't take a billable agent seat unless upgraded. See what is a Zendesk light agent for the full breakdown.
How many custom roles can I create? Up to 197 per account — but resist the urge to use them all. Build roles per function, not per person, and you'll need only a handful.
Can I change an agent's role later? Yes. Reassign at any time from either the Roles page or the team member's profile. Just remember that some roles aren't selectable from the drop-down due to plan/product dependencies (e.g. Support custom roles on Suite Enterprise).
The bottom line
Zendesk roles setup comes down to a clear sequence: know the standard roles you already have (end user, agent, admin, account owner) on every plan; understand the plan gating (custom roles are Enterprise, light agents are Suite Growth and up); then, on Enterprise, open Admin Center → People → Team → Roles, start from a predefined role or a clone, set permissions category by category with least privilege in mind, and assign the role from either the role or the team member. Build roles around functions, guard the destructive permissions, and lean on light agents and contributors for the people who only need to look and comment. Do that, and your help desk stays both secure and easy to run as the team grows — see the Zendesk ticketing system explained for how roles fit into the bigger picture.
Setup steps and plan availability verified against Zendesk's official documentation, June 2026. Zendesk updates its product periodically — confirm labels and plan requirements in your own account before relying on them.


