


 Shopify
 Stripe
 Slack
Slack Notion
 Google Workspace
 Confluence
How to Build an AI Agent on Macha — A Full Walkthrough


Building an agent in Macha takes minutes, and there are two ways to do it: describe it and let the AI build it for you, or configure it by hand. The first is the fastest way to a working agent; the second gives you full control. This walkthrough covers both, then how to test the agent and take it live.

Watch the full walkthrough
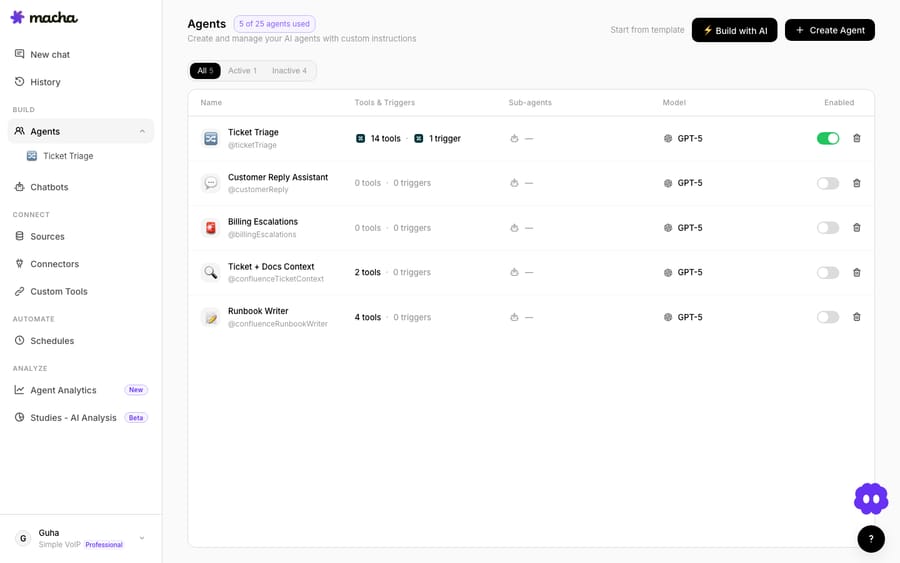
Where you start
Everything begins in the Agents section. Click to create a new agent and you'll see the two paths: Build with AI or create it yourself.
Option 1 — Build with AI (the fast path)
This is the easiest starting point: you describe the agent you want and Macha assembles it. One thing worth knowing up front — "Build with AI" is Sidekick, Macha's built-in assistant. Clicking it opens the Sidekick panel (scoped to "Your agents"), and you build the agent by chatting with it.
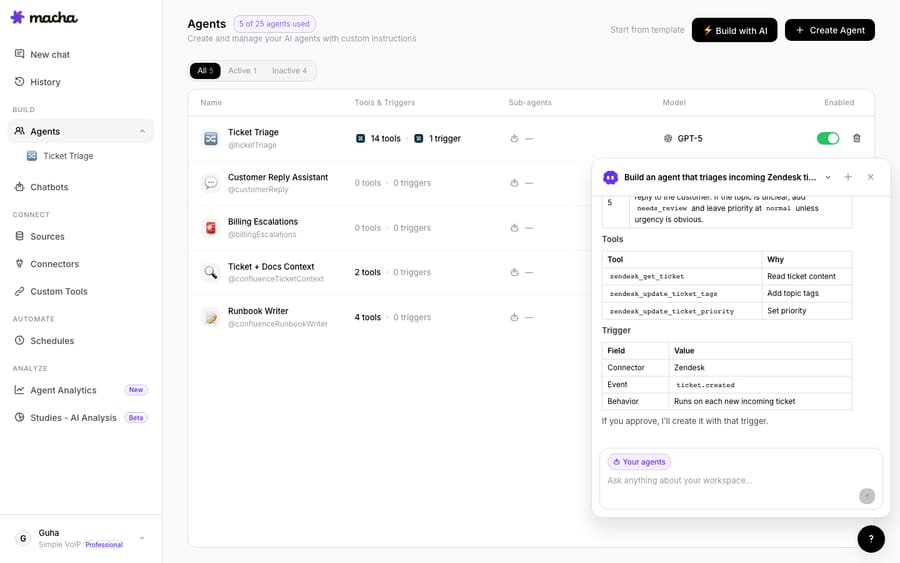
- Click Build with AI (this opens Sidekick) and describe the agent in plain language. Be specific — "Create an agent that summarizes closed tickets, including the customer's issue, what resolved it, and the final status," beats "make a summary agent." The more detail you give, the better the result.
- Let it build. The builder reviews your request and proposes the agent — name, handle, short description, and the full instructions. Confirm it ("yes, please") and it creates the agent.
- Open the agent and review it. Scroll up, click the created agent, and you'll see it's already filled in the name, handle, description, and instructions. Review everything — this is AI-generated, so treat it as a strong starting point, not a finished product.
- Edit by asking. Forgot something? Just tell the editor — "Also capture the customer's name and organization in the summary" — confirm, and it updates the agent for you. You can keep refining this way, or edit the text directly.
The transcript says it best: the AI gives you a starting point, but you should always review the whole thing and decide if it works or needs changes.
Option 2 — Build it manually (full control)
Prefer to set it up yourself? Create the agent and fill in each part — the same four building blocks every agent has:
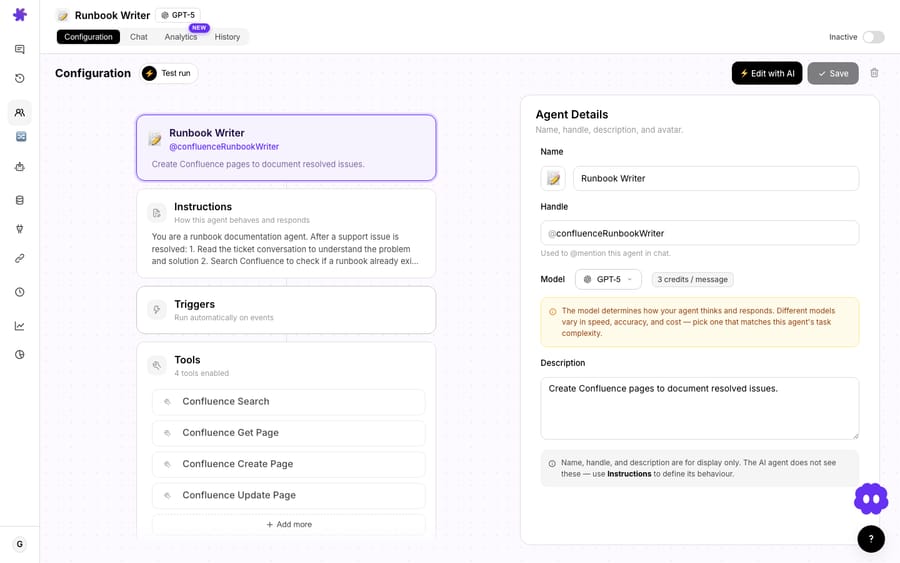
- Instructions — write, in plain English, exactly what the agent should do. This is the most important field; be specific about the steps and the edge cases.
- Model — pick the AI model. A fast, low-cost model handles most jobs; save the stronger ones for genuinely tricky work. (See picking the right model.)
- Tools — toggle on the actions the agent can take (reply, update fields, set tags, assign, plus actions from your other connected apps). Give it only what it needs.
- Knowledge — link the data sources it should read (Help Center, docs, Notion). Search-all, or pin specific documents.
- Triggers — add the events that should run it automatically (e.g., Ticket Created). Leave triggers off and it only runs when you chat with it.
Whether you build with AI or by hand, you end up in the same place: an agent with instructions, tools, knowledge, and (optionally) triggers.
Test before you trust it
Don't point a fresh agent at live customers. Use the Test Run to simulate the agent against real data and watch what it does and what it would change. If it misbehaves, tighten the instructions or adjust the tools and test again. (Full detail in how to test an agent before going live.)
A good habit when the agent takes write actions: start it on internal notes or with confirmation, watch a few real runs, then let it act on its own once you trust it.
Take it live
When you're happy:
- Make sure the agent is Active.
- Add (or confirm) the trigger that should run it.
- From here, matching events fire the agent automatically — and you can still chat with it any time.
Tips for good instructions
Since instructions drive everything, a few that make a big difference:
- Describe the steps, not just the goal: "First look up the order, then reply with the status, then tag the ticket."
- Spell out the edge cases: "If you can't identify the customer or it isn't a genuine support request, escalate to a human."
- Tell it when to stop: when to escalate, when to ask, when not to act.
- Iterate using the test run until the behavior matches what you'd do.
Three good first agents to build
If you're not sure what to build first, these are low-risk, high-value, and quick to stand up:
- Ticket Triage — classify, tag, and route every new ticket. It never replies to customers, so it's the safest place to start, and it saves time on day one.
- Ticket Summarizer — drop a short internal-note summary on each ticket (or each escalation) so agents ramp in seconds. Internal-only, so also low-risk.
- WISMO / order lookup — answer "where's my order?" from your store data. Higher value, slightly higher risk: start it on confirmation, then let it reply on its own once you trust it.
Build one of these, get comfortable with the flow, then expand into the trickier workflows.
Frequently asked questions
What's the fastest way to build an agent? Build with AI — describe what you want and the AI Agent Builder assembles the name, instructions, and setup; you review and tweak.
Do I have to use AI to build it? No — you can create the agent and fill in every section (instructions, model, tools, knowledge, triggers) by hand.
Should I trust the AI-generated agent as-is? Treat it as a strong starting point and always review the instructions before going live.
How do I make it run automatically? Add a trigger (like Ticket Created). Without a trigger, the agent only runs when you chat with it.
How do I know it works before customers see it? Use the Test Run to simulate it against real data, and start write actions on confirmation/internal notes first.
The bottom line
You can have a working agent in minutes: describe it and let the AI Agent Builder do the assembly, or configure the four parts by hand for full control. Either way, review the instructions, test it against real data, start it safely, then add a trigger and let it run.
Build your first agent now: describe it, review it, test it, go live. 7-day free trial, no credit card required. Start free.
Resolve tickets automatically with AI agents
Macha's AI agents work on top of the help desk you already use — no code.


