 Zendesk
 Freshdesk
 Gorgias
 Front
Front Shopify
 Stripe
 Slack
Slack Notion
 Google Workspace
 Confluence
How to Connect Gmail or Outlook to Zendesk (Step by Step)


If you run support out of a Gmail, Google Workspace, or Outlook/Microsoft 365 inbox and you've just bought Zendesk, the first job is wiring that inbox in so every incoming email turns into a Zendesk ticket — and every reply still goes out from your address, not some `@zendesk.com` one. That's what people mean by a Zendesk Gmail integration (or Outlook integration): connecting your real support mailbox so email becomes a managed, trackable channel instead of a shared inbox free-for-all.

Here's the one concept that makes the whole thing click: Zendesk doesn't "log into" your mailbox by default. It turns email into tickets through a support address. Every account ships with a default Zendesk-hosted address — [email protected] — and any message sent there automatically becomes a ticket (Zendesk: adding support addresses). To use your own address (like [email protected]), you connect it as an external support address using one of two methods: forwarding or a connector. This guide walks through both, for Gmail/Workspace and Outlook/365, plus the DNS bits (SPF, DKIM, DMARC) that keep replies out of spam.
Every step below is verified against Zendesk's current documentation (June 2026). The Gmail- and Outlook-side screens are described from Google's and Microsoft's docs — confirm exact labels in your own admin console, since both vendors reshuffle their settings UI regularly.
The two ways Zendesk handles your email
Before clicking anything, pick your method. They get email into Zendesk differently, and the choice affects deliverability, attachments, and how much DNS work you do.
| Forwarding | Connector (Gmail / Microsoft) | |
|---|---|---|
| How mail arrives | Your mailbox auto-forwards to support@…zendesk.com | Zendesk pulls unread mail from your mailbox via OAuth |
| Setup effort | Forwarding rule + a support address in Zendesk | OAuth sign-in; admin consent |
| Outbound sending | From Zendesk mail servers (add SPF/DKIM to use your domain) | Can send from your Gmail/Microsoft mailbox |
| Best for | Most teams; cleanest long-term setup | Teams that want sending to stay inside Gmail/365 |
| Watch-outs | Don't chain/multi-hop forward; verify the address | Rate limits; some features unsupported (Microsoft) |
The short version: forwarding is Zendesk's recommended, most robust path for the majority of teams, and it's where Zendesk steers new setups. Connectors are handy when you specifically want outbound mail to keep flowing through your existing mailbox. We'll do forwarding first, then the connectors.
Before you start: what you'll need
- Zendesk admin access. Adding support addresses lives in Admin Center, which requires an admin role.
- Admin access to your email provider. For Google Workspace you need the Google Admin console; for Microsoft 365 you need the Exchange admin center. Personal/single-mailbox forwarding can be done from the mailbox itself, but org-wide setups need admin rights.
- Access to your DNS. SPF, DKIM, and DMARC records live in your domain's DNS zone (GoDaddy, Cloudflare, Route 53, etc.). Line this up early.
- A decision: forwarding or connector (see the table above).
Once email lands in Zendesk it becomes a ticket like any other — same statuses, macros, triggers, and routing. If that model is new to you, our Zendesk ticketing system explainer covers what a ticket actually is before you start feeding it email.
Method 1 — Forwarding (recommended)
Forwarding is two halves: tell Zendesk about your address, then tell your mailbox to forward to Zendesk. Order matters less than getting both done before you verify.
Step 1 — Add your external address in Zendesk
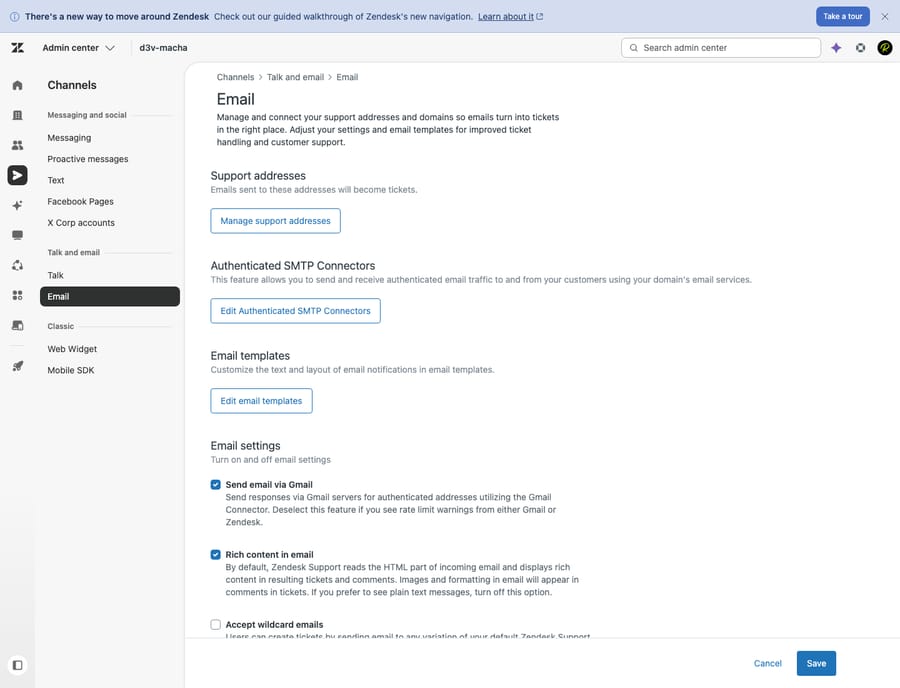
- In Admin Center, click Channels in the sidebar, then select Talk and email > Email.
- Click Manage support addresses.
- Click Add address, then choose Connect external address.
- Select your brand (if you run more than one), choose Email forwarding, and click Next.
This is also where you'd click Create new Zendesk address if you just want a hosted variant like [email protected] — note that the noreply string is reserved and can't be used. But for connecting a real domain address, Connect external address is the path.
Step 2 — Set up forwarding at your provider
Now point your mailbox at the Zendesk address. The destination is your default Zendesk address — [email protected] — unless you've configured a different one.
Critical rule: set forwarding up at the server/admin level, not as a client-side rule that re-sends each message. If you manually forward (or auto-forward from a desktop client) a message that originated from an external address, Zendesk sees the wrong sender and the ticket lands in Suspended instead of your queue. Zendesk also doesn't support multi-hop forwarding — mail that passes through several addresses before reaching Zendesk (Zendesk: forwarding from your existing email address).
Gmail (single personal mailbox): open Gmail Settings > See all settings > Forwarding and POP/IMAP, click Add a forwarding address, enter your Zendesk address, and confirm. (Google sends a confirmation code to that address — it'll surface in Zendesk as a suspended ticket you can open to grab the code.)
Google Workspace (org-wide, recommended): in the Google Admin console go to Apps > Google Workspace > Gmail > Default routing, click Add setting, choose Single recipient and enter the address you use as your support address. Under the action, choose Change envelope recipient and set it to your Zendesk address, e.g. [email protected]. Save. This server-side route is Zendesk's recommended Workspace setup (Zendesk: forwarding Gmail/Google Workspace email).
Outlook / Microsoft 365 (org-wide, recommended): in the Exchange admin center, open the mailbox (or shared mailbox), go to Mailbox features, and set up forwarding to your Zendesk address. One gotcha that trips up almost everyone: Microsoft 365 blocks automatic external forwarding by default. You (or your M365 admin) must first allow it in the anti-spam outbound policy / Manage remote domains, or forwarding silently fails and you'll hit an "access denied" error (Zendesk: access-denied error in Office 365; Microsoft: control automatic external email forwarding). Described from Microsoft's docs — confirm the exact panel in your tenant.
Step 3 — Enter and verify the forwarding address
Back in Zendesk, in the Enter forwarding address field, type your external address ([email protected]) and click Save. Then click the options menu (•••) next to that address and choose Verify forwarding. Zendesk sends a test message through the forwarding path; when it arrives, the address shows as verified (Zendesk forwarding docs). If verification fails, 90% of the time it's the forwarding rule not being active yet, or M365's external-forwarding block from Step 2.
Method 2 — Connect an external account directly (connector)
Connectors skip forwarding entirely: Zendesk authenticates into your mailbox via OAuth and pulls mail out. The path starts the same — Admin Center > Channels > Talk and email > Email > Manage support addresses > Add address > Connect external address — then you pick a connector instead of "Email forwarding."
Option A — Gmail connector
- From Connect external address, select your brand, then choose Gmail connector.
- Decide on backfill: there's a Create tickets from last 300 emails option — deselect it if you only want new, unread messages turned into tickets.
- Click Next, sign in to the Gmail account, and grant the requested permission: Read, compose, and send emails from your Gmail account.
Once connected, Zendesk checks the inbox roughly every minute and converts new, unread inbox messages into tickets, tagging each imported message with a Zendesk label in Gmail. You can connect multiple Gmail accounts, each added as its own support address (Zendesk: Gmail connector).
There's an optional Send email via Gmail toggle: with it on, ticket notifications go out from your Gmail account rather than Zendesk's servers — but you still need SPF/DKIM set up to authorize it, and Gmail-sent notifications can't carry real attachments. Heavy senders can hit Gmail's sending limits, at which point Zendesk recommends switching outbound back to forwarding + SPF.
Option B — Microsoft Exchange connector (Outlook / Microsoft 365)
For Outlook/365, the equivalent is the Microsoft Exchange connector, which uses the Microsoft Graph API with OAuth. During sign-in, Zendesk requests scopes including Mail.Send, Mail.ReadWrite, and User.Read, and an Exchange admin must consent to the connection; whoever authorizes must be able to sign in as the mailbox account. Zendesk then fetches new, unread inbox messages into tickets (labeling them Zendesk, or RejectedByZendesk on failure), and outbound ticket notifications are sent from your Microsoft email address (Zendesk: Microsoft Exchange connector).
Two things to weigh before choosing this over forwarding:
- It's Exchange Online only — on-premises Exchange Server isn't supported.
- Some features don't work through it: personalized email replies and side conversations are unsupported with the Exchange connector. There are also rate limits (sending ~30 emails/minute and 50 MB per 5 minutes; fetching ~25/minute; 50 MB max per email).
If side conversations or personalized replies matter to your team, use forwarding for Outlook/365 instead — it sidesteps both limitations.
Step 4 — Make replies come from your domain (SPF, DKIM, DMARC)
By default, Zendesk sends outbound replies from its own servers, and recipients may see a "via zendesk.com" note next to your address (or worse, replies get filtered to spam). Domain authentication fixes both. Three records, in your DNS:
- SPF authorizes Zendesk to send on your behalf. Add Zendesk to your domain's SPF TXT record with
include:mail.zendesk.com(if you also send via Google, keepinclude:_spf.google.com). A domain can only have one SPF record — merge, don't duplicate (Zendesk: allowing Zendesk to send on behalf of your domain). - DKIM digitally signs your outbound mail so receivers can verify it. Add the CNAME record(s) Zendesk provides to your DNS, then in Zendesk go to the email settings, find Custom domain for DKIM, click Enable, and Save (Zendesk: digitally signing email with DKIM). Note: digital signing is only available when you're using an external email domain.
- DMARC tells receivers what to do with mail that fails SPF/DKIM. Once SPF and DKIM pass, a
p=noneDMARC policy to start (monitoring) is sensible before tightening (Zendesk: authenticating incoming email — SPF, DKIM, DMARC, ARC).
The payoff: with domain authentication in place, the "via zendesk.com" label disappears and replies look like they come straight from your brand. DNS changes can take a few hours to propagate, so set these up before your go-live announcement, not during it.
Step 5 — Test inbound and outbound end to end
Don't trust the config screens — run the full loop:
- Inbound: from an outside account (your personal Gmail, a phone), email your support address. Within a minute or two it should appear as a new ticket in Zendesk. If it lands in Suspended, check Step 2 — that's the classic symptom of client-side or multi-hop forwarding.
- Outbound: reply to that ticket from Zendesk. Confirm the customer receives it, that the From shows your domain (not
@zendesk.com), and that there's no "via zendesk.com" once DNS has propagated. - Threading: reply back as the customer and confirm it threads onto the same ticket rather than opening a new one.
- Attachments: if you rely on attachments, send one in — especially worth testing if you used the Gmail "Send email via Gmail" option, which doesn't carry real attachments.
Where do these tickets actually live for your team? In the Zendesk Agent Workspace, alongside any chat, messaging, and phone tickets — one queue, not a separate inbox.
A note on the Gmail contextual app (it's not this)
Worth clearing up because it's a common mix-up: Zendesk also offers a Gmail contextual add-on (sometimes called Zendesk Support for Gmail) that puts a Zendesk sidebar inside Gmail so an agent can see ticket context while reading mail. That's a convenience layer for agents who live in Gmail — it does not convert email into tickets. If your goal is "email becomes tickets," you want a support address (Method 1 or 2 above), not the contextual app.
Agent personal email vs. a shared support mailbox
One design decision worth making deliberately: connect your shared support mailbox (support@, help@, billing@), not an individual agent's personal inbox. Tickets routed off a personal mailbox break the moment that person is out, leaves, or changes roles — and you'll be re-authorizing connectors and rebuilding forwarding rules under pressure. A shared address keeps ownership with the team, survives staff changes, and is what Zendesk's routing, triggers, and SLAs are built around. Use a connector on a personal mailbox only for a genuinely personal queue, never as your front door.
Where AI fits in
Here's the honest part. Once email is flowing in as tickets, you've solved intake — but not volume. A connected support@ inbox can turn into hundreds of tickets a day, and most of them are the same handful of questions: order status, password resets, "how do I…" If a human reads and types every one, you've just moved the shared-inbox grind into Zendesk.
That's the gap an AI agent layer like Macha is built for. Macha isn't a help desk and it doesn't replace Zendesk — it runs on top of your Zendesk (see Macha on Zendesk). Once your Gmail or Outlook email lands as tickets, Macha can read each one, triage and tag it, draft (or send) a reply pulled from your knowledge base and past tickets, and escalate the genuinely tricky ones to a human with context attached — automatically, on the email volume you just connected.
The fair framing: it's another integration to set up, and it's only as good as the knowledge you connect to it. On cost, Macha bills per AI action — each automated step it takes, whether tagging, drafting, or replying — not per "resolution," because most of the useful work is the steps along the way, not a tidy closed ticket. If your newly connected inbox is mostly repetitive questions, that's exactly where it earns its keep. You can try it free — 7-day free trial, no credit card required.
Best practices and common mistakes
- Forward at the server, never the client. Client-side or auto-forward rules on individual messages create suspended tickets. Use Google Workspace default routing or the M365 Exchange admin center.
- Unblock external forwarding in Microsoft 365 first. It's off by default; forwarding fails silently until you allow it in the outbound anti-spam policy / remote domains.
- Do the DNS work. Without SPF and DKIM, replies show "via zendesk.com" and risk spam folders. It's an hour of setup that pays off forever.
- Connect the shared mailbox, not a person's inbox. Future-proofs routing and ownership.
- Pick forwarding for Outlook if you need side conversations. The Microsoft Exchange connector doesn't support side conversations or personalized replies.
- Always test the full loop. Inbound, outbound, threading, attachments — from a real outside account, not the Zendesk preview.
Frequently asked questions
How do I connect Gmail to Zendesk? Two ways. Forwarding: in Admin Center > Channels > Talk and email > Email > Manage support addresses > Add address > Connect external address > Email forwarding, then forward your Gmail/Google Workspace mail to [email protected] and click Verify forwarding. Connector: same path, but choose Gmail connector and sign in with Google via OAuth so Zendesk pulls unread inbox mail into tickets. Forwarding is the recommended default for most teams.
How do I connect Outlook or Microsoft 365 to Zendesk? Either forward your Outlook/365 mailbox to your Zendesk support address (via the Exchange admin center — and first allow external forwarding, which M365 blocks by default), or use the Microsoft Exchange connector (Connect external address, OAuth via Microsoft Graph, admin consent required). The connector is Exchange Online only and doesn't support side conversations or personalized replies, so many teams forward instead.
What's the difference between forwarding and the connector? Forwarding auto-sends your mail to a Zendesk address; the connector logs into your mailbox via OAuth and pulls mail out. Forwarding is more robust and lets you authenticate outbound with SPF/DKIM. Connectors keep outbound sending inside your Gmail/365 mailbox but add rate limits and (for Microsoft) some unsupported features.
Why do my Zendesk replies say "via zendesk.com"? Because your domain isn't authenticated yet. Add an SPF record (include:mail.zendesk.com) and enable DKIM (add the CNAME records, then turn on Custom domain for DKIM in Zendesk). Once verified, the "via" label disappears and replies appear to come from your domain.
Why did my forwarded email land in Suspended tickets? Usually because the mail was forwarded from a client/desktop rule or passed through multiple addresses (multi-hop). Set forwarding at the server/admin level instead. Verification emails and confirmation codes also intentionally land in Suspended — open the ticket to retrieve them.
Is the Gmail contextual app the same as connecting email? No. The Gmail contextual add-on shows Zendesk ticket context inside the Gmail sidebar for agents — it doesn't turn email into tickets. To convert email to tickets, use a support address with forwarding or a connector.
The bottom line
Connecting Gmail or Outlook to Zendesk comes down to one idea — a support address — and one choice: forwarding (recommended, most robust) or a connector (OAuth-based, keeps sending inside your mailbox). Add your external address in Admin Center > Channels > Talk and email > Email, set up forwarding (server-side) or the Gmail/Microsoft connector, authenticate your domain with SPF, DKIM, and DMARC so replies come from your brand, then test inbound and outbound end to end. Connect a shared mailbox, not a personal one, and remember that for Outlook the Exchange connector skips side conversations — so forwarding is often the cleaner pick. Once email is flowing in as tickets, it's just another channel in your Agent Workspace — and a prime candidate for AI-assisted triage and replies.
Setup steps verified against Zendesk's official documentation, June 2026; Gmail and Outlook admin screens described from Google's and Microsoft's docs. All three vendors update their UIs periodically — confirm labels in your own consoles before relying on them.


