 Zendesk
 Freshdesk
 Gorgias
 Front
Front Shopify
 Stripe
 Slack
Slack Notion
 Google Workspace
 Confluence
How to Migrate to Zendesk from Freshdesk (Step-by-Step Guide)


A Freshdesk to Zendesk migration sounds like it should be a button: export from one, import to the other, done. It isn't — and the teams that treat it that way are the ones who discover, two weeks in, that their ticket history landed without timestamps, their SLAs are reporting garbage, and not a single automation made the trip. The data can move cleanly. What trips people up is not knowing which parts move automatically, which parts you rebuild by hand, and which migration route actually carries full ticket history (spoiler: it's not the one most guides point you to first).

This guide walks the whole thing end to end: auditing what you have in Freshdesk, choosing honestly between the three real migration routes, mapping fields, running a demo before you commit, verifying, and then the unglamorous post-migration work — rebuilding automations, SLAs, and macros that no tool transfers for you. Every step is verified against current Zendesk and Help Desk Migration documentation; UIs change, so confirm labels in your own accounts as you go. If you're still deciding whether to switch at all, start with our Zendesk vs. Freshdesk comparison and come back here once you've committed.
The honest version: what a migration actually involves
Before any tooling, set expectations. A help desk migration is really three separate jobs wearing one name:
- Records — tickets and their conversations, contacts/companies, agents, organizations, knowledge base articles, custom field values. These can be moved with the right tool.
- Configuration — automations, triggers, SLA policies, macros/canned responses, business hours, routing rules, ticket forms, apps. These do not migrate. You rebuild them in Zendesk, by hand, ideally better than they were.
- The cutover — the operational choreography of freezing one system, switching email and channels, and getting agents working in the new tool without dropping live conversations.
Most of the pain lives in #2 and #3, which is exactly where the "just export and import" framing falls down. Keep all three in view and the project stays manageable.
Step 1 — Audit everything in Freshdesk first
You can't map what you haven't inventoried. Open Freshdesk and write down, for real, what you're carrying over:
- Tickets — roughly how many (open vs. resolved/closed), and how far back you actually need history. Note that each ticket carries a subject, description, status, priority, type, requester, assignee, threaded replies, private notes, and attachments.
- Contacts and companies — your end users and the organizations they belong to (companies in Freshdesk → organizations in Zendesk).
- Agents and groups — who needs a seat, and the groups/teams tickets are assigned to. Agents and groups generally must exist in Zendesk before tickets import so assignments land correctly.
- Custom fields — every custom ticket/contact/company field, its type, and its dropdown values. These have to be recreated in Zendesk before their values can be populated.
- Canned responses — Freshdesk lets you export these to CSV, but they don't move via API into Zendesk macros; they become a rebuild list.
- Knowledge base — your Freshdesk Solutions categories, folders, and articles (and which are published vs. draft).
- Automations & SLAs — Dispatch'r, Supervisor, and Observer rules, SLA policies, scenario automations, business hours. Treat this as a requirements document for what you'll reconstruct in Zendesk, not as something that transfers.
Two facts to internalize now, because they shape every later decision: in Freshdesk, agents must be created manually (an import can reference an agent by ID but cannot create the agent), and custom fields and groups must exist before records that use them are imported (eesel, ClonePartner checklist).
Tip: Use the audit to prune. A migration is the cheapest moment you'll ever have to leave behind dead custom fields, unused canned responses, and ancient closed tickets you don't legally need. Don't faithfully reproduce a mess.
Step 2 — Understand the three migration routes (and their honest limits)
There are exactly three ways data gets into Zendesk. Knowing what each can and can't do is the single most important part of this guide.
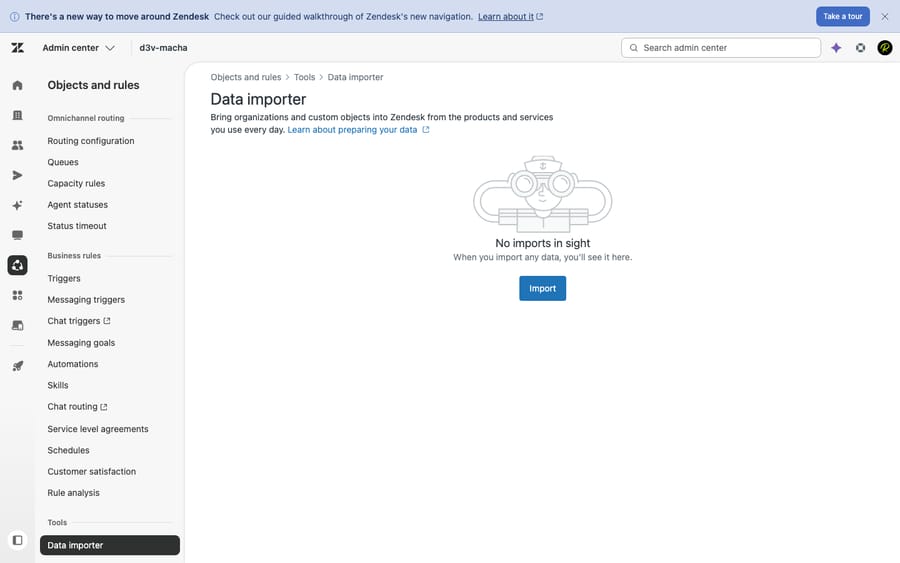
Route 1 — Zendesk's native Data importer (limited; not for tickets)
Zendesk ships a built-in tool at Admin Center → Objects and rules → Tools → Data importer. It's the recommended native way to bulk-load users, organizations, custom object records, and IT asset records from a CSV — files up to 1 GB / ~500,000 rows (About the data importer).
The critical caveat, stated plainly: **the Data importer does not import tickets or ticket history.** It's excellent for getting your contacts and organizations in, and it's a genuine part of a real migration — but if you came here to move conversations, this tool alone won't do it.
Route 2 — CSV import (users and organizations only)
Zendesk also supports CSV import for users, organizations, roles, and brands, but it's deliberately narrow — legacy CSV import handles small files (around 2,000 rows) and, like the Data importer, does not cover tickets (Zendesk import options explained). It's a fine, free way to seed your people and accounts if you're light on volume. It is not a ticket-migration path.
For completeness: full historical tickets can be moved natively, but only through the Ticket Import API (POST /api/v2/imports/tickets, batched up to 100 per call via create_many). It preserves historical created_at/updated_at/solved_at timestamps and won't fire your triggers or automations on import — but it requires engineering effort, and SLAs and metrics aren't supported for imported tickets, so Zendesk recommends tagging imported tickets and excluding them from reporting (Ticket Import API reference). For most teams, hand-rolling against this API isn't worth it — which leads to Route 3.
Route 3 — A third-party migration service (the realistic choice for most)
For a complete move — tickets with full conversation threads, private notes, attachments, contacts, companies, agents, knowledge base articles, and custom field values — most teams use an automated migration service such as Help Desk Migration (by Relokia), or similar tools. These connect to both Freshdesk and Zendesk via their APIs, map your data, and move it without you touching the Ticket Import API yourself.
Two honesty notes. First, these are paid services (typically priced by record volume), so budget for it. Second — and we're flagging this directly — the third-party tool screens described below are from the vendors' own documentation, not our hands-on dashboard; we've used Zendesk first-hand (the screenshot above is ours), but we're not claiming first-hand captures of every migration wizard. Verify the exact UI in the tool you choose.
The short version: native tools move your people and KB; a third-party service moves your tickets. Almost every real migration uses a combination, with the heavy lifting on Route 3.
Step 3 — Plan the cutover and freeze
Decide your switchover model before you move a single record:
- Big-bang — pick a low-volume window (a weekend), freeze new ticket creation in Freshdesk, migrate, verify, and flip channels to Zendesk. Cleanest, but needs a real freeze.
- Phased / parallel — run both systems briefly, migrate history, then forward new tickets to Zendesk going forward. Lower risk, more operational overhead while both are live.
Either way, set a data freeze point: from a chosen timestamp, no new edits in Freshdesk. Anything created or changed after the freeze gets caught by a delta migration at the end (more on that in Step 6). Communicate the freeze to agents — the most common migration failure is people quietly working tickets in Freshdesk after cutover, stranding those updates.
Step 4 — Export and prep your data from Freshdesk
Whether you're feeding a CSV route or letting a service pull via API, get your Freshdesk house in order:
- Export tickets, contacts, and companies. From Freshdesk's admin/export area you can export tickets, contacts, or companies to CSV/Excel, with filters (created date, agents, groups, type, status) and your custom fields included (Freshdesk: how do I export my tickets).
- Export canned responses to CSV so you have the full text to rebuild as Zendesk macros later (Freshworks: exporting canned responses).
- Document your automations and SLAs — screenshot or export the logic. This is your rebuild spec for Step 7.
- Clean as you export. Drop the dead fields and stale records you flagged in Step 1.
If you're going the third-party route, you typically don't hand over CSVs at all — the service connects to Freshdesk's API directly. But you still want these exports as your reference copy to verify against after migration.
Step 5 — Map your fields (Freshdesk → Zendesk)
Field mapping is where data gets quietly mangled if you rush it. The two systems don't use identical vocabularies. The defaults you'll confirm or adjust:
| Freshdesk | Zendesk | Notes |
|---|---|---|
| Status: Open, Pending, Resolved, Closed (+ custom) | Status: New, Open, Pending, On-hold, Solved, Closed | Map Resolved → Solved. Zendesk's New and On-hold have no native Freshdesk equivalent — decide where they apply. |
| Priority: Low, Medium, High, Urgent | Priority: Low, Normal, High, Urgent | Map Medium → Normal. |
| Contact | End user | Straightforward. |
| Company | Organization | Companies become organizations. |
| Agent / Group | Agent / Group | Must exist in Zendesk before import. |
| Custom fields | Custom fields | Recreate field + type + dropdown values in Zendesk first, then map. |
| Solutions (KB) | Guide articles | Categories/folders → sections; watch internal links. |
In a third-party tool, this mapping happens in a guided wizard — standard fields auto-map and you adjust the rest (Help Desk Migration). If you're doing it manually, build this table out in a spreadsheet first. For a refresher on how Zendesk models tickets, statuses, and fields, see Zendesk's ticketing system explained.
Step 6 — Run a sample (demo) migration, then the full one
Never run a full migration as your first migration. The standard, sane sequence:
- Demo / sample migration. Most third-party tools offer a free demo that moves a small batch (e.g., ~20 tickets) so you can preview exactly how records land in Zendesk — fields populated, threads intact, attachments attached (Help Desk Migration).
- Verify the demo carefully. Open the migrated sample tickets in Zendesk. Check: requester and assignee correct? Full conversation thread (public replies and private notes) present? Attachments and inline images there? Status and priority mapped right? Custom field values populated? Timestamps preserved? Fix mapping and re-run the demo until it's clean.
- Run the full migration. Once the sample is right, launch the complete move. Expect it to run for hours-to-days depending on volume; most tools show progress and let agents keep working (in the phased model).
- Delta migration. After the bulk run, a delta pass imports anything created or updated since the freeze point so nothing slips through the cracks.
Set expectations on record IDs and downtime: ticket numbers will not match between systems (Zendesk assigns its own IDs), so any external references to old Freshdesk ticket IDs won't resolve — keep the Freshdesk export as a lookup, and consider storing the old ID in a custom field if you need traceability. In a big-bang cutover, plan for a short window where neither system is "the source of truth" while you verify.
Step 7 — Rebuild what doesn't transfer
This is the step everyone underestimates. None of your business logic migrates. Block real time to rebuild, in Zendesk:
- Triggers and automations — Freshdesk's Dispatch'r/Supervisor/Observer rules map conceptually to Zendesk triggers (run on ticket events) and automations (run on time). Rebuild them from your Step 4 documentation; don't assume parity.
- SLA policies — recreate from scratch. Remember imported tickets won't carry valid SLA/metric data, so your SLA reporting effectively starts at go-live.
- Macros — rebuild from your exported Freshdesk canned responses.
- Business hours / schedules, routing, ticket forms, and apps/integrations — all reconfigured natively in Zendesk.
The upside of doing this by hand: you get to fix the cruft instead of porting it. Build the triggers you wish you'd had. Then test each one with a sample ticket before agents rely on it — a misfiring trigger on day one erodes trust in the whole project.
Step 8 — Set up forwarding, retrain agents, and go live
The final mile is operational, not technical:
- Redirect your channels. Point support email forwarding/MX, web widget, and any social/chat channels at Zendesk. Send a real test email and confirm it creates a Zendesk ticket.
- Retrain agents. Even Freshdesk veterans need a short orientation on the Zendesk Agent Workspace, macros, and views. A 30-minute walkthrough and a one-page cheat sheet prevent a week of "where's the…?".
- Verify once more, broadly. Spot-check ticket counts (Freshdesk export total vs. Zendesk), confirm a sample of customers can log into the new help center, and watch the first day's live tickets closely.
- Keep Freshdesk read-only for a grace period. Don't cancel immediately. Keep it accessible (read-only) for a few weeks as a safety net and reference, then decommission.
When the first day of live tickets flows cleanly through Zendesk — created, routed, replied, solved — you've migrated. For the reverse direction (getting data out of Zendesk later, for backups or audits), see our guide on how to export data from Zendesk.
What transfers vs. what you rebuild
The whole project in one table:
| Item | Transfers (with the right tool)? | How |
|---|---|---|
| Tickets + conversation threads | ✅ | Third-party service (or Ticket Import API) |
| Private notes & attachments | ✅ | Third-party service |
| Contacts (end users) | ✅ | Data importer / CSV / service |
| Companies → organizations | ✅ | Data importer / CSV / service |
| Agents & groups | ⚠️ Create first | Manual setup, then map |
| Custom fields (definitions) | ⚠️ Create first | Manual, then values map |
| Knowledge base articles | ✅ | Third-party service |
| Triggers / automations | ❌ | Rebuild in Zendesk |
| SLA policies | ❌ | Rebuild in Zendesk |
| Macros (from canned responses) | ❌ | Rebuild in Zendesk |
| Business hours, routing, forms, apps | ❌ | Reconfigure in Zendesk |
Where AI fits in (once you're on Zendesk)
A migration is a natural moment to rethink how much of your support a human needs to touch at all — because you're already moving the two things an AI agent needs: your ticket history and your knowledge base.
Once you're settled on Zendesk, an AI agent like Macha can sit on top of your new setup and resolve repetitive questions directly from that migrated knowledge — deflecting and resolving the "where's my order / how do I reset this" volume in-thread, then escalating to a human with full context when it's not confident. To be clear about what Macha is and isn't: it's not a help desk and not a Zendesk replacement — it's an AI agent layer that runs on your existing help desk. (It connects to Zendesk and, notably, also works on Freshdesk — so the AI layer is never the thing forcing a migration. If AI was your only reason to switch, you may not need to.)
The honest framing: it's one more integration to configure, and it's only as good as the knowledge you point it at — which is exactly why doing the migration's KB step well pays off twice. On cost, Macha bills per AI action (any automated step it takes — drafting a reply, tagging, routing, resolving), not per closed ticket, because most automation is work done along the way, not a tidy one-to-one "resolution." If your migrated knowledge base is solid, that's the layer that turns it into deflection. You can try it free — 7-day free trial, no credit card required.
Frequently asked questions
Can I migrate from Freshdesk to Zendesk for free? Partially. Zendesk's native Data importer and CSV import are free and will move your users and organizations — but neither imports tickets or ticket history. Full ticket migration means either building against Zendesk's Ticket Import API (engineering effort) or paying for a third-party service like Help Desk Migration. For most teams, the paid service is the realistic free-time-vs-money trade.
Does the Zendesk Data importer move my Freshdesk tickets? No. The Data importer (Admin Center → Objects and rules → Tools → Data importer) imports users, organizations, custom objects, and IT assets — not tickets or ticket history (Zendesk docs). For tickets, use a third-party migration service or the Ticket Import API.
Will my automations, SLAs, and macros transfer? No. Business logic — triggers, automations, SLA policies, macros/canned responses, business hours, routing, and apps — does not migrate. You rebuild it natively in Zendesk. Document everything in Freshdesk first so you have a rebuild spec, and treat it as a chance to improve, not just copy.
How long does a Freshdesk to Zendesk migration take? The data transfer itself runs from a few hours to a couple of days depending on ticket volume. But the project — audit, field mapping, demo + verification, rebuilding automations/SLAs, retraining — is usually one to a few weeks of part-time work. Run a demo migration first; it's the best predictor of how the full run will go.
Will my Freshdesk ticket numbers stay the same in Zendesk? No. Zendesk assigns its own ticket IDs, so old Freshdesk ticket numbers won't carry over as the primary ID. If you need traceability, store the original Freshdesk ID in a custom field during migration and keep your Freshdesk export as a lookup.
Should I delete my Freshdesk account right after migrating? No. Keep Freshdesk accessible (read-only) for a few weeks after go-live as a safety net and reference, verify everything in Zendesk, then decommission once you're confident nothing was missed.
The bottom line
A clean Freshdesk to Zendesk migration comes down to a clear sequence: audit what you have, choose your routes honestly (native Data importer and CSV for users/orgs; a third-party service or the Ticket Import API for actual tickets), plan the cutover and freeze, export and prep from Freshdesk, map fields carefully (Resolved → Solved, Medium → Normal, companies → organizations), run a demo before the full migration, then rebuild the automations, SLAs, and macros that no tool transfers — and finally redirect channels, retrain agents, and go live with Freshdesk kept read-only as a safety net. The records can move intact; the configuration is yours to rebuild (and improve). Get the knowledge base right on the way over and you'll have set up the next win too — an AI agent layer that resolves from it. Still weighing the platforms? Revisit Zendesk vs. Freshdesk before you commit.
Migration steps and tool capabilities verified against Zendesk, Help Desk Migration, and Freshdesk documentation, June 2026. Native tool scopes (Data importer, CSV, Ticket Import API) confirmed against Zendesk help/developer docs; third-party migration UIs are described from vendor documentation, not first-hand captures. Confirm exact labels and current pricing in your own accounts before relying on them.


