 Zendesk
 Freshdesk
 Gorgias
 Front
Front Shopify
 Stripe
 Slack
Slack Notion
 Google Workspace
 Confluence
How to Set Up SSO (Single Sign-On) in Zendesk (Step by Step)


If you're doing Zendesk SSO setup, you want one thing: your agents and your customers signing into Zendesk with the same identity they already use everywhere else — Okta, Entra ID (Azure AD), Google Workspace — instead of yet another Zendesk-specific password. Single sign-on (SSO) makes that happen by handing authentication off to your identity provider (IdP), so access is centralized, offboarding is one click, and nobody is reusing a weak password on your support stack.

This guide walks the whole thing, step by step: the one distinction that trips up almost every first-timer (team members vs. end users are configured separately), the SSO methods Zendesk supports, how to create and enable an SSO configuration in Admin Center, a concrete Okta/Entra example, how to test it, and — critically — how to avoid locking yourself out. Every path is verified against Zendesk's official documentation as of June 2026; Zendesk revises its UI periodically, so confirm labels in your own account.
The one thing to understand first: team members vs. end users
In Zendesk, "users" are two different populations, and you configure SSO for them separately:
- Team members — your agents, admins, and other staff who log into the Agent Workspace to do support work.
- End users — your customers, who sign in to the help center to submit tickets, track requests, or read restricted articles.
These have two distinct settings pages, and turning SSO on for one does nothing for the other:
- Admin Center → Account → Security → Team member authentication
- Admin Center → Account → Security → End user authentication
The actual SSO configurations (the SAML/JWT connections to your IdP) are created in one shared place — Admin Center → Account → Security → Single sign-on — and then assigned to team members, end users, or both. So the mental model is: build the connection once, then decide who's allowed to use it. Most companies SSO their staff first (that's the security win) and either leave customers on regular help-center login or wire them to a separate, customer-facing IdP. If you're also sorting out who can do what once people are in, that's a separate job — see how to configure Zendesk roles and permissions. SSO controls who gets in; roles control what they can touch.
The SSO methods Zendesk supports
Per Zendesk's Single sign-on (SSO) options article, there are three families:
| Method | What it is | Best for |
|---|---|---|
| Social | Facebook, Google, Microsoft using personal accounts | End users / customers signing into the help center |
| Business (OAuth) | Google Workspace, Microsoft Entra ID / Office 365 — sign in with a work account | Quick team-member SSO when you're already all-Google or all-Microsoft |
| Enterprise | SAML, JWT, and OIDC (OpenID Connect) — full IdP integration | Any serious staff deployment (Okta, Entra ID, OneLogin, Ping, custom) |
A quick way to choose:
- SAML is the standard enterprise choice. Almost every IdP (Okta, Entra ID, OneLogin, Ping, Google) has a pre-built Zendesk SAML app. If you have an IdP, start here.
- JWT is the path when you want to authenticate users against your own application or a custom user store — your app mints a signed token and redirects to Zendesk. It needs developer work but gives you full control.
- OAuth/social and business SSO are the lightweight options — great for customers (social) or for a small team that lives entirely in Google or Microsoft (business).
Plan availability: SSO is not an Enterprise-only feature. Per the plan banners on Zendesk's SSO docs, single sign-on — including SAML and JWT — is available on all Suite plans (Team, Growth, Professional, Enterprise, Enterprise Plus) and on Support Team, Professional, and Enterprise. What can vary by tier is the number of simultaneous configurations you can run; Zendesk's current docs say you can have multiple active SAML, JWT, and OIDC configurations, but the exact cap has changed over time, so verify the limit in your own account before you plan for, say, four separate IdP connections.
Before you start: what you'll need
A few prerequisites save a mid-setup detour:
- Zendesk admin access. Everything below lives in Admin Center under Account → Security, which requires an admin role.
- Admin access to your IdP (Okta, Entra ID, etc.) to create the Zendesk application and read its metadata.
- Three values from your IdP (for SAML): the SAML SSO URL (sometimes called the Sign-on URL or SingleSignOnService), the certificate fingerprint (SHA-256 / SHA2), and optionally a remote logout URL.
- A matching-email plan. Zendesk identifies users by email address (the SAML
NameID). The email your IdP sends must match the user's email in Zendesk, or they'll either fail to authenticate or get a brand-new account. Decide whether you'll also let Zendesk auto-create users on first SSO login. - A backup admin login — keep at least one admin able to sign in with regular Zendesk authentication. More on this in the lockout section, because it's the mistake that turns a 20-minute setup into a support ticket to Zendesk.
Step 1 — Open the Single sign-on page
In Admin Center, click Account in the sidebar, then Security, then Single sign-on. The Security section is also where you'll see Team member authentication and End user authentication listed — those are the assignment surfaces you'll use in Step 4.
The full path is Admin Center → Account → Security → Single sign-on.
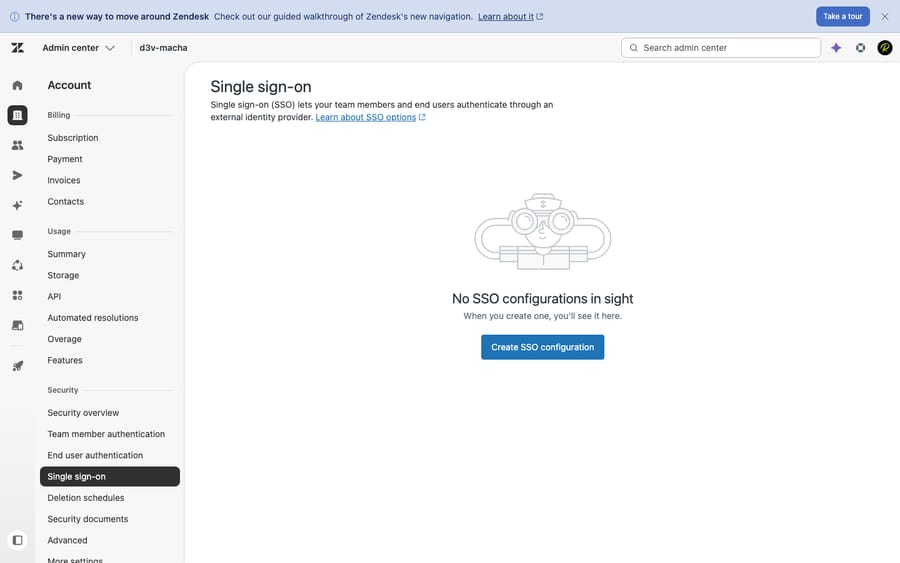
Step 2 — Create an SSO configuration
On the Single sign-on page, click Create SSO configuration and choose your method — SAML or JSON Web Token (JWT) (OIDC is also available if your IdP uses it).
If you chose SAML
Per Zendesk's Enabling SAML single sign-on guide, you'll fill in:
- Configuration name — a label for your own reference (e.g. "Okta — Staff").
- SAML SSO URL — the remote login URL from your IdP. This is the IdP's
<SingleSignOnService>endpoint, the address Zendesk redirects users to in order to authenticate. - Certificate fingerprint — the SHA-256 (SHA2) fingerprint of the signing certificate from your IdP. This is required; it's how Zendesk trusts the assertion really came from your IdP.
- Remote logout URL (optional) — where to send users after they sign out of Zendesk.
- IP ranges (optional) — if set, only users coming from these IPs are routed to SSO; everyone else sees standard sign-in. Useful for staggered rollouts.
- Show button when users sign in (optional) — adds a labeled SSO button to the sign-in page.
Click Save. The configuration is created inactive — saving it does not turn it on yet. That's intentional and it's your safety net.
If you chose JWT
Per Enabling JWT single sign-on:
- Configuration name — your label.
- Remote login URL — the endpoint in your application that authenticates the user and builds the signed JWT (e.g.
https://yourapp.com/zendesk/sso). Zendesk automatically appends abrand_idparameter so a multi-brand setup can route correctly. - Remote logout URL (optional) — where to redirect after sign-out; Zendesk appends
email,external_id, andbrand_id. - IP ranges (optional) — same selective-routing behavior as SAML.
- Shared secret — Zendesk generates this; hand it to your development team for their JWT implementation. You can rotate it later via the configuration's Edit → Reset secret.
Click Save. Again, it's created inactive until you assign it.
Tip: Name configurations clearly ("Okta — Staff", "Entra — Customers"). Once you have more than one, vague names like "SSO 2" make the assignment step in Step 4 a guessing game.
Step 3 — Mirror the configuration in your IdP (Okta / Entra example)
SSO is a two-sided handshake: Zendesk needs to know about your IdP (Step 2), and your IdP needs to know about Zendesk. At a high level:
Okta (Zendesk's Okta guide):
- In the Okta Admin Console, add the Zendesk app from the catalog (or create a SAML 2.0 app).
- Set your Zendesk subdomain so Okta knows your instance.
- Copy Okta's Identity Provider Single Sign-On URL → paste into Zendesk's SAML SSO URL.
- Copy Okta's certificate fingerprint (SHA-256) → paste into Zendesk's Certificate fingerprint.
- Assign the Okta app to the users/groups who should get Zendesk access.
Microsoft Entra ID (Azure AD) follows the same shape: add the Zendesk enterprise application, configure SAML-based sign-on, set the Identifier/Reply URL to your Zendesk subdomain, then copy Entra's Login URL and certificate thumbprint into the matching Zendesk fields. (Microsoft maintains a step-by-step Zendesk SAML tutorial in Entra's docs.)
The principle is identical across IdPs: the IdP's sign-on URL and certificate fingerprint go into Zendesk; Zendesk's subdomain/ACS URL goes into the IdP. Make sure the IdP sends the user's email address as the SAML NameID, because that's how Zendesk matches the login to an existing account.
Step 4 — Enable it (for team members and/or end users)
This is where the team-member vs. end-user split comes back. Your saved configuration does nothing until you assign it.
To enable it for staff: go to Admin Center → Account → Security → Team member authentication. Under External authentication → Single sign-on (SSO), select your configuration's checkbox, then Save.
To enable it for customers: go to Admin Center → Account → Security → End user authentication and do the same.
When you enable SSO, you also choose how it coexists with regular login:
- SSO alongside Zendesk authentication — users can sign in with SSO or a Zendesk password. Safer during rollout; nobody gets stranded.
- SSO as the only method — Zendesk passwords are disabled for that population; everyone must go through your IdP. This is the end-state most security teams want, but flip it only after you've tested.
You can have a different posture for each group — for example, SSO-only for staff, but customers still allowed to use a help-center password. (See Zendesk's Giving users different ways to sign into Zendesk.)
Step 5 — Test before you commit (and don't lock yourself out)
This is the step people skip and regret. **The classic failure: an admin sets SSO as the only method, the IdP mapping is slightly off, and now nobody — including the admin — can get into Zendesk.** Recovering means contacting Zendesk support, which is a bad afternoon.
Do it safely:
- **Keep SSO alongside Zendesk auth first.** Don't make it the only method until you've confirmed a real login works end to end.
- Keep one break-glass admin on Zendesk authentication. Have at least one administrator who can still log in with a Zendesk password if SSO breaks. Some teams keep a dedicated admin account permanently on Zendesk auth for exactly this reason.
- Test with a real assigned user. Sign in (ideally in a private/incognito window) through the IdP. Confirm you land in Zendesk as the correct existing user — not a freshly created duplicate, which signals an email/
NameIDmismatch. - Test logout. If you set a remote logout URL, confirm sign-out redirects where you expect.
- Only then tighten it. Once SSO logins are reliably working, switch the relevant population to SSO as the only method if that's your policy.
If logins create duplicate users or fail with a certificate error, the cause is almost always one of two things: the email/NameID doesn't match, or the certificate fingerprint is wrong or expired. Re-check those first.
Step 6 — Plan for rollout and maintenance
A couple of things that aren't strictly "setup" but save you later:
- Certificate rotation. IdP signing certificates expire. When yours rotates, update the certificate fingerprint in Zendesk or logins will start failing on the cutover date. Put the expiry in a calendar.
- Offboarding. The big SSO payoff: deactivate a leaver in your IdP and their Zendesk access dies with it — no orphaned Zendesk passwords. Make sure your IdP group assignment, not a manual Zendesk list, is the source of truth.
- Multiple IdPs / brands. If different audiences use different IdPs (staff on Okta, an acquired team on Entra), you can run multiple configurations and assign them appropriately — just confirm your plan's current config limit, as noted above.
Where AI fits in once access is secured
SSO answers one question: who is allowed into Zendesk, and proven how? It's an identity-and-access control — it doesn't do support work, and nothing about adding AI changes that.
Here's the honest relationship, because it's a common point of confusion. An AI agent like Macha isn't an identity provider and it isn't a Zendesk replacement — it's an AI agent layer that runs on top of your existing Zendesk. It operates inside the environment your SSO secures, under the same access model: it works tickets, drafts and sends replies, tags, and routes within the permissions it's given, exactly as a team member would within theirs. SSO decides who gets in; Macha works on what's already inside, once they're in. It doesn't widen your security perimeter or bypass your IdP — it inherits it.
What that buys you in practice: the same way SSO centralizes access, an AI agent centralizes the repetitive resolution work once people are through the door — reading a customer's actual question, pulling from your connected knowledge and past tickets, resolving the routine ones in-thread, and escalating to a human with full context when it isn't confident. On cost, Macha bills per AI action — any automated step it takes, like drafting a reply, tagging, or routing — not per closed ticket, because most automation is work done along the way, not a tidy one-shot "resolution." If you want to see how that layer sits on your Zendesk, here's Macha on Zendesk, and you can try it free — 7-day free trial, no credit card required.
It's a different job from SSO entirely. One secures the door; the other helps with the work inside. If you're still getting the fundamentals of that "inside" squared away, our explainer on the Zendesk ticketing system is a good companion.
Best practices and common mistakes
- Configure team members and end users separately — and deliberately. Enabling SSO for staff does nothing for customers, and vice versa. Decide each one on purpose.
- Never go "SSO only" before testing. Keep it alongside Zendesk auth until a real login works end to end.
- Always keep a break-glass admin on Zendesk authentication. This is the single most important line in this guide.
- Match emails exactly. Duplicate users on first login almost always means the IdP isn't sending the right email as
NameID. - Watch certificate expiry. A rotated IdP cert with a stale fingerprint in Zendesk = everyone locked out on the rotation date.
- Use IP ranges for staggered rollout. Route one office or VPN range to SSO first, validate, then widen.
- Name configurations clearly. Future-you, staring at the assignment checkboxes, will thank present-you.
Frequently asked questions
Where do I set up SSO in Zendesk? In Admin Center: Account → Security → Single sign-on. Click Create SSO configuration, choose SAML or JWT, paste your IdP details, and save. Then enable it separately under Account → Security → Team member authentication and/or End user authentication.
What's the difference between team member and end user authentication? Team members are your staff (agents/admins); end users are your customers. They have separate authentication pages, and turning SSO on for one does not affect the other. You build the SSO configuration once and assign it to either group, both, or neither.
Which SSO methods does Zendesk support? Three families: social (Facebook/Google/Microsoft personal accounts, mainly for customers), business/OAuth (Google Workspace and Microsoft Entra ID/Office 365 work accounts), and enterprise — SAML, JWT, and OIDC — for full IdP integrations like Okta or Entra ID.
Do I need a specific Zendesk plan for SSO? No — SSO, including SAML and JWT, is available across all Suite plans (Team through Enterprise Plus) and Support (Team, Professional, Enterprise). What can vary by tier is how many simultaneous SSO configurations you can run, so verify the current limit in your own account.
How do I set up Zendesk SSO with Okta? Add the Zendesk app in Okta, set your Zendesk subdomain, then copy Okta's Single Sign-On URL into Zendesk's SAML SSO URL and Okta's certificate fingerprint into Zendesk's Certificate fingerprint. Save the config, then enable it under Team member (or End user) authentication. Entra ID/Azure AD follows the same pattern.
How do I avoid locking myself out? Keep SSO alongside Zendesk authentication until you've tested a real login, and keep at least one admin who can still sign in with a Zendesk password. Only switch to "SSO as the only method" after end-to-end testing succeeds.
Why are SSO logins creating duplicate users? Almost always an email mismatch: the email your IdP sends as the SAML NameID doesn't match the user's existing Zendesk email, so Zendesk creates a new account. Align the emails and re-test.
The bottom line
Zendesk SSO setup is a clear sequence once you internalize the one rule that everything hangs on: team members and end users are configured separately. Build the connection once at Admin Center → Account → Security → Single sign-on (Create SSO configuration → SAML or JWT → paste your IdP's SSO URL and certificate fingerprint, or your JWT remote login URL and shared secret → Save), mirror it in your IdP (Okta, Entra ID, or your own app), then assign and enable it under Team member authentication and/or End user authentication — choosing whether SSO runs alongside Zendesk login or replaces it. Test with a real user, keep a break-glass admin, and only go "SSO only" once it works. SSO is broadly available across Zendesk plans, so the gating to watch is the number of configurations, not whether you can use it at all.
SSO secures who gets into Zendesk. What they (and your AI agents) actually do inside it is a separate layer — and a well-secured Zendesk is exactly the foundation an AI agent on top needs to do useful work.
Setup paths verified against Zendesk's official documentation, June 2026. Zendesk updates its product periodically — confirm field labels and your plan's configuration limits in your own account before relying on them.


