 Zendesk
 Freshdesk
 Gorgias
 Front
Front Shopify
 Stripe
 Slack
Slack Notion
 Google Workspace
 Confluence
How to Set Up Zendesk Talk (Step by Step)


If you're doing Zendesk Talk setup, you're turning on Zendesk's built-in cloud voice channel — a browser-based phone line that lives inside the same Agent Workspace your team already uses for email and chat. There's no separate dialer to install and no PBX to wire up: agents take and place calls in the browser, and every call (plus every voicemail) becomes a ticket automatically, with recording and transcript attached. This guide walks the whole setup, step by step, from enabling the channel in Admin Center to testing a live inbound and outbound call.

One thing to settle up front, because it trips people up: Talk is voice; messaging is text. They're different channels with different setup flows. If you came here wanting a chat bubble on your website, that's Zendesk messaging, not Talk. Talk is for phone support — real calls, on a real number. Everything below is verified against Zendesk's own documentation; Zendesk revises its UI periodically, so confirm labels in your own account as you go.
Before you start: what you'll need
A few prerequisites save you a mid-setup detour:
- Admin access. Enabling Talk, buying numbers, and configuring lines all happen in Admin Center, which requires an admin role.
- The right plan. Talk is available on the Team, Professional, and Enterprise Support plans and across all Suite editions (Team, Growth, Professional, Enterprise, Enterprise Plus). More on the edition and billing nuances below — they matter, because voice has usage charges on top of your seat cost.
- Agent Workspace turned on. Talk calls surface in the unified Agent Workspace alongside tickets and messaging. Most accounts already have it on.
- A network and hardware check. Zendesk recommends a minimum of ~50 kbit/s per concurrent call, the right firewall ports open, a WebRTC-compatible browser (Chrome/Firefox/Edge), and a decent USB headset. Calls run over the browser, so bandwidth and audio gear are the usual culprits behind "the line sounds terrible."
- A decision on your number. Buy a fresh Zendesk number, port an existing one, or forward your current number to a Zendesk number. You can change this later, but knowing your starting point makes Step 2 quick.
Where Talk lives in Admin Center
Everything starts in one place: Admin Center → Channels → Talk and email → Talk. That's the home for enabling the channel, buying and managing numbers (the Lines tab), greetings, voicemail, IVR, and overflow routing.
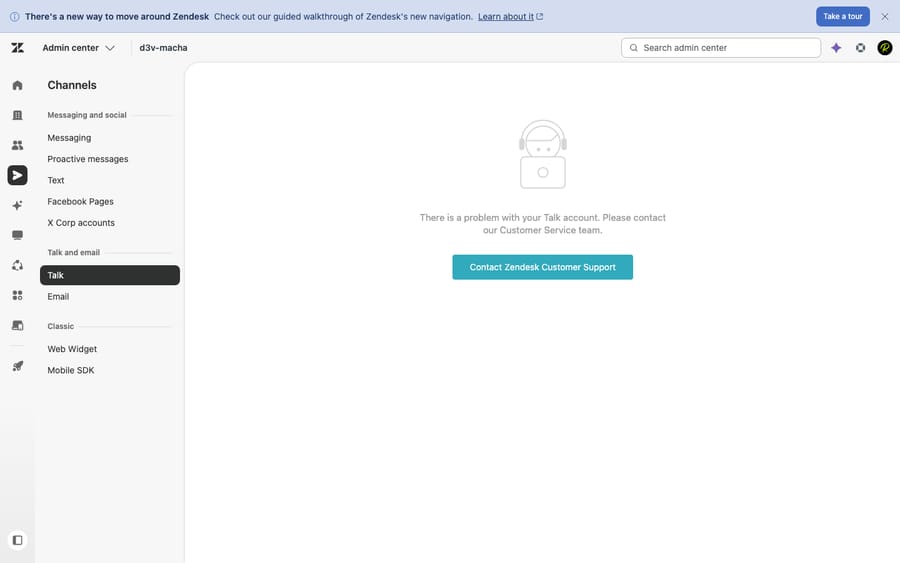
The screenshot above is a first-hand capture of the Channels admin navigation in a live Zendesk instance — it shows exactly where Talk sits in the sidebar (Talk and email → Talk). A note in the interest of honesty: Talk requires provisioning on your account, and on our test instance it wasn't provisioned (the Talk admin returns "There is a problem with your Talk account"), so the configuration screens that follow — Lines, greetings, voicemail, IVR, overflow — can't be captured first-hand here. The steps below are described faithfully from Zendesk's official documentation rather than mocked up. Once Talk is provisioned on your account, you'll see these screens under the same nav path.
Step 1 — Enable the Talk voice channel
To switch Talk on:
- In Admin Center, click Channels in the sidebar.
- Select Talk and email → Talk.
- On the welcome page, click Get Started.
The Get Started wizard walks you through three quick screens, per Zendesk's Getting started with voice support and Activating the voice channel guides:
- Your number. Zendesk assigns you a starter number to review. Click Next — you can buy more numbers or port your own later.
- Who will answer the calls. Choose Everyone, Only Me, or Specific Users to decide which agents can handle calls. Click Next.
- Let's try your new number. Follow the on-screen prompts to simulate a call, or click Skip this step.
That's the channel live. Once you're past the wizard, the same Talk page exposes the deeper settings you'll want to tune before going to production.
Step 2 — Add a phone number (buy, port, or forward)
Your number is the front door, so get it right. On the Talk page, open the Lines tab. You have three paths, all documented in Adding Talk phone lines:
Buy a Zendesk number
- On the Lines tab, click Add line → Purchase a new number.
- Choose a country, then pick the number type — local or toll-free. Icons indicate whether each number supports voice, text, or MMS.
- Optionally search for a specific area code or digit sequence, select a number, and click Next.
- Review the number and its monthly cost, complete any business-verification or address steps your country requires, and click Finish.
Number availability and monthly cost vary by country and regulations; some regions require documentation before you can activate a line. Check Zendesk Talk number availability and pricing for your country before you commit.
Port an existing number
If you already publish a support number and don't want customers to relearn it, you can port it into Zendesk (US numbers are supported; follow Zendesk's "Porting numbers into Zendesk" process). Porting takes time and paperwork, so plan it as a project, not a five-minute task.
Forward an external number
The fastest no-downtime option: buy a Zendesk number, then ask your current telephone provider to forward your existing number to it. Confirm with your provider that inbound caller ID passes through, so your agents still see who's calling.
If you run multiple brands, you can assign different numbers to different brands so each brand answers on its own line — see Setting up Talk numbers for multiple brands.
Step 3 — Configure the line: greetings, voicemail, business hours, recording
A bare number that just rings is a missed opportunity. Each line is configured individually on the Lines tab (click the line to edit it).
Greetings
For each number you can set several greetings, per Managing outgoing greetings:
- Wait greeting — what callers hear while waiting in queue.
- Available-agents greeting — plays when agents are online.
- Hold greeting / hold music — while a caller is on hold.
- Voicemail greeting — before they leave a message.
- Callback greeting — if you offer a queue callback.
Use Zendesk's default greetings (English or Japanese) or upload your own recordings, and assign different greetings to different numbers.
Voicemail
On the line's Voicemail tab (see Configuring voicemail options), enable voicemail, set the greeting, and decide how after-hours calls are handled — for example, sending them straight to voicemail or routing them to another number. Voicemails arrive as tickets with the audio (and an optional transcription) attached.
Business hours
Apply a business-hours schedule to a number so Talk knows when you're open. Calls received outside the schedule can be routed automatically to voicemail or into an after-hours IVR, so customers get a clear "we're closed, here's what to do" instead of an endless ring.
Recording
In the channel's general settings (Activating the voice channel and configuring general settings) you control call recording, including whether new live call recordings are public (accessible to the requester), plus options like maximum queue size, maximum queue wait time (1–20 minutes; up to 60 on Enterprise), and agent confirmation when forwarding a call to an external phone. Check your local laws on call-recording consent before you flip recording on.
IVR / routing for multiple lines
If you support more than a couple of teams, set up a multi-level IVR (interactive voice response, a.k.a. a phone tree). An IVR lets callers press a digit to reach the right team or department, play recorded answers to frequently asked questions, and even deflect by switching the interaction to text. See Can I use an IVR menu to route calls after hours? for the after-hours pattern. A single-line shop can skip the IVR entirely; a multi-team operation should map the tree on paper first.
Step 4 — Enable agents for Talk and set availability
You chose who can answer during the wizard (Everyone / Only Me / Specific Users), but two things make the difference between "configured" and "actually taking calls":
- Agents must be enabled for Talk. Confirm the right agents have Talk access. Without it, calls have nowhere to land and fall through to voicemail or overflow.
- Agents set their availability. An agent who's enabled for Talk still has to be online for voice to receive calls. In the Agent Workspace, agents toggle their omnichannel/Talk status — when they're set to available, the console shows the Talk controls and routes calls to them. If everyone's offline, every call goes to voicemail.
This is the most common "Talk isn't working" cause: the channel is live, the number is bought, but no agent is set to available for voice.
Step 5 — Set routing and overflow
Turning Talk on doesn't decide what happens when no one can pick up. Configure that deliberately:
- Overflow. On the line's Overflow tab (Managing overflow calls and after-hours call routing), turn on Overflow calls and enter a phone number that calls spill over to when your queue is full or you're inside business hours but slammed. This keeps customers off an endless hold.
- After-hours routing. Pair your business-hours schedule with voicemail or an after-hours IVR so off-hours calls get a clear path instead of ringing into the void.
- Group / multi-line routing. If you run several numbers or brands, route each to the right team and apply group-specific greetings and schedules. Zendesk's best practices for rolling out Talk is worth a read before a larger rollout.
Step 6 — Test an inbound and an outbound call
Before you publish the number anywhere, run the full loop yourself:
- Set yourself available for Talk in the Agent Workspace.
- Call your Zendesk number from your mobile. Confirm you hear the wait/available greeting, the call rings through to the agent console, and you can answer it in the browser.
- Check the ticket. Confirm the inbound call created a ticket with the recording attached and the right requester.
- Place an outbound call from a ticket or the Talk console, and verify the customer sees your Talk number as caller ID and that the outbound call also logs to a ticket.
- Test the failure paths. Go offline and confirm the call hits voicemail; if you set overflow, confirm it spills to the overflow number; if you built an IVR, press through each branch.
Ninety percent of "it's not working" comes down to no agent being available for voice, the number not being assigned to the right brand/group, or a network/headset issue degrading audio.
Talk editions and how voice is billed
Two separate things determine your Talk cost: your plan edition and your per-minute voice usage.
Editions
- Talk as a built-in channel. On modern Zendesk, Talk is part of the suite: it's included on the Team, Professional, and Enterprise Support plans and across the Suite editions (Team, Growth, Professional, Enterprise, Enterprise Plus). Higher tiers unlock more advanced voice features (longer queue wait times, more sophisticated routing, etc.). (Historically Zendesk also sold standalone Talk tiers — Lite/Team/Professional/Enterprise — but for new setups Talk is configured as the voice channel within your existing plan. Verify what's enabled on your account.)
- Talk Partner Edition (TPE) is a different thing entirely. It's not Zendesk's own voice service — it's a CTI toolkit and API that lets you plug a third-party telephony system (or your own) into Zendesk, with 200+ prebuilt integrations. Calls from your external provider create Zendesk tickets and surface in the agent interface. If you already run a call-center platform and just want it wired into Zendesk, TPE is the path; if you want Zendesk to be your phone system, you want native Talk (above). See Understanding Talk Partner Edition.
Billing: voice usage is per-minute
This is the part teams underestimate. Native Talk voice usage is billed per minute, on top of your seat cost, regardless of plan, per the Zendesk Talk billing FAQ. Key points:
- Per-minute calls. Inbound and outbound calls accrue per-minute charges, and time a customer spends on hold also counts toward billing.
- Two payment models. Either pay-as-you-go (credit card, all usage billed at the end of your cycle) or pre-purchased bulk Talk credits (paid by invoice; credits expire after one year and auto-recharge when they drop below 10% of the recharge amount or $5, whichever is greater).
- Phone-number monthly fee. Charged per number and varies by country — US/Canada local numbers are about $1/month and toll-free about $2/month; digital lines have no monthly charge and bill only on use.
- Transcription. Call transcription runs about $0.01/minute (via the Copilot add-on).
- Per-minute call rates for US/Canada are commonly cited around $0.037/min inbound and $0.022/min outbound — treat these as approximate; they're widely reported by third parties (CloudTalk, Ringly) rather than pulled from a single Zendesk price line in this pass, and they vary by country and call type. Always confirm current rates on Zendesk Talk number availability and pricing for your region before you model a budget.
The practical takeaway: estimate your call minutes, not just your seat count. A team with high call volume can pay more in usage than in licenses.
Talk vs. messaging — don't confuse the two channels
Because both are "channels" in the same Admin Center, people conflate them. They're not interchangeable:
- Talk is synchronous voice — real phone calls, a person on each end, in real time. Setup means numbers, greetings, voicemail, IVR, and per-minute billing.
- Messaging is persistent text — a chat thread on your website or app that resumes across sessions and lands as a ticket. Setup is the Web Widget/SDK flow in our Zendesk messaging guide.
Both feed the same Agent Workspace, and both turn conversations into tickets — which is the through-line of the whole platform (see how the Zendesk ticketing system works). Most teams run both: phone for the calls that need a voice, messaging for everything that can be handled in text.
Where AI fits in
Here's the honest reality of voice: a phone call almost always needs a human on the line. AI can transcribe, summarize, and suggest, but it doesn't replace the agent who actually picks up. So the highest-leverage move isn't "automate the phone" — it's reducing how many things have to become a phone call in the first place.
That's the angle an AI agent like Macha takes. Macha isn't a help desk and it isn't a Zendesk replacement — it runs on top of your existing Zendesk and works the deflectable text and chat volume: the "where's my order," "how do I reset this," "what's your return policy" questions that don't need a voice at all. By resolving those inside messaging and email, it keeps them off the phone queue, so your lines stay free for the calls that genuinely need a person — the upset customer, the complex account problem, the judgment call.
There's a second connection worth noting: the tickets and transcripts Talk produces are knowledge. Call recordings and their transcripts capture how real issues get resolved, and that material can feed the same knowledge base an AI agent draws on — so good phone resolutions quietly make your text deflection smarter over time.
The honest caveats: it's another integration to configure, and it's only as good as the knowledge you connect to it. On cost, Macha bills per AI action — any automated step it takes, like drafting a reply, tagging, or routing — not per resolution, because most automation is work done along the way, not a tidy "resolution." If your inbound volume is mostly repetitive questions your help center could answer, that's the line where freeing up the phones starts to pay off. You can try it free — 7-day free trial, no credit card required.
Frequently asked questions
Where do I set up Zendesk Talk? In Admin Center → Channels → Talk and email → Talk. Click Get Started to run the setup wizard, which reviews your assigned number, lets you choose who answers calls (Everyone, Only Me, or Specific Users), and offers a test call. From there the same Talk page holds the Lines, greetings, voicemail, IVR, and overflow settings.
How do I add a phone number to Zendesk Talk? On the Talk page, open the Lines tab and click Add line → Purchase a new number, then choose a country and number type (local or toll-free). You can also port an existing US number into Zendesk, or forward your current provider's number to a Zendesk number you've bought.
Which Zendesk plans include Talk? Talk is available on the Team, Professional, and Enterprise Support plans and across all Suite editions (Team, Growth, Professional, Enterprise, Enterprise Plus). Higher tiers unlock more advanced voice features. Talk Partner Edition is a separate CTI toolkit for integrating a third-party phone system, not Zendesk's own voice service.
How is Zendesk Talk billed? Voice usage is billed per minute on top of your seat cost, and on-hold time counts. You can pay as-you-go by credit card or pre-purchase bulk Talk credits by invoice (credits expire after a year and auto-recharge). Phone numbers carry a small monthly fee that varies by country (US/Canada local ~$1/mo, toll-free ~$2/mo); transcription is about $0.01/min. Confirm current rates on Zendesk's pricing pages for your country.
Is Zendesk Talk the same as Zendesk messaging? No. Talk is voice (phone calls); messaging is persistent text (a chat thread on your site or app). They're separate channels with separate setup, though both land in the Agent Workspace as tickets. See our messaging setup guide for the chat side.
Do agents need to do anything for calls to reach them? Yes. Agents must be enabled for Talk and set their status to available for voice in the Agent Workspace. If no agent is available, calls route to voicemail or overflow. This is the single most common reason a freshly configured Talk line "isn't ringing."
The bottom line
Zendesk Talk setup is a clear sequence: enable the channel in Admin Center → Channels → Talk and email → Talk → Get Started, add a number (buy, port, or forward) on the Lines tab, configure the line (greetings, voicemail, business hours, recording, and an IVR if you run multiple teams), enable agents and have them go available for voice, set routing and overflow, then test a real inbound and outbound call plus the failure paths. Budget for two costs, not one — your plan edition and per-minute voice usage. And keep the channels straight: Talk is voice, messaging is text, and both ultimately become tickets in the same Zendesk workspace.
Setup steps and billing verified against Zendesk's official documentation, June 2026. Per-minute call rates are approximate and sourced partly from third-party summaries; Zendesk updates its product and pricing periodically — confirm labels and rates in your own account before relying on them.


