How to Configure Business Hours in Zendesk (Step by Step)


If your SLAs are breaching overnight, your out-of-hours auto-replies aren't firing, or your "resolution time" numbers look wildly inflated, the cause is almost always the same: Zendesk doesn't know when you're open. The fix is a schedule — Zendesk's term for your business hours, time zone, and holidays bundled into one setting that your SLAs, triggers, and reports all read from.

This is the hands-on, click-by-click guide to Zendesk business hours setup. We'll create a schedule from scratch, set the time zone and weekly hours, add holidays, then connect it to the two things it actually drives — SLA targets and out-of-hours behavior — and cover how to run more than one schedule. If you want the why behind schedules (business vs. calendar hours, the design trade-offs), the companion concepts guide, Business hours & schedules in Zendesk, goes deeper. This post is the procedure. Every step is verified against Zendesk's own documentation.
Before you start, you'll need admin access (schedules live in the Admin Center), and it helps to know your plan: you get one schedule on Growth and Professional, and multiple schedules on Enterprise (more on that in Step 8).
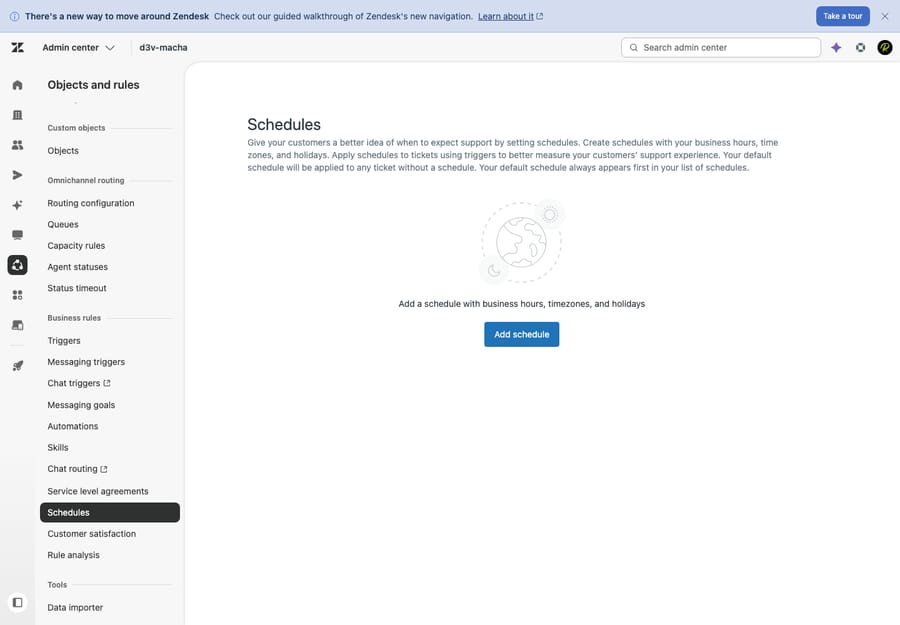
Step 1 — Open the Schedules page
In the Admin Center, go to Objects and rules → Business rules → Schedules, then click Add schedule.
(If you're more used to the agent interface: the Admin Center is the gear/settings area, not the Support agent workspace. Schedules are not in the old Settings menu — they live under Business rules alongside triggers, automations, and SLAs.)
Step 2 — Name the schedule and set the time zone
Give the schedule a clear, descriptive name — US Support (ET), EU Support, Billing 9–5 — not just "Schedule 1." On a multi-schedule account you'll thank yourself later when you're picking one from a trigger dropdown.
Then set the time zone. This is the single most important field on the page: it's the reference clock every business-hours and holiday calculation is measured against. A "9–5" means nothing until Zendesk knows which 9–5. Choose the zone your team primarily works in, and set it before you draw your hours, because the hours you set are interpreted in this zone.
Step 3 — Set your weekly business hours
Now define your open window for each day. Zendesk uses a weekly grid you set in 15-minute increments:
- Click and drag to paint a block of open hours on a day — for example, 9:00 a.m. to 5:00 p.m. Monday through Friday.
- Adjust an existing block by dragging the whole block up or down to move it, or dragging its top or bottom edge to change the start or end time.
- Leave a day blank to mark it fully closed (typical for weekends).
- Split a day into two blocks if you close for lunch — e.g. 9:00–12:30 and 1:30–5:00.
Two limits worth knowing: each interval must be at least one hour, and a single block can't span midnight (for a graveyard shift, set hours on each calendar day separately). The golden rule: set the hours your team actually covers, not the hours you wish you covered. The SLA clock takes this literally.
Step 4 — Add your holidays
Scroll to the holidays section and add each closure: a public holiday, a company shutdown, the week between Christmas and New Year. For each one:
- Give it a name (e.g.
Thanksgiving,Winter shutdown). - Pick a start date, then click the second date field to pick an end date. Use the same date for both to mark a single day, or a range for a multi-day closure.
You can schedule holidays up to roughly two years in advance, so add the whole year (and next year) in one sitting rather than editing the schedule every December. During a holiday, business-hours SLAs and "within business hours" logic treat your team as closed — which is exactly the point.
Step 5 — Save
Click Save. The schedule is now live. On a single-schedule plan, this one schedule automatically becomes the default and starts governing every ticket immediately — you're done with setup and can skip to Step 7 to wire it into your SLAs.
Step 6 — Understand the default, and apply a different schedule
Here's the rule that trips people up: the first schedule in your list is the default, and it applies to all tickets that haven't been assigned another one. Every ticket gets a schedule whether you do anything or not.
To put specific tickets on a different schedule (only possible on Enterprise, where you can have more than one), you use a trigger:
- Go to Admin Center → Objects and rules → Business rules → Triggers and create a new trigger.
- Add conditions that match the tickets you want — e.g. Organization is EU-Customers, Group is Billing, or Brand is …. These decide which tickets qualify.
- Add the action Ticket: Set schedule and choose the schedule from the dropdown.
You create one such trigger per schedule you want to route to. If the mechanics of conditions and actions are new, Zendesk triggers explained walks through them. The key thing to remember: on a multi-schedule account, a second schedule does nothing until a Ticket: Set schedule trigger moves tickets onto it.
Step 7 — Connect the schedule to SLAs and out-of-hours behavior
A schedule is only useful once something reads from it. The two big consumers:
SLA targets. When you build an SLA policy, each target — first reply, next reply, resolution — can be measured in business hours or calendar hours. Calendar hours count all elapsed time around the clock; business hours count only the time inside your schedule, pausing when you close and resuming when you reopen. So a ticket arriving at 4:45 p.m. with a 4-hour business-hours first-reply target is due mid-morning the next working day — not at 8:45 p.m. while the office is dark. To get this behavior, set the relevant targets to business hours (calendar hours ignore the schedule entirely). This is the whole reason most teams build a schedule, so double-check it on your highest-priority policies.
Out-of-hours auto-replies. Triggers can branch on whether a ticket arrived inside or outside your hours using the condition Ticket: Within business hours? (true/false). That lets you send a normal "we've got it" during hours and an honest "our team is offline until 9 a.m. Monday" outside them — one of the cheapest CSAT wins available.
Step 8 — Mind the plan gating
Before you design anything region-specific, confirm what your plan allows:
| Plan | Schedules |
|---|---|
| Growth | One schedule |
| Professional | One schedule |
| Enterprise | Multiple schedules |
If you're on Growth or Professional and need different hours per region or team, you have a single schedule to work with — usually that means picking the most representative window and accepting some imprecision, or upgrading. Plans and packaging change, so confirm the limit in your own Admin Center before committing to a multi-schedule design.
Best practices
- Set the time zone first, and double-check it. A schedule built in the wrong zone is off by hours for every ticket, quietly and consistently. It's the hardest mistake to spot from breach numbers alone.
- Match reality, not aspiration. Set the hours you truly staff. The SLA clock believes whatever you enter.
- Load holidays a year ahead. Add the full calendar in one pass so the clock doesn't run through long weekends and shutdowns.
- Name schedules clearly. On Enterprise you'll pick them from trigger dropdowns —
EU SupportbeatsSchedule 2. - Revisit at least yearly. Hours change, offices move, you add regions. Refresh the schedule whenever you touch your SLAs, and roll holidays forward before they lapse.
Common mistakes to avoid
- Business-hours SLAs with no schedule. The classic: targets set to "business hours" but no schedule to define them, so time counts around the clock and you rack up phantom overnight and weekend breaches.
- Forgetting holidays. The most common ongoing failure — the clock runs straight through every public holiday, and the team returns to a wall of "breached" tickets.
- Building a second schedule but no routing trigger. On Enterprise, every ticket stays on the default until a
Ticket: Set scheduletrigger moves it. No trigger, no effect. - Assuming Chat hours follow Support hours. Support business hours (the schedule above) are a separate setting from Chat/messaging operating hours. If you run live chat, configure both.
- Setting SLA targets to calendar hours by accident. Calendar-hour targets ignore your schedule completely. If you want pausing, the target has to say business hours.
A note on what schedules can't do
Schedules keep your metrics honest about your hours — but they don't extend them. Out of hours, the customer still waits for a human. That gap is where an AI agent layer fits: something like Macha runs on top of Zendesk (it's not a help desk and not a Zendesk replacement) and answers from your knowledge base and connected systems 24/7 — so a customer who writes in at 2 a.m. on a holiday can get an actual resolution to a routine question instead of just a "we're closed" auto-reply, while anything it can't handle becomes a normal ticket for your team when the schedule reopens. It complements schedules rather than replacing them: the schedule still governs your human SLAs and reporting; the AI just narrows how much has to wait for working hours. Worth being straight about the model — Macha is billed per AI action (any automated step, costing 0.5–9 credits depending on the model you choose), not per closed ticket, and it only performs as well as the knowledge you connect to it. If after-hours volume is your pain point, see how to automate Zendesk with AI, or try it free — 7-day free trial, no credit card required.
Frequently asked questions
Where do I set business hours in Zendesk? In the Admin Center, go to Objects and rules → Business rules → Schedules and click Add schedule. A schedule holds your time zone, weekly business hours, and holidays. (Note: Support business hours are separate from Chat/messaging operating hours, which are configured elsewhere.)
How do I set the time zone for my Zendesk schedule? Set it on the schedule itself, near the name field, before you draw your hours — the hours you enter are interpreted in that zone. It's the reference clock for every business-hours and holiday calculation, so getting it right is the most important part of setup.
How do I add holidays to a Zendesk schedule? Open the schedule, go to the holidays section, give each holiday a name, then pick a start date and an end date (use the same date for a single day, or a range for a multi-day closure). You can add holidays up to about two years in advance.
How does a ticket get a schedule in Zendesk? Every ticket uses the default schedule — the first one in your list — unless a trigger assigns a different one. On multi-schedule (Enterprise) accounts, create a trigger whose conditions match the target tickets and use the action Ticket: Set schedule to apply the right one. See Zendesk triggers explained.
Can I have different business hours for different teams or regions? Yes, but it's plan-gated: one schedule on Growth and Professional, multiple on Enterprise. With multiple schedules you create region- or team-specific schedules and route tickets to them with Ticket: Set schedule triggers, so each ticket's SLAs pause and resume against the right local clock.
Why are my Zendesk SLAs breaching outside business hours? Almost always because the SLA target is set to calendar hours, or because there's no schedule (or the wrong time zone/holidays) for a business-hours target to pause against. Set the relevant targets to business hours and make sure a correct schedule exists. Details in Zendesk SLA explained.
The bottom line
Configuring business hours in Zendesk is a five-minute job with outsized reach: create a schedule, set the time zone first, paint your weekly hours in 15-minute blocks, add a year of holidays, and save. On Growth and Professional that one schedule becomes the default automatically; on Enterprise you can run several and route tickets to them with Ticket: Set schedule triggers. The payoff only lands once you wire it in — set your important SLA targets to business hours so they pause overnight, and branch your auto-replies on Within business hours?. Get the time zone and holidays right and your breach numbers finally tell the truth. For the concepts behind all this, see business hours & schedules explained; to go deeper on what reads from your schedule, see SLAs and triggers.
Procedure verified against Zendesk's official documentation, June 2026. Zendesk updates its product and packaging periodically — confirm specifics in your own Admin Center before relying on them.


