How to Create a Custom View in Zendesk (Step by Step)


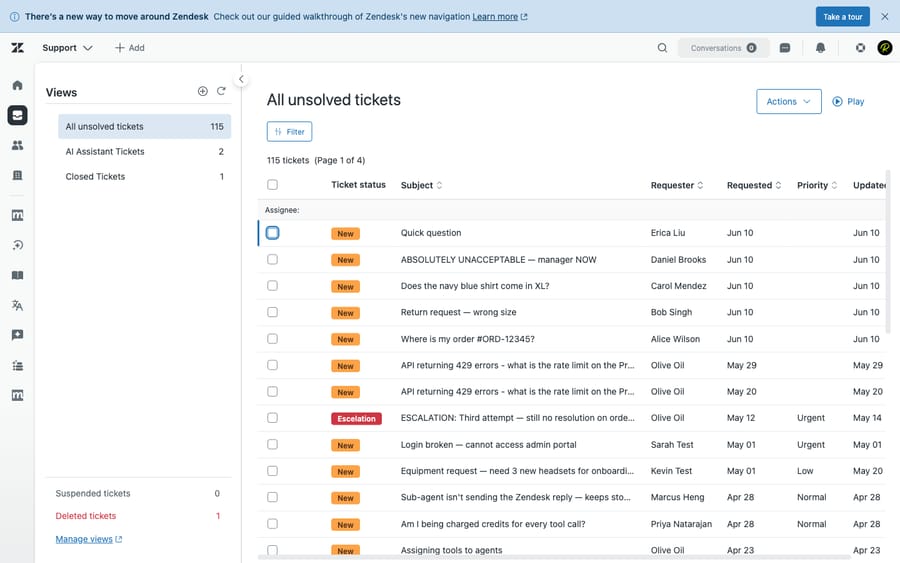
A Zendesk view is the list of tickets your agents actually work from — the queue down the left edge of the Agent Workspace. The default views ("All unsolved tickets," "Unassigned tickets") are fine to start, but the moment you have more than one team or any kind of triage process, you'll want custom views: saved, filtered queues built around how your team works. The good news is that creating one takes about two minutes once you know where the controls are.

This is the hands-on, step-by-step build. If you want the conceptual background first — what a view actually is, how it differs from search and filters, the active-view limits, and the queues every team should have — read Zendesk views explained, the companion to this guide. Here, we're going to build one from scratch, using a single worked example so each step lands on something concrete. The steps below are verified against Zendesk's own documentation.
Our worked example
We'll build a view called "Billing — unsolved, oldest first": a single queue of every open piece of work assigned to the Billing group, sorted so the oldest ticket sits at the top and gets cleared first. It's a realistic everyday queue, and building it touches every control you need — conditions, sharing, columns, and sort order. Adapt the specifics to your own team as we go.
One prerequisite: you create and edit shared views in the Admin Center, which requires admin permission. Agents can create personal views for themselves from the Views list, but the full management screen lives in Admin Center.
Step 1 — Open the Views admin screen
In your Zendesk account, open the Admin Center (the gear icon, or yoursubdomain.zendesk.com/admin). In the sidebar, go to Workspaces > Agent tools > Views. This is the master list of every shared view in your account.
On the Views list page, click the Create view button in the top corner. This opens the form titled Create view — the single screen where everything below happens.
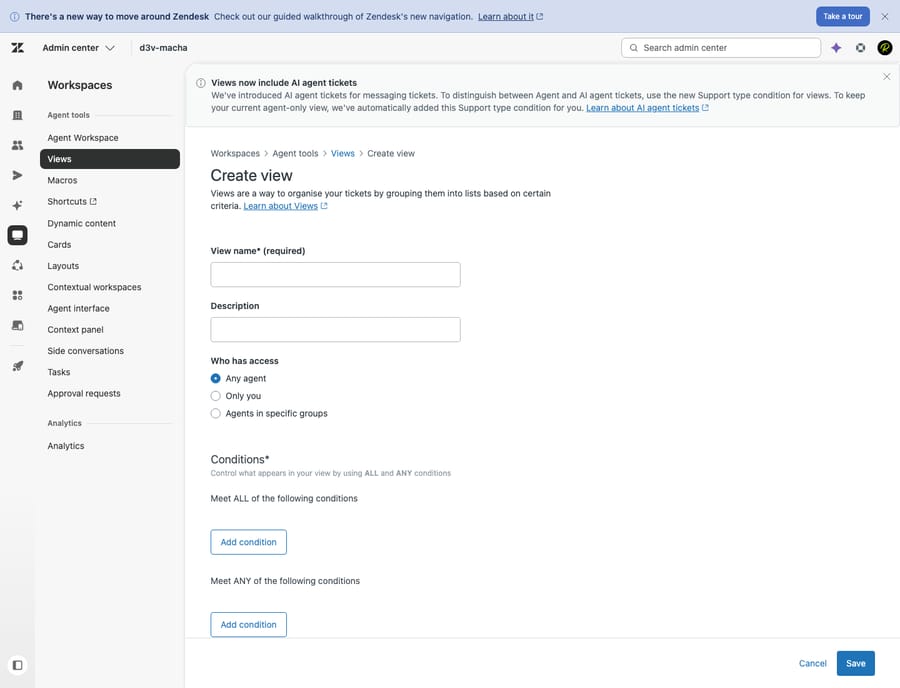
Step 2 — Name the view
Give the view a clear, scannable name at the top — this is exactly what agents read in the sidebar, so make it self-explanatory. For our example: Billing — unsolved, oldest first. A name like that tells an agent the team, the scope, and the sort at a glance; "View 7" or "Copy of All unsolved" tells them nothing. There's an optional description field too — useful for documenting why a view exists, especially if someone else will maintain it later.
Step 3 — Set the conditions (meet all / meet any)
Conditions are the filter that defines which tickets appear. Zendesk gives you two blocks:
- Tickets must meet all of these conditions — AND logic. Every condition has to be true.
- Tickets can meet any of these conditions — OR logic. The ticket appears if it matches any one of them.
One rule to remember: your conditions must include at least one core ticket property — Status, Status category, Type, Group, Assignee, Requester, or Support type — so the view always has something concrete to anchor on.
For "Billing — unsolved, oldest first," put these in the meet all block:
- Group is Billing
- Status is less than Solved (this is the standard way to capture "unsolved" — it includes New, Open, Pending, and On-hold, but not Solved or Closed)
That's enough for a clean queue. To widen one dimension — say, also surface High or Urgent priority — you'd add those as a meet any block. (One caveat from the docs: a few time-based conditions like "Hours since…" aren't available in the "any" block, only in "all.") For how conditions, triggers, and automations relate, see the Zendesk business rules guide.
Step 4 — Choose who can see it
Under Who has access, set the view's availability. There are three options:
- Any agent — a shared view everyone in the account sees.
- Agents in specific groups — a shared view scoped to one or more teams. This is what you usually want for a team queue: set it to the Billing group so only billing agents carry it in their sidebar and nobody else's list gets cluttered.
- Only you — a personal view, visible only to you. Good for an individual's private "things I'm watching" list, not for team process.
Rule of thumb: if more than one person needs it, make it a shared, group-scoped view. Reserve personal views for individual workflow quirks. For our example, choose Agents in specific groups → Billing.
Step 5 — Pick the columns (up to 15)
Columns control what each ticket row displays. Zendesk lets you add up to 15 columns and drag them into any order — but restraint wins here; four or five well-chosen columns scan far faster than a cluttered fifteen. (Note: multi-select custom fields can't be used as columns.)
For a billing queue, a sensible set is:
- Subject — what the ticket is about
- Requester — who it's for
- Priority — so urgent items stand out
- Status — New vs. Pending at a glance
- Request date (or "Latest update") — to back up the oldest-first sort
Add the columns your team genuinely scans for and drop the rest.
Step 6 — Set grouping and sort order
Two controls shape the layout of the list:
- Group by clusters rows under headers — by priority, by status, by assignee — turning a long list into tidy sections. For our example you could group by Priority so Urgent billing tickets sit in their own block; or leave grouping off for a single flat list.
- Order by sets the sort within the view, ascending or descending. This is where "oldest first" comes from: set Order by → Request date → Ascending, so the longest-waiting ticket rises to the top and gets worked first.
If your priority were to triage by urgency instead, you'd order by Priority descending. The point is that grouping and sort encode how the team should attack the queue, so set them deliberately.
Step 7 — Preview, then save
Before saving, use the Preview pane to sanity-check the result — it shows the tickets currently matching your conditions, with your chosen columns and sort applied. This is the moment to catch mistakes: an empty preview means your conditions are too narrow (often conditions that can never all be true at once); a flooded one means they're too loose. Tweak, re-preview, and when it looks right, click Save.
Your new view now appears in the Views list, and the agents you scoped it to will see it in their sidebar.
Step 8 — Reorder views and mind the limits
Creating the view isn't quite the last step — placement matters. The Views sidebar is finite and ordered, and in practice the views near the top get worked while the ones buried at the bottom get ignored. Back on the Admin Center > Workspaces > Agent tools > Views screen, drag your most-used views toward the top so they're the first thing agents reach for.
On the limits: as of 2026, the Views list shows the first 100 shared views and the first 10 personal views — a big increase over the old default of 12 shared and 8 personal. On Enterprise plans, admins can use custom roles to deliberately restrict agents back to that 12/8 cap. Either way, the lesson is the same: prune views nobody uses and keep the active set tight and well-ordered. (Always confirm the current limit on your own plan, since Zendesk adjusts these.)
Best practices
A few habits separate teams whose views help from teams whose views are noise:
- Don't over-create. A sidebar with 40 views is one nobody reads. Build the handful the team actually works and stop.
- Build team-based, group-scoped views, not one view per person. Scope shared views to groups; use personal views for individual quirks.
- Always have an SLA-breach view. A queue of tickets approaching or past their SLA target is an early-warning system that stops urgent work from slipping. Build it once and it pays for itself.
- Name views for what they are. "Billing — unsolved, oldest first" tells an agent everything; "Copy of View 3" tells them nothing.
- Revisit periodically. Prune dead views and re-order the live ones every quarter.
Common mistakes to avoid
- Forgetting a core property. A view needs at least one of Status, Group, Assignee, Type, etc. Build around one of those, then refine.
- Mixing up "all" and "any." Putting "Status is Open" and "Status is Pending" in the all block returns nothing (a ticket can't be both at once). Conditions that are alternatives belong in the any block.
- Confusing a view with routing. A view shows tickets; it never assigns or moves them. If your "Unassigned" view is always full, that's a routing problem (fixed with triggers and the ticketing setup underneath), not a view problem.
- Column overload. Fifteen columns is the ceiling, not the goal. A scannable queue uses a handful.
- Leaving new views at the bottom. An unordered sidebar buries your best queue. Reorder after you create.
Where AI fits
Even a perfectly built set of views still assumes a human opens each queue and works tickets down by hand. That's the gap an AI agent layer like Macha addresses — it sits on top of your existing Zendesk (it isn't a help desk and doesn't replace one). Connected to your tickets and knowledge, it can triage and route incoming tickets and resolve routine ones outright, so fewer tickets ever reach a manual queue. Your custom views still exist for everything that genuinely needs a person; they just stay shorter.
The honest trade-offs: it's another integration to manage, and it only performs as well as the knowledge and rules you connect to it. On cost, Macha bills per AI action — any automated step, whether triage, tag, route, look up data, draft, or resolve, at 0.5–9 credits depending on the model you choose — not per closed ticket, because most of that work is automation along the way rather than a single "resolution." If a perpetually full intake view is your real bottleneck, that's the gap an AI layer fills. You can try it free — 7-day free trial, no credit card required.
Frequently asked questions
How do I create a view in Zendesk? In the Admin Center, go to Workspaces > Agent tools > Views, click the Create view button to open the Create view form, name it clearly, set the conditions (including at least one core property such as Status or Group), choose who has access (Any agent, Agents in specific groups, or Only you), pick your columns and sort/group order, preview the matched tickets, and save. Managing shared views requires admin permission; agents can create personal views from the Views list in the Agent Workspace.
What conditions can I use in a Zendesk view? Almost any ticket property — Status, Group, Assignee, Priority, Type, Tags, Requester, hours since update, custom fields, and more. Conditions split into a "meet all" (AND) block and a "meet any" (OR) block, and a view must include at least one core property: Status, Status category, Type, Group, Assignee, Requester, or Support type.
How many columns can a Zendesk view have? Up to 15 columns, which you can drag into any order. Multi-select custom fields can't be used as columns. In practice, four or five well-chosen columns make a queue far easier to scan than a crowded fifteen.
What's the difference between a shared view and a personal view? Shared views are created by admins (or permitted agents) and are available to all agents or to a specific group — your team's standard queues. Personal views are created by an individual agent for their own use only and aren't visible to anyone else.
How many views can I have in Zendesk? As of 2026, the Views list shows the first 100 shared views and the first 10 personal views; the older default cap was 12 shared and 8 personal, and Enterprise admins can restrict roles back to that limit via custom roles. Because the list is finite and ordered, keep your most-used views near the top, and confirm the current limit on your plan.
The bottom line
Creating a custom view in Zendesk comes down to eight quick decisions: open Admin Center > Workspaces > Agent tools > Views, name the view, set the conditions (at least one core property, "all" vs. "any" logic), choose who sees it (group-scoped for team queues), pick a handful of columns, set the group and sort order, preview, and save — then reorder so it sits where agents will actually use it. Build a small set of well-named, group-scoped views like our "Billing — unsolved, oldest first" example, add an SLA-breach early-warning view, and your whole team always knows what to work on next. For the deeper concepts behind all of this, see Zendesk views explained; to understand the tickets your views are filtering, start with the Zendesk ticketing system.
View-creation flow verified against Zendesk's official documentation, June 2026. Zendesk updates its product periodically — confirm specifics, especially view limits and button labels, in your own account before relying on them.


