How to Create Custom Ticket Fields & Forms in Zendesk (Step by Step)


Out of the box, a Zendesk ticket captures the basics — subject, description, status, priority. But the moment you need to know which product a customer is on, which order they're asking about, or what category the issue falls into, you've outgrown the defaults. The fix is a custom ticket field: a structured input you add to tickets so the data you actually triage and report on is captured every time, not buried in free-text.

This guide covers two builds in one place. Part A creates a custom ticket field. Part B assembles those fields into a ticket form — the predefined set of fields a particular request type shows. If you want the concepts first — system vs. custom fields, every field type, fields vs. forms — read the companion explainers on ticket fields vs. forms and Zendesk custom fields explained. If you're ready to build, start here. Every step is verified against Zendesk's documentation; Zendesk revises its UI periodically, so confirm labels in your own account.
Before you start: who can do this
You need to be an admin to create custom fields and forms — or an agent in a custom role that's been granted permission. If you don't see the paths below, that's why; ask an admin.
One plan caveat to know up front: **a single default ticket form is available on every plan, but multiple ticket forms require Suite Growth, Professional, Enterprise, or Enterprise Plus** (Team is limited to the one Default Ticket Form). Custom fields themselves are available on all plans — so even on Team you can add fields, you just add them to the single default form rather than building separate forms. We'll flag this again in Part B.
Part A — Create a custom ticket field
Step 1 — Open the Fields admin page
Custom fields live in the Admin Center, not in a ticket:
- Click the Zendesk Products icon (the four-dot grid) and choose Admin Center.
- In the left sidebar, click Objects and rules.
- Click Tickets, then Fields.
The full path is Admin Center → Objects and rules → Tickets → Fields. This page lists every field on your account — the grayed-out system fields (Subject, Status, Priority, etc., which you can't delete) and any custom fields you've already built.
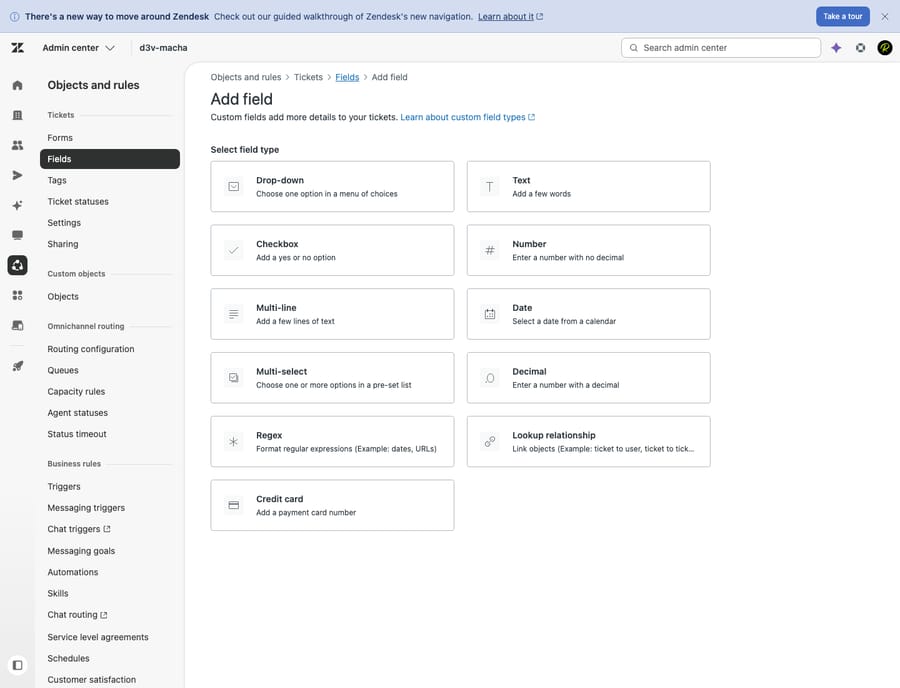
Step 2 — Click Add field and pick a type
Click Add field in the top-right corner. The first decision is the field type, and it's the one most worth getting right, because the type dictates how the data is stored, validated, and reported on. Zendesk offers eleven:
- Drop-down — a single choice from a predefined list (up to 2,000 values). The workhorse for categories like "Issue type" or "Product line."
- Multi-select — like a drop-down, but the customer or agent can pick several values at once.
- Checkbox — a single yes/no toggle (e.g. "VIP customer").
- Text — a single line of free text (up to 65,536 characters).
- Multi-line — a larger free-text box for longer notes.
- Numeric (whole numbers) and Decimal (numbers with decimals).
- Date — a date picker.
- Regex — text validated against a pattern you define (e.g. an order-number format).
- Credit card — masks all but the last four digits.
- Lookup relationship — links the ticket to a related user, organization, or custom-object record.
The big rule of thumb: prefer a drop-down over free text wherever the answer is a known, finite set. A drop-down is reportable, filterable, and tag-generating; a text field full of "billing," "Billing," and "bil ling" is none of those. More on that in the mistakes section below.
Step 3 — Set the display name and titles
Enter a Display name — this is what admins see in the fields list and what agents see on the ticket by default. There's also an optional Description, which is visible to admins only (a good place to note what the field is for and when to use it).
If you later make the field customer-facing (Step 4), you'll be able to enter a separate title shown to customers and a customer-facing description — so the agent-facing label can stay terse ("Cat.") while end users see something friendlier ("What's this about?").
Step 4 — Set permissions (who sees and edits it)
Under Permissions, choose one of three options. This single setting decides whether the field is internal-only or appears on the help-center request form:
- Agents can edit — agents view and edit it; end users never see it. Use this for internal triage data (routing category, internal severity).
- Customers can edit — agents and end users can view and edit it. The field appears on tickets and on the support request form in your help center. Use this when you want the customer to tell you something at submission (order number, product).
- Customers can view — agents edit it; end users can only read it. Useful for a status-style field you want to surface but not let customers change.
Step 5 — Set required (and required-to-solve)
Two independent "required" toggles control when the field must be filled in:
- Required to solve a ticket — an agent can't move the ticket to Solved until this field has a value. This is how you guarantee, say, a "Resolution category" is captured before closure.
- Required to submit a request — a customer can't submit the help-center form without filling this in (only relevant for customer-facing fields).
Use these sparingly. Every required field is friction; make required only what you genuinely can't close or triage without.
Step 6 — For drop-down / multi-select, add the options (these create tags)
If you picked Drop-down or Multi-select, you now define the field values. Each value has a display label and a tag — and here's the part that quietly makes Zendesk powerful: every option you add generates a tag (each must be unique). Those tags then flow into your triggers, automations, macros, views, and Explore reports, so a drop-down isn't just data capture — it's the hook the rest of your Zendesk automation hangs on. (A checkbox works similarly: you define one tag that gets applied whenever the box is checked.)
For example, a "Product" drop-down with values Mobile app, Web app, and API might carry the tags product_mobile, product_web, and product_api — and now a trigger can auto-route any product_api ticket to your developer-support group.
Step 7 — Save
Click Save — or click the dropdown arrow and choose Save and add another to build several fields in a row. Your field now exists.
One critical gotcha: **if you already have two or more active ticket forms, a newly created field is not automatically added to them.** You'll need to add it to each relevant form manually — which is exactly what Part B covers.
Part B — Create a ticket form
A ticket form is a predefined set of fields shown to agents and end users for a particular kind of request. A "Returns" form might surface order number, return reason, and item condition; a "Bug report" form surfaces product, severity, and steps to reproduce. Different requests, different fields — that's the whole point of forms.
Plan check: building multiple forms requires Suite Growth, Professional, Enterprise, or Enterprise Plus. On Team, you have one Default Ticket Form that you customize instead of creating new ones. You can create up to 300 forms per account on supported plans.
Step 1 — Open the Forms admin page
Go to Admin Center → Objects and rules → Tickets → Forms. You'll see the Default Ticket Form plus any others you've built.
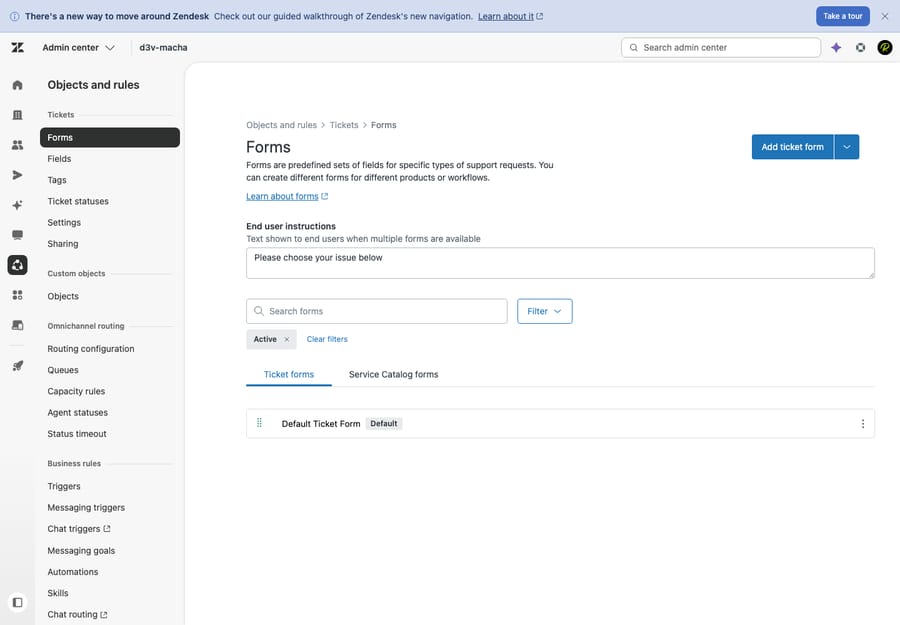
Step 2 — Click Add form and name it
Click Add form. Click New form at the top to set the form name (this is the agent-facing name). Optionally enter a different Title shown to end users — so agents see "Returns — RMA" while customers see "Return or exchange an item."
If end users should be able to choose this form themselves in the help center, check Editable for end users.
Step 3 — Add fields and put them in order
The available fields sit in a panel on the right. Drag a field onto the form (or click the + next to it) to add it, then drag fields up and down to set the order agents and customers see. Click the X on a field to remove it — note that among system fields, only Type and Priority can be removed; the core system fields stay.
This is where the fields you built in Part A come together into a coherent request experience. Lead with what the customer can answer easily, and keep the form short (more on that below).
Step 4 — Add end-user instructions
If you let end users pick their form, add a short line of end-user instructions so customers choose the right one ("Use this form for billing questions only"). When several forms are presented in the help center, clear instructions are what stop everything landing on the wrong form.
Step 5 — Save, activate, and assign to brands
Click Save. By default a form has Apply to all brands selected. If you run multiple brands and want this form limited to specific ones, deselect "Apply to all brands" and choose which brands it applies to. Once active, the form is available to agents on new tickets and (if you made it end-user editable) in the help center.
How fields and forms appear once live
To agents, the form's fields show in the ticket interface; required-to-solve fields block the Submit-as-Solved action until filled. To end users, customer-facing fields appear on the help-center support request form, and if you've activated multiple end-user forms, customers first pick a form, then see its fields. The data captured then powers your views, triggers, and reports — which is the entire reason to structure it in the first place.
Best practices and common mistakes
- Use drop-downs, not free text, for anything finite. This is the single biggest mistake. A free-text "Category" field can't be reported on or used to route tickets; a drop-down can (and it generates tags for free). Reserve text fields for genuinely open answers like order details.
- Keep forms short. Every field is friction, and over-collecting at submission drives customers to abandon the form or pick "Other." Capture what you need to triage, and let agents fill the rest. A tight five-field form beats a fifteen-field one nobody completes.
- Make "required" the exception. Required-to-submit fields raise abandonment; required-to-solve fields are gentler (they only bind agents at closure). Require only what you truly can't operate without.
- Plan your tags before you build drop-downs. Because each option becomes a tag, a messy value list becomes a messy automation layer. Name them consistently (
product_,reason_) from the start. - Remember the multi-form gotcha. With multiple active forms, new fields aren't auto-added — audit each form after creating a field so it doesn't silently go missing.
Where AI takes the pressure off your fields
Well-built fields only help if they're actually filled in correctly — and that's the catch. Required-to-submit fields nudge customers but raise abandonment; required-to-solve fields put the classification work on agents, ticket after ticket. The richer your field schema, the more manual tagging someone does.
That's the gap an AI agent layer like Macha helps close. Macha isn't a help desk and it's not a Zendesk replacement — it runs on top of your existing Zendesk. It can read an incoming ticket, classify it, and auto-fill the right custom fields (product, category, severity) and apply the matching tags before an agent ever opens it — so your drop-downs get populated consistently without anyone manually triaging. The honest framing: it's another integration to set up, and it's only as accurate as the field structure and knowledge you give it. On cost, Macha bills per AI action — any automated step it takes, such as classifying a ticket or setting a field — not per closed ticket, because most of this work is automation, not a "resolution." If keeping fields filled in is eating your team's time, that's the line worth exploring. You can try it free — 7-day free trial, no credit card required.
Frequently asked questions
Where do I create a custom field in Zendesk? In the Admin Center: Admin Center → Objects and rules → Tickets → Fields, then click Add field. Pick a field type, set the display name and permissions, and save. You must be an admin (or an agent in a custom role with permission).
What's the difference between a ticket field and a ticket form? A field captures one piece of data (e.g. "Product"). A form is a predefined set of fields shown for a particular request type. You build fields first, then arrange them into forms. See ticket fields vs. forms for the full breakdown.
Do drop-down fields create tags? Yes. Every drop-down and multi-select value carries a unique tag that's applied to the ticket when the value is selected, and a checkbox applies one admin-defined tag when checked. Those tags can drive triggers, automations, macros, views, and reports. Lookup relationship and plain text fields do not generate tags.
How do I make a Zendesk field required? On the field, use Required to solve a ticket (agents can't solve until it's filled) and/or Required to submit a request (customers can't submit the help-center form without it). The two are independent.
Why isn't my new field showing on a form? If you have two or more active ticket forms, a newly created field is not added to them automatically — you have to add it to each form manually under Objects and rules → Tickets → Forms.
Can I create multiple ticket forms on any plan? No. Multiple forms require Suite Growth, Professional, Enterprise, or Enterprise Plus. On Team you customize the single Default Ticket Form instead (custom fields are available on all plans).
The bottom line
Custom fields setup in Zendesk is two builds. First the field: Admin Center → Objects and rules → Tickets → Fields → Add field, pick a type (favor a drop-down over free text), set the display name, choose permissions, decide if it's required, add options (which become tags), and save. Then the form: Forms → Add form, name it, drag fields into order, add end-user instructions, save, and assign to brands — remembering that multiple forms need Suite Growth or above. Build a tight, well-typed set of fields and your views, triggers, and reports all get sharper. For the concepts behind it all, see ticket fields vs. forms and custom fields explained.
Steps verified against Zendesk's official documentation, June 2026. Zendesk updates its product periodically — confirm labels in your own account before relying on them.


