 Zendesk
 Freshdesk
 Gorgias
 Front
Front Shopify
 Stripe
 Slack
Slack Notion
 Google Workspace
 Confluence
How to Migrate to Zendesk from Intercom (Step-by-Step Guide)


An Intercom to Zendesk migration is rarely as simple as "export here, import there" — and the reason is structural. Intercom is conversation-centric: it thinks in conversations, contacts, and companies, with a Messenger-first Inbox at its core. Zendesk thinks in tickets. So before you move a single record, the real work is translating one data model into another, then choosing a migration route that actually carries your history across. This guide walks the whole thing end to end — what maps to what, which of the three routes fits your data, the step-by-step sequence, and the honest list of what won't transfer and has to be rebuilt.

If you're still deciding whether to switch at all, our Zendesk vs. Intercom comparison weighs the two platforms feature by feature. This guide assumes the decision is made and you want a clean move. Every claim below is verified against current Zendesk, Help Desk Migration, and Intercom documentation as of June 2026 — but UIs change, so confirm labels in your own accounts.
Update (June 2026): Salesforce has agreed to acquire Fin (formerly Intercom) for ~$3.6 billion and plans to fold it into Salesforce's Agentforce — the deal was announced June 15, 2026 and is expected to close around Q4 of Salesforce's FY2027, worth weighing in any long-term Intercom/Fin decision.
First, understand the model shift (this is the whole game)
Most migration headaches trace back to one thing: Intercom and Zendesk don't store support data the same way. If you map the objects correctly up front, everything downstream gets easier. Here's the translation:
| Intercom object | Zendesk equivalent | Notes on the shift |
|---|---|---|
| Conversation | Ticket | The big one. An Intercom conversation (a back-and-forth message thread) becomes a Zendesk ticket. Threads, statuses, and timestamps carry over, but the "rolling chat" feel becomes a structured ticket. |
| Contact (user or lead) | End user | Intercom splits people into users and leads; Zendesk has one end-user object. Leads usually map to end users too. |
| Company | Organization | Direct conceptual match; linked contacts are preserved. |
| Saved reply | Macro | Same idea (canned responses), different name — and these do not migrate automatically. You rebuild them. |
| Article (Help Center / Knowledge) | Guide article | Intercom Articles map to Zendesk Guide, including categories and sections. |
| Custom data attribute | Custom field | Mapped during migration; review each one. |
| Inbox | Agent Workspace / Views | The agent's working surface — different layout, same job. |
| Fin / Workflows / Series | (no direct equivalent) | Automation and bot logic does not transfer. Rebuilt natively in Zendesk. |
The headline caveat: Intercom's conversation model doesn't map to tickets 1:1. A long, sprawling Intercom conversation that drifted across three topics over two months becomes a single Zendesk ticket — which is usually fine, but it's why a sample migration (Step 5) matters so much. You want to see how your real conversations look as tickets before you commit the whole dataset. For a primer on how Zendesk structures tickets in the first place, see the Zendesk ticketing system explained.
The three migration routes (and which one you actually need)
There are three ways to get data into Zendesk. Most real migrations use a combination, but only one carries full conversation history.
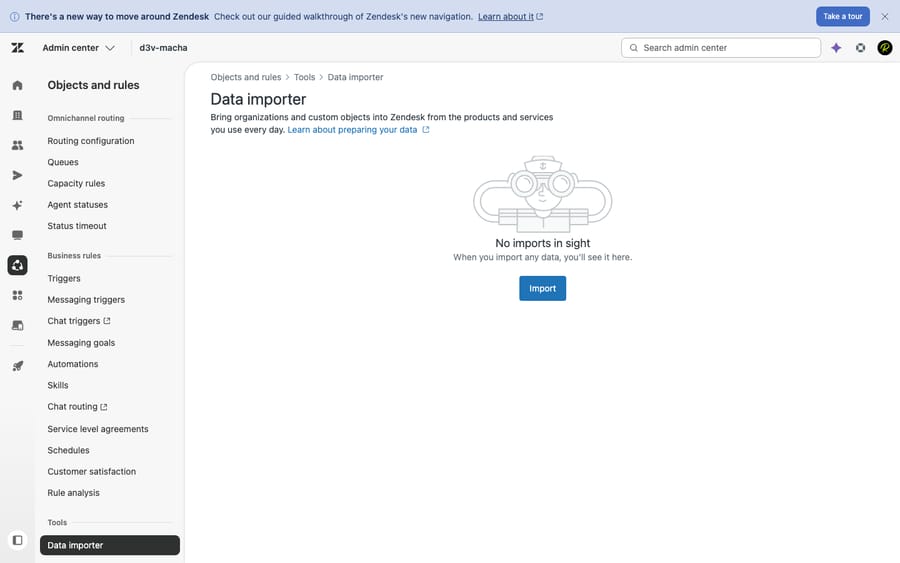
Route 1 — Zendesk's native data importer
Zendesk's built-in data importer lives in Admin Center → Objects and rules → Tools → Data importer. It imports users, organizations, custom object records, and IT asset records from a CSV (up to 1 GB, recommended max ~500,000 rows including the header), and it's available on Suite Team and up (and Support Team/Professional/Enterprise) (About the data importer).
The crucial limitation, stated plainly: the native data importer does not import tickets or conversation history. It's excellent for your people and account data — contacts and companies — but it will not move your Intercom conversations. Don't discover this halfway through.
Route 2 — CSV import for users and organizations
This is really a manual flavor of Route 1: export your Intercom contacts and companies (via Intercom's export or API), reshape the CSV to match Zendesk's expected columns, and run it through the same data importer. It's free and fine for account data, but it's the same dead end for conversations — and reshaping CSVs by hand gets tedious fast above a few thousand rows.
Route 3 — A third-party migration service (the realistic route for history)
If you want your conversation history, attachments, and articles in Zendesk — and almost everyone does — you use a dedicated migration service. The established option is Help Desk Migration (by Relokia), which connects to both platforms via API and automates the model translation. Per its documentation, it migrates:
- Conversations → tickets — full message threads with conversation ID, subject, statuses, and timestamps
- Contacts/users and companies → organizations (linked contacts preserved)
- Intercom Articles → Zendesk Guide — including categories, sections, and internal hyperlinks
- Agents — profiles, roles, group assignments, and historical ticket ownership
- Attachments and inline images, tags, custom fields, and internal notes
What it explicitly does not carry: workflow bots, Series automations, and product tours — "because Zendesk uses a different data model." And saved replies must be recreated manually as Zendesk macros. (Other vendors exist; describe-from-docs applies — confirm scope on the live product before relying on it.)
Bottom line on routes: use the native importer/CSV for a quick free move of users and orgs, or a third-party service for a complete migration including conversation history and your knowledge base. The steps below assume the realistic combined approach.
Step-by-step: migrating from Intercom to Zendesk
Step 1 — Plan and audit before you touch any data
Migrations fail in planning, not execution. Before exporting anything:
- Inventory what you have in Intercom. Roughly how many conversations, contacts, companies, and articles? How many active saved replies, custom attributes, and Fin/Workflow automations?
- Decide what's worth bringing. You rarely need every closed conversation from five years ago. Many teams migrate open + recently-closed tickets and archive the rest. Less data = faster, cheaper, cleaner.
- Set up Zendesk first. Create your Zendesk account, configure brands, add agents, and define groups before migrating — historical ticket ownership maps to agents that must already exist.
- Pick your route (above) based on whether you need conversation history.
- Communicate a timeline. Pick a low-volume window and tell your team when the cutover happens.
Step 2 — Export and prepare your data from Intercom
Pull your data out of Intercom using its export tools and the Intercom REST API. For a third-party service you usually don't export manually — the tool reads Intercom directly via API authorization — but you still want clean source data:
- Deduplicate and tidy contacts. Merge duplicate contacts/leads now; it's far easier in Intercom than after the move.
- Note your custom data attributes. List every custom attribute so you can confirm each one lands in the right Zendesk custom field during mapping.
- Snapshot your saved replies and automations. Since these don't transfer, export or screenshot them as a build list for later.
Step 3 — Map your fields (mind the conversation→ticket shift)
This is where the model shift becomes concrete. Whether you're shaping CSVs or configuring a migration tool, you're matching Intercom objects to Zendesk objects:
- Conversations → tickets: confirm status mapping (Intercom open/closed/snoozed → Zendesk new/open/pending/solved/closed), assignee, and timestamps.
- Contacts → end users, companies → organizations.
- Custom data attributes → custom fields: create the matching custom ticket/user fields in Zendesk first, then map to them. Migration tools auto-map standard fields but custom ones deserve a manual check.
- Tags → tags, internal notes → internal notes.
Good tools auto-map the majority of standard fields, leaving you to verify the custom and edge cases. Don't rush this screen — a wrong mapping here is what produces thousands of mis-filed tickets.
Step 4 — Set up your Zendesk knowledge base target
Your Intercom Articles will land in Zendesk Guide, so prepare the destination: enable Guide, sketch your category/section structure, and decide whether you're keeping Intercom's content organization or restructuring as you move. Migration services preserve categories, sections, and internal article links — but it's still worth a content audit so you don't import stale articles. If you're rethinking structure, our guide on how to build a Zendesk knowledge base covers the layout decisions.
Step 5 — Run a sample / demo migration first
Never run a full migration blind. Both CSV testing and third-party tools support a trial run — Help Desk Migration offers a free demo that moves a small sample (around 20 records) of tickets and articles into your Zendesk so you can inspect the result. Use it to check:
- Do conversations render as readable tickets, with the full thread intact and in order?
- Did attachments and inline images come across?
- Are agents, requesters, timestamps, and statuses correct?
- Did custom fields populate the right values?
- Do articles keep their formatting and internal links?
This is your chance to catch the conversation→ticket quirks (Step 0's caveat) on 20 records instead of 20,000. Fix mappings, re-run the demo, and only proceed when a sample looks right.
Step 6 — Run the full migration
Once the demo passes, launch the full migration. With a third-party service this runs in the background — typical full migrations complete in roughly 24–48 hours depending on volume, and you can keep using Intercom while it runs. Because new conversations keep arriving during that window, plan for a delta (recent-data) sync afterward to capture anything created mid-migration. If you're doing CSV imports yourself, run them in batches (users/orgs first, then any conversation data via your tool) and watch for row errors.
Step 7 — Verify everything landed
After the run, audit before you trust it:
- Counts: do ticket, user, organization, and article totals roughly match your Intercom inventory (minus anything you intentionally left behind)?
- Spot-check tickets: open a range — old and new, simple and multi-topic — and confirm threads, attachments, and assignees are right.
- Knowledge base: confirm articles, categories, and internal links resolve.
- Users/orgs: verify contact–company associations survived.
Log any gaps now; this is your acceptance test.
Step 8 — Rebuild what doesn't transfer
This is the step people underestimate. The data moved; the operational layer did not. Rebuild natively in Zendesk:
- Saved replies → macros. Recreate your Intercom saved replies as Zendesk macros. Use the export from Step 2 as your checklist.
- Automations and routing. Intercom Workflows and Series do not migrate — rebuild your assignment, SLA, and notification logic with Zendesk triggers, automations, and routing rules.
- Bot / Fin flows. Any Fin or Custom Answer logic must be rebuilt with Zendesk's own AI/bot tooling (or a third-party AI layer — more below). There's no automated path for bot logic.
- Channels and the widget. Reconnect email, set up Zendesk messaging and the Web Widget, and reconnect social channels. Update the chat snippet on your site to Zendesk's.
- Retrain agents. The Agent Workspace is not the Intercom Inbox. Budget time for a walkthrough so your team isn't learning live on customer tickets.
Step 9 — Go live and cut over
Final cutover: do a last delta sync to catch in-flight conversations, switch your support email routing and website widget to Zendesk, point your help-center URL/links at Guide, and tell customers if anything visible changes. Keep Intercom in read-only mode for a grace period in case you need to reference something — then decommission once you're confident.
What transfers vs. what you rebuild (quick reference)
| Category | Transfers (via third-party service) | You rebuild manually |
|---|---|---|
| Conversations → tickets | ✅ Full threads, statuses, timestamps | — |
| Contacts, companies | ✅ Users + organizations, associations | — |
| Articles | ✅ → Zendesk Guide (categories, sections, links) | — |
| Attachments, inline images | ✅ | — |
| Tags, internal notes, custom fields | ✅ (custom fields via mapping) | — |
| Agents, historical ownership | ✅ Profiles, roles, groups | — |
| Saved replies | ❌ | ✅ As Zendesk macros |
| Workflows / Series / automations | ❌ | ✅ As triggers/automations/routing |
| Fin / bot / Custom Answers | ❌ | ✅ Native Zendesk AI or an AI layer |
| Product tours, Messenger config | ❌ | ✅ Channels/widget reconfigured |
Note: the native Zendesk data importer alone covers only users, organizations, and custom objects — the full "transfers" column above assumes a third-party service for conversation history and articles.
Where an AI agent fits in once you're on Zendesk
A lot of teams leave Intercom partly for the platform — and partly for the bill. Intercom's Fin charges roughly $0.99 per resolution outcome (with a 50-resolution monthly minimum, and qualification outcomes priced higher), on top of per-seat plans that run from about $29/seat/mo up to ~$132/seat/mo for the top tier (Fin pricing; Intercom pricing — figures approximate, confirm live). If outcome-based AI pricing is part of why you're moving, it's worth thinking about your AI layer before you rebuild bot flows from scratch.
This is where Macha fits — and it's important to be precise about what it is. Macha is not a help desk and not a Zendesk replacement. It's an AI agent layer that runs on top of Zendesk. Once your conversations and knowledge base are migrated, Macha reads a customer's actual question, pulls from your migrated Guide articles and past tickets, and resolves the issue right in the Zendesk ticket — handling tagging, status, and routing, and escalating to a human with full context when it isn't confident. In other words, it's a candidate for the "rebuild your Fin flows" line in Step 8, except you're building on the knowledge you just migrated.
Honest framing on cost, since it's a genuine contrast: Macha bills per AI action — any automated step it takes, such as drafting a reply, tagging, or routing — not per resolution. That's a deliberately different model from outcome-based pricing, because most automation isn't a tidy "resolution"; it's the work done along the way. Whether that's cheaper depends entirely on your volume and mix, so model it against your own numbers rather than assuming. It's also one more integration to configure, and it's only as good as the knowledge you connect — which, conveniently, you just finished migrating. You can try it free: 7-day free trial, no credit card required.
The bottom line
Migrating from Intercom to Zendesk is a model-translation project first and a data-transfer project second. Get the object mapping right — conversations → tickets, contacts → end users, companies → organizations, saved replies → macros, Articles → Guide — and the rest follows. Use Zendesk's native data importer (Admin Center → Objects and rules → Tools → Data importer) for users and organizations, but remember it won't move conversation history; for that, a third-party service like Help Desk Migration is the realistic route, carrying tickets, attachments, articles, and agents across. Always run a sample migration before the full one, verify counts and spot-check tickets after, and budget real time to rebuild what doesn't transfer — saved replies, automations, and bot/Fin logic. Do those, and you land on Zendesk with your history intact instead of a clean-but-empty instance.
Migration details verified against current Zendesk, Help Desk Migration, and Intercom documentation, June 2026. Third-party tool capabilities and pricing change — confirm scope and figures on the live products before relying on them.
Frequently asked questions
Can Zendesk's native data importer move my Intercom conversations? No. Zendesk's built-in data importer (Admin Center → Objects and rules → Tools → Data importer) imports users, organizations, custom object records, and IT assets via CSV — it does not import tickets or conversation history. To migrate Intercom conversations with their full threads and attachments, you need a third-party migration service.
How do Intercom conversations map to Zendesk tickets? Each Intercom conversation becomes a Zendesk ticket, preserving the message thread, subject, statuses, and timestamps. The mapping isn't perfectly 1:1 — Intercom's rolling, multi-topic conversations become single structured tickets — which is exactly why you should run a sample migration and inspect the result before committing the full dataset.
What does not transfer when migrating from Intercom to Zendesk? Your operational logic. Saved replies (rebuild as Zendesk macros), Workflows and Series automations, product tours, and Fin/bot flows do not migrate, because Zendesk uses a different data model. Conversations, contacts, companies, articles, attachments, tags, custom fields, internal notes, and agents can transfer via a third-party service.
How long does an Intercom to Zendesk migration take? With a third-party service, the full automated migration typically runs 24–48 hours in the background depending on volume, after which you run a delta sync to catch conversations created during the window. The larger time cost is usually the planning, field mapping, verification, and rebuilding of saved replies and automations around it.
Is there a free way to migrate from Intercom to Zendesk? Partly. Zendesk's native data importer is free and moves your users and organizations, and migration services usually offer a free demo that moves a small sample (around 20 records) so you can validate the result. A full conversation-history migration via a third-party tool is a paid service, priced by record volume.
Will my Intercom help center articles move to Zendesk? Yes, via a third-party service. Intercom Articles migrate into Zendesk Guide, preserving categories, sections, and internal hyperlinks. It's a good moment to audit and prune stale content rather than importing everything — see our guide on building a Zendesk knowledge base.


