



 Shopify
 Stripe
 Slack
Slack Notion
 Google Workspace
 Confluence

How Do You Connect Office 365 or Gmail to Freshdesk? (2026)


Connecting Office 365 or Gmail to Freshdesk takes about five minutes over OAuth, but a Microsoft 365 shared mailbox cannot sign in and needs forwarding instead. The other failure comes later, when the token expires and a reauthorize banner appears on a page nobody checks.
Key takeaways
- Connecting Office 365 or Gmail to Freshdesk runs through Admin > Channels > Support Email > New Support Email and takes about five minutes over OAuth.
- A Microsoft 365 shared mailbox cannot complete a Freshdesk OAuth sign-in because Microsoft says its sign-in should always be blocked, so forwarding is the working route.
- When a Freshdesk mailbox connection fails, Freshdesk retries 8 times over about 12 minutes, then marks the mailbox disconnected and shows a reauthorize banner.
- Reauthorizing a custom mailbox in Freshdesk is listed for the Growth, Pro and Enterprise plans only.
- For a custom Microsoft 365 mail server, Freshdesk uses smtp.office365.com on SMTP port 587 and IMAP port 993 over SSL.

To connect Office 365 or Gmail to Freshdesk, go to Admin > Channels > Support Email > New Support Email, pick Microsoft Office 365 or Gmail as the mail server, and click Sign in to approve OAuth access; it takes about five minutes. A Microsoft 365 shared mailbox is the exception: Microsoft blocks sign-in on shared mailboxes, so forward it to Freshdesk instead. Once connected, watch for the "Please reauthorize your Email settings" banner, because Freshdesk marks the mailbox disconnected after 8 failed retries over about 12 minutes.
Should you use forwarding or a native OAuth mailbox?
| Forwarding | Native OAuth mailbox | |
|---|---|---|
| Setup | One rule in Exchange or Google Workspace | OAuth consent plus scopes |
| Outbound "from" | Freshdesk's infrastructure on your behalf | Your real Microsoft 365 or Gmail mailbox |
| Deliverability rests on | Your SPF and DKIM records | The mailbox's own reputation |
| Breaks when | DNS records are missing or wrong | The OAuth token expires or is revoked |
| Works with a shared mailbox | Yes | Not straightforwardly, see below |
If you run Microsoft 365 or Google Workspace on a normal user mailbox, native OAuth is worth the extra minutes: replies leave from the real address, threading behaves, and you aren't relying on DNS you may not control. If your support address is a shared mailbox or a distribution group, forwarding is the route that actually works.
How do you connect a Microsoft 365 or Gmail mailbox over OAuth?
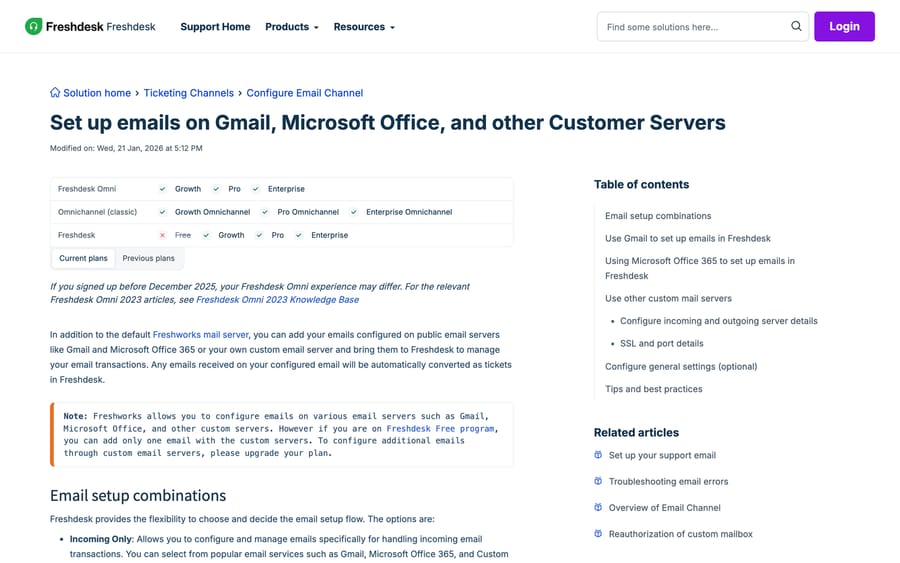
Per Freshworks' Using custom email servers to send and receive support emails, modified 21 January 2026:
- Go to Admin > Channels > Support Email.
- Click New Support Email.
- Choose the mail server: Gmail, Microsoft Office 365, the Freshworks mail server, or Custom.
- Choose whether Freshdesk uses this mailbox for incoming only, outgoing only, or both.
- With Microsoft Office 365 selected, click Sign in, authenticate on Microsoft's own page, and approve the consent screen for read, write and send access on that mailbox.
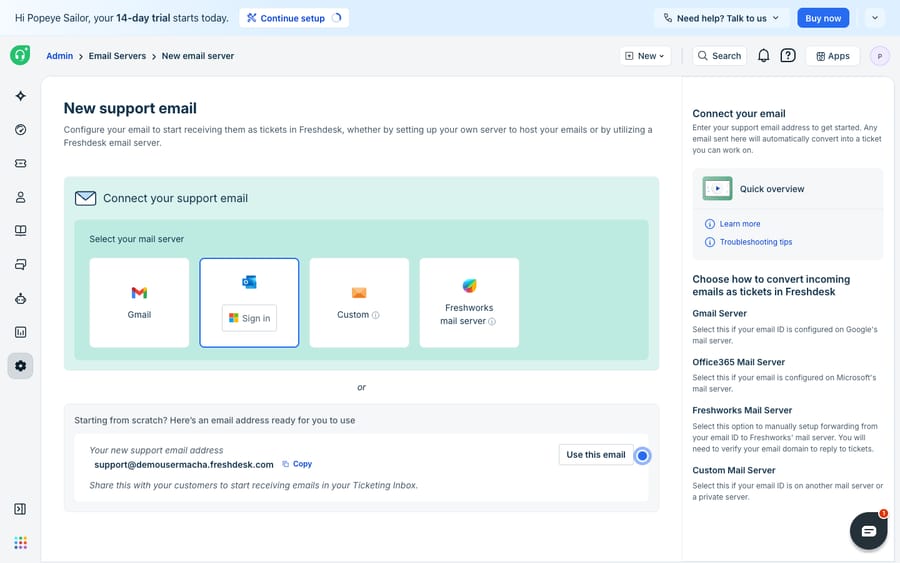
The incoming/outgoing/both toggle matters more than it looks. Pick both if you want customer mail to become tickets and agent replies to leave from your real mailbox. Pick outgoing only if inbound arrives some other way.
Two things your IT team may need to do: approve the Freshdesk application in Entra ID if conditional access is tight, and allowlist Freshdesk's IP ranges on the mail server if the connection keeps dropping.
Gmail is the same shape through Google's consent screen, and it is no longer optional. Google stopped supporting third-party sign-ins that use only a username and password on 30 September 2024, so any Freshdesk-Gmail connection still built on basic auth stopped working then. If you inherited an older account, check the email channel for a basic-auth warning and re-authorize with Sign in with Google.
If neither provider fits, the Custom option takes any IMAP/SMTP mailbox. Freshworks' current article gives the settings:
| Service | Host | SMTP port | IMAP port | Security |
|---|---|---|---|---|
| Outlook / Microsoft 365 | smtp.office365.com | 587 | 993 | SSL |
| Gmail | smtp.gmail.com | 587 | 993 | SSL |
| Yahoo Mail | smtp.mail.yahoo.com | 587 | 993 | SSL |
| Namecheap Private Email | mail.privateemail.com | 587 | 143 | SSL |
Can you connect a Microsoft 365 shared mailbox to Freshdesk?
Microsoft 365 Shared Mailbox support is the most-read email thread in the Freshworks community, at about 5,900 views. The reason it stays unresolved isn't a Freshdesk gap. It's how Microsoft builds shared mailboxes.
From Microsoft's own About shared mailboxes in Microsoft 365 article:
- "A shared mailbox isn't intended for direct sign-in by using its associated user account. Always block sign-in for the shared mailbox account and keep it blocked."
- "Every shared mailbox has a corresponding user account with a system-generated password that isn't known or intended for use."
- Email sent from a shared mailbox can't be encrypted, "because the mailbox doesn't have its own security context (username and password)."
An OAuth connection asks you to sign in as the mailbox. Microsoft's position is that you should never be able to. That is the whole conflict, and no amount of clicking Sign in will resolve it, which is why the thread runs on.
Three routes that do work, in order of how much we'd recommend them:
- Forward from the shared mailbox to a Freshdesk address. A shared mailbox can hold a forwarding rule without anyone signing in. This is the supported, boring answer, and it costs you outbound identity: replies leave through Freshdesk, so your SPF and DKIM records have to be right. Ours is Freshdesk SPF, DKIM and custom mailbox setup.
- Use a licensed user mailbox as the support address and give the team Full Access to it in Exchange. You lose the shared-mailbox licensing benefit, which Microsoft sets at 50 GB without a license and 100 GB with Exchange Online Plan 2, and you gain a mailbox that can sign in.
- Convert the workflow to a Microsoft 365 group, which Microsoft recommends anyway if more people need access: a shared mailbox supports a maximum of 25 users. Then forward from the group.
We could not find a Freshworks article that states plainly whether a Microsoft 365 shared mailbox is supported over OAuth, in either direction. We're not going to fill that gap with a guess. What we can say is what Microsoft documents about its own product, and that the forwarding route is documented by both vendors.
Worth naming the incentive at work here, because it shapes every help desk's email story. Microsoft prices shared mailboxes at zero because they hold no license and no sign-in, and the moment you need one to authenticate you're buying a license. Freshdesk, meanwhile, counts mailboxes per plan. Neither vendor is being difficult; both are pricing the thing you actually want, which is an address that several people use and a system can authenticate as.
Why does Freshdesk ask you to reauthorize the mailbox?
This is the second-largest thread in the cluster, Reauthorization required for Microsoft Office 365 OAuth mailbox, Refresh Token expired, at about 3,300 views. Freshworks' Reauthorization of custom mailbox article, modified 11 June 2026, documents what happens.
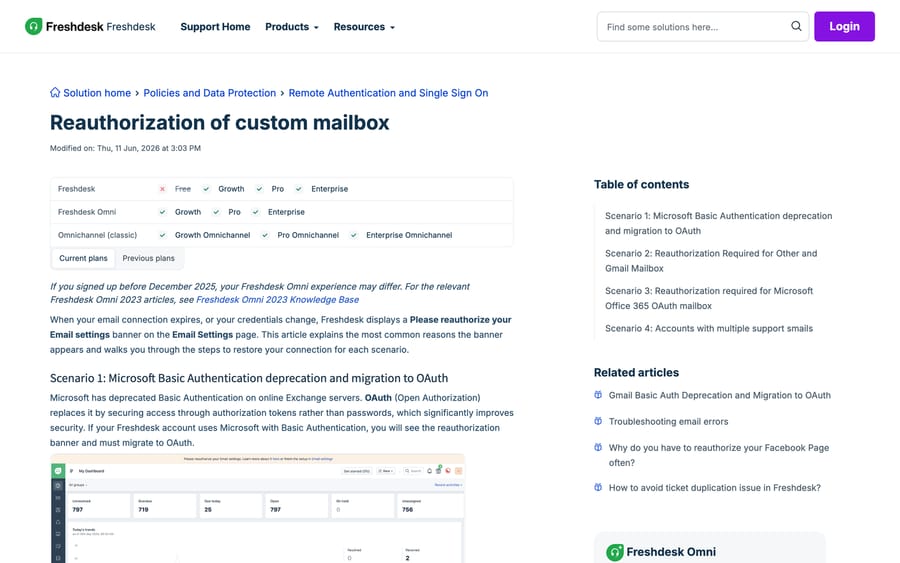
What triggers it: an expired OAuth token, a password change on the account, account inactivity, caching conflicts, or Microsoft's ongoing removal of basic authentication on Exchange.
What you see:
- A "Please reauthorize your Email settings" banner on the Email Settings page.
- Outgoing emails failing with an "Unexpected error" message.
- The mailbox marked as disconnected after 8 automatic retry attempts over about 12 minutes.
How to fix it: Admin > Channels > Email, select the email, then Re-authorize (or the edit icon, then Sign in with Microsoft). It's the same sign-in you did at setup.
Three operational notes that the docs don't spell out but follow from them:
- Twelve minutes is the whole window. Between a token dying and the mailbox being marked disconnected, Freshdesk retries eight times over roughly 12 minutes. Nobody is watching the Email Settings page during those twelve minutes, so the practical detection mechanism is a customer telling you.
- The banner lives on a page admins rarely open. Put a calendar reminder to check Admin > Channels > Email once a month, or add the support address to whatever uptime monitoring you already run by sending it a test message and alerting if no ticket appears.
- Reauthorization is a plan-gated feature. Freshworks lists the article for the Growth, Pro and Enterprise plans only. The Freshdesk pricing page no longer shows a free plan; the separate Free program covers up to 2 agents for 6 months.
Freshworks doesn't publish how long a refresh token lasts before it expires, and we're not going to invent a number. Treat the failure as a when rather than an if, and build the detection.
If mail has already stopped, the wider diagnostic tree is in Freshdesk email not working, and the deliverability side is in Freshdesk emails going to spam.
What should you verify before going live?
Connecting the mailbox is half the job. Publish the DKIM records Freshdesk generates for your sending domain, and check SPF. A native OAuth mailbox sends from your real address and will usually be fine; a forwarding setup sends on your behalf and gets filtered without SPF and DKIM in place. Freshdesk's very long SPF record has its own well-known problems on domains that already carry several senders, which the forum's 9,400-view SPF thread is entirely about. The full channel configuration is in how to configure email in Freshdesk.
How was this checked?
We checked every admin path, symptom, port and plan gate against Freshworks' own current support articles in a browser on 20 September 2026, and against Microsoft Learn for the shared-mailbox rules, capturing two screenshots in that session, and re-checked the reauthorization article and Microsoft's shared-mailbox rules on 24 September 2026; the Email Servers screenshot is carried over from the previous version of this page. Community view counts come from our crawl of community.freshworks.com, where the email clusters hold 172 threads and about 83,700 views between them. We don't run a Freshdesk account or a Microsoft 365 tenant, so no mailbox here was connected or reauthorized. Two things we could not establish and therefore do not claim: how long a Freshdesk OAuth refresh token lasts, and whether Freshworks formally supports a Microsoft 365 shared mailbox over OAuth.
Where does an AI agent layer fit once mail arrives?
Email configuration is plumbing, and plumbing either works or it doesn't. An AI layer has nothing to add to a token refresh.
What it does change is what happens to the mail once it arrives. Macha runs on top of the Freshdesk your mailbox feeds: it reads the ticket, drafts or posts a reply grounded in your knowledge base, triages by intent so it reaches the right group, and calls your own systems through a custom API tool when the answer needs a lookup. It doesn't replace Freshdesk, its email channel or its automations, and it isn't a help desk. The connector is for Freshdesk specifically, not Freshchat, Freshservice or Freshcaller. Across help desks, Macha runs on Zendesk, Freshdesk, Gorgias, Front, HubSpot or Intercom.
It suits teams whose inbox is mostly repeat questions with a lookup attached. It's the wrong fit if your email volume is low, or if the mail arriving is mostly internal, since there's nothing repetitive for it to learn. Pricing is one plan on monthly ticket volume, from $299/month for 750 tickets, about $0.40 per ticket at every tier, with setup and monitoring by the Macha team, included on every plan. A ticket is one thread between Macha and one person, charged once no matter how many messages it takes. The trial is $50 of free usage (about 125 tickets), no credit card, no time limit. See Macha on Freshdesk and the pricing page.
Frequently asked questions
How do I connect Office 365 to Freshdesk? Admin > Channels > Support Email > New Support Email, choose Microsoft Office 365 as the mail server, pick incoming, outgoing or both, then click Sign in and complete Microsoft's OAuth consent for read, write and send access on that mailbox.
Can I connect a Microsoft 365 shared mailbox to Freshdesk? Not through a straightforward OAuth sign-in, because Microsoft states that a shared mailbox isn't intended for direct sign-in and that its account's sign-in should always be blocked. The working routes are forwarding from the shared mailbox to a Freshdesk address, using a licensed user mailbox with Full Access granted to the team, or moving to a Microsoft 365 group and forwarding from that.
Why does Freshdesk keep asking me to reauthorize my mailbox? The OAuth token has expired or been invalidated, usually by a password change, account inactivity, or Microsoft's removal of basic authentication. Freshdesk shows a "Please reauthorize your Email settings" banner, outgoing mail fails with an "Unexpected error", and the mailbox is marked disconnected after 8 retries over about 12 minutes.
How do I reauthorize a Freshdesk mailbox? Admin > Channels > Email, select the affected email, and click Re-authorize, or use the edit icon and Sign in with Microsoft. It's the same sign-in flow you used at setup, and it needs the Growth, Pro or Enterprise plan.
How long does a Freshdesk OAuth token last? Freshworks doesn't publish a refresh-token lifetime, and we found no figure we'd be willing to quote. Plan for the connection to need reauthorizing at some point and put a monthly check or an inbound-mail monitor in place so you find out before a customer does.
Should I use forwarding or a native mailbox with Freshdesk? Native OAuth if your support address is a normal licensed mailbox, because replies leave from the real address and threading behaves. Forwarding if it's a shared mailbox or a distribution group, or if your security team won't allow a third-party OAuth token, accepting that outbound deliverability then rests on your SPF and DKIM records.
What are the IMAP and SMTP settings for Freshdesk? For Microsoft 365, smtp.office365.com on port 587 and IMAP on 993 over SSL. Gmail uses smtp.gmail.com on the same ports. Freshworks also lists Yahoo on 587 and 993, and Namecheap Private Email on 587 and 143.
Does the Gmail connection still work with a username and password? No. Google stopped supporting third-party sign-ins that use only a username and password on 30 September 2024, so any older basic-auth connection stopped creating tickets and sending replies. Re-authorize it with Sign in with Google.
Sources:
- Using custom email servers to send and receive support emails (Freshworks support, modified 21 Jan 2026)
- Reauthorization of custom mailbox (Freshworks support, modified 11 Jun 2026)
- Troubleshooting email errors (Freshworks support)
- About shared mailboxes in Microsoft 365 (Microsoft Learn)
- Freshdesk plans and pricing
- Community: Microsoft 365 Shared Mailbox support
- Community: Reauthorization required for Microsoft Office 365 OAuth mailbox, Refresh Token expired
- Community: Error when using Microsoft 365 and sending response emails from Freshdesk