How to Create a Macro in Zendesk (Step by Step)


If your agents keep retyping the same "Here's how to reset your password" reply — or copy-pasting it from a Google Doc and forgetting to set the status afterward — a macro is the fix. A Zendesk macro is a saved, one-click bundle of a prepared reply plus the ticket changes that always go with it (set status, add a tag, route to a group). This guide walks through exactly how to create one, step by step, from the Admin Center path to how an agent actually applies it on a ticket.

This is the hands-on companion to our concepts guide, what Zendesk macros are and what they can do. If you just want to understand macros (personal vs. shared, placeholders, macros vs. triggers), start there. If you're ready to build one, you're in the right place. Every step below is verified against Zendesk's own documentation; Zendesk does revise its UI periodically, so confirm labels in your own account.
Before you start: who can create a macro?
Two things determine what you can build, so check these first:
- Shared macros (available to a team or the whole account) are created by admins, and by agents in custom roles that have been granted macro permission. These are the official, sanctioned responses everyone is meant to use.
- Personal macros (visible only to you, though admins can see them) can be created by any agent for their own use.
So if you're an admin, you can do everything below. If you're a regular agent, you can still create a personal macro for yourself — the steps are identical except for the availability setting in Step 5. If you need a shared macro but don't have the option, ask an admin to grant your role permission or to create it for you.
The rest of this guide assumes you want a shared macro, since that's the common case. We'll flag where a personal macro differs.
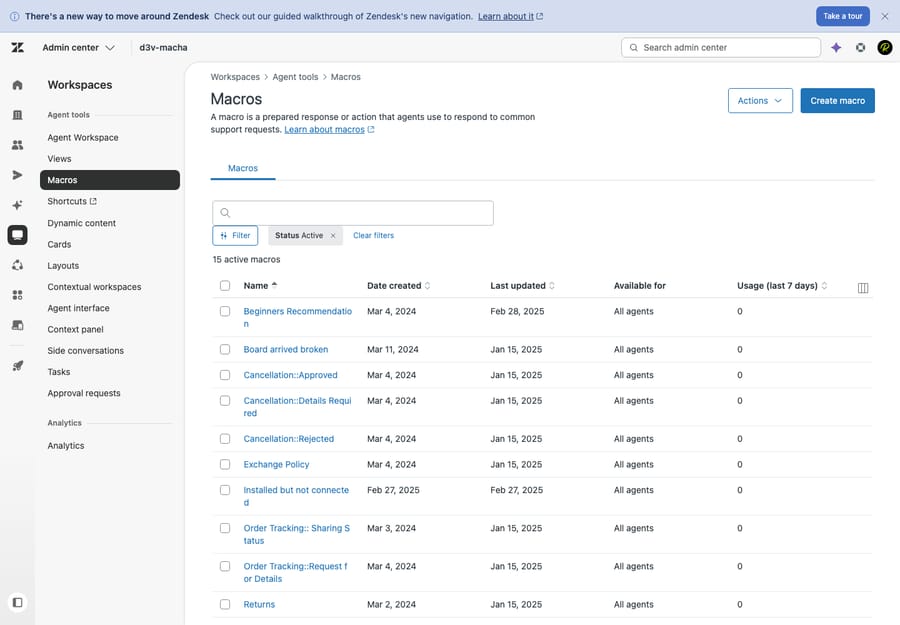
Step 1 — Open the Macros admin page
Macros live in the Admin Center, not in a ticket. To get there:
- In the top toolbar, click the Zendesk Products icon (the four-dot grid) and choose Admin Center.
- In the left sidebar, click Workspaces.
- Click Agent tools, then Macros.
The full path is Admin Center → Workspaces → Agent tools → Macros. This page lists every shared macro on the account — and, importantly, it's also where you'll edit, clone, reorder, and track usage later (Step 8).
Step 2 — Click Add macro
On the Macros page, click the Add macro button in the top-right corner. (Some accounts label this Create macro — same thing.) This opens the macro editor, where you'll name it, define what it does, and decide who can use it. Nothing is saved until you finish and click Create in Step 6, so feel free to explore.
Step 3 — Name it (and use the :: category convention)
Give the macro a clear name in the Macro name field. There's also an optional Description — use it to note when the macro should be applied, which helps the whole team apply macros consistently.
Here's the single most useful trick in this guide, and Zendesk barely advertises it: use double colons (::) in the name to create categories. Zendesk reads :: as a folder separator and automatically nests your macros for agents. So instead of Refund approved, name it:
Billing::Refunds::Refund approvedAgents then see a clickable Billing folder → Refunds subfolder → the Refund approved macro, exactly like folders on your computer. You can nest as many levels as you need (Account::Password reset, Shipping::Delay apology). A flat list is unsearchable; a tidy tree is a menu — so adopt the convention from your very first macro, because retrofitting categories onto hundreds of flat-named macros later is miserable.
Step 4 — Add the actions
Actions are what the macro does. Click Add action, pick an action type from the dropdown, and set its value. Add as many as you need — a good macro bundles the reply and every field change that normally goes with it, so the agent never forgets to tag or re-status the ticket. The actions a macro can perform:
- Comment / description — insert the canned text. You choose public reply (sent to the customer) or internal note (visible only to agents). This is the most common action by far. Tip: macros support placeholders like
{{ticket.requester.first_name}}, so a canned reply can still greet the customer by name — see the concepts guide for the full list. - Status — move the ticket to Open, Pending, Solved, etc. A "reply + set Solved" macro is a staple.
- Priority and Type — set urgency (Low/Normal/High/Urgent) or classify it (Question/Incident/Problem/Task).
- Tags — add, remove, or set tags (e.g.
refund_requested). This is powerful because a tag a macro adds can in turn fire a trigger. - Assignee and Group — reassign the ticket to a specific agent or hand it to another team (e.g. route to the Billing group).
- Ticket fields — set your own custom fields (product line, plan tier, issue category).
- Subject, followers, attachments, and side conversations — the longer tail for tidying up or looping people in.
A realistic example: a Billing::Refunds::Refund approved macro might combine a public reply confirming the refund + Status: Solved + add tag refund_approved + Type: Question — a four-step manual update collapsed into one click, done identically by every agent. One decision to make deliberately here is public reply vs. internal note: build the comment as the wrong type and private remarks can reach customers.
Step 5 — Set who can use it (availability)
Set the Available for dropdown to control the macro's scope. There are three options:
- All agents — a shared macro everyone on the account can use. This is the usual choice for a sanctioned, team-wide response.
- Agents in group — a shared macro limited to a specific group (e.g. only the Billing team sees it). This option requires a Suite Growth / Support Professional plan or higher.
- Me only — a personal macro, private to you (though admins can still see it). Choose this if you're an agent building a shortcut just for yourself.
This single setting is the difference between a personal and a shared macro. "All agents" and "Agents in group" are shared; "Me only" is personal.
Step 6 — Save the macro
Click Create (or Save). Your macro is now live and immediately available to the agents you scoped it to — there's no separate publish step. If you don't see it apply correctly on a test ticket, reopen it and re-check the actions and availability.
Step 7 — How agents apply the macro on a ticket
A macro never runs on its own — that's the defining trait of a macro. An agent applies it manually while working a ticket. Here's how, in the Agent Workspace:
- Open a ticket and click Apply macro in the bottom toolbar.
- Start typing the macro's name to filter the list (this is where your
::categories pay off — typeBillingto narrow instantly). Your roughly seven most-used macros from the past week also surface at the top. - Select the macro. Its actions populate the ticket — the reply text drops into the comment box, and the field changes are staged.
- Review, then submit the ticket. Important: applying a macro does not save anything until you submit the update, so the agent can tweak the wording first.
There's also a shortcut: with Agent Workspace active, an agent can type a slash (/) in the comment box to pull up the macro list inline. Agents can apply more than one macro to the same ticket before submitting.
Step 8 — Edit, clone, reorder, and track usage
Back on the Admin Center → Workspaces → Agent tools → Macros page, select a macro's checkbox to reveal an action bar that lets you:
- Edit — change the text, actions, or availability anytime.
- Clone — duplicate a macro as a starting point for a similar one (the fastest way to build a family of related macros).
- Deactivate — turn a macro off without deleting it.
- Reorder — change a macro's position in the list.
- Track usage — on Suite Growth / Support Professional and up, you can sort by usage (last week/month/year). This is how you find dead macros to prune and spot the workhorses worth refining.
Cloning is what makes a real library cheap to build: create one solid macro, clone it, and tweak the copy rather than starting from scratch each time.
Best practices and common mistakes
A few habits keep a macro library healthy — and their opposites are the mistakes that quietly wreck one:
- Name with
::from day one, not "later." A flat list with no categories becomes an unsearchable wall agents ignore. - Bundle the field changes, not just the text. A reply-only macro that leaves the agent to set status and tags manually defeats half the point.
- Keep the library tight. A focused set of well-maintained shared macros beats hundreds of near-duplicates — if two do nearly the same thing, merge them. Watch for macro sprawl: every agent creating overlapping personal macros that should be one shared one.
- Use the description field with a one-line "use when…" so agents apply the right macro, and prune by usage on a schedule so stale text (last year's pricing, a deprecated process) doesn't rot in the menu.
- Don't expect a macro to run itself. Macros are manual by design. If you want something to happen automatically when a ticket arrives, you want a trigger (event-based) or an automation (time-based) — see automations vs. triggers.
Where AI goes beyond the macro menu
Macros are a brilliant manual shortcut, but notice the ceiling: an agent still has to read each ticket, decide which macro fits, find it in the menu, and apply it. With a dozen macros that's fine. With a few hundred, "which macro do I use here?" becomes its own slow, error-prone task — and the macro only ever inserts the text you wrote, regardless of the specifics of the customer's question.
That's the gap an AI agent layer like Macha fills. Macha isn't a help desk and it's not a Zendesk replacement — it runs on top of your existing Zendesk. Instead of an agent hunting for the right macro, Macha reads the ticket and the customer's actual question, pulls from your knowledge base and past tickets, and drafts a context-aware reply — while still handling the field updates a macro would, like tagging, setting status, and routing. Where a macro inserts one fixed paragraph, the AI composes a response to this customer's specific issue, and escalates anything it can't confidently handle to a human with full context attached.
The honest framing: it's another integration to set up, and it's only as good as the knowledge you connect to it. On cost, Macha bills per AI action — any automated step it takes, whether drafting a reply, tagging, routing, or resolving — not per closed ticket, because most automation isn't a "resolution," it's work done along the way. If your team's bottleneck is the volume of repetitive replies rather than typing speed, that's the line where macros stop scaling. You can try it free — 7-day free trial, no credit card required.
Frequently asked questions
Where do I create a macro in Zendesk? In the Admin Center, not in a ticket. Go to Admin Center → Workspaces → Agent tools → Macros, then click Add macro (labeled Create macro in some accounts). Name it, add actions, set who it's available for, and click Create.
Who can create macros in Zendesk? Admins can create shared macros, as can agents whose custom role has been granted macro permission. Any agent can create a personal macro for their own use by setting availability to "Me only." If you don't see the option for a shared macro, ask an admin to grant the permission.
How do I create a personal macro vs. a shared one? The steps are identical except for Step 5. In the Available for dropdown, choose Me only for a personal macro, or All agents / Agents in group for a shared one. ("Agents in group" requires a Suite Growth / Support Professional plan or higher.)
How do agents apply a macro to a ticket? In a ticket, the agent clicks Apply macro in the bottom toolbar and starts typing to filter the list (or types / in the comment box). Selecting a macro stages its reply and field changes; nothing is saved until the agent submits the ticket, so they can edit first.
Can I organize Zendesk macros into folders? Yes — use double colons in the name. Zendesk reads :: as a category separator, so naming a macro Billing::Refunds::Refund approved automatically nests it under a Billing → Refunds folder in the agent's macro menu. No separate category tool needed.
Can I edit, clone, or delete a macro after creating it? Yes. On the Macros admin page, select a macro's checkbox to Edit, Clone, Deactivate, or reorder it. On Suite Growth / Support Professional plans and up, you can also sort macros by usage to find and prune the ones nobody uses.
The bottom line
Creating a macro in Zendesk is quick: open Admin Center → Workspaces → Agent tools → Macros, click Add macro, name it with the :: category convention, add the reply and the field changes that go with it, choose who can use it, and save. From there, agents apply it in one click via Apply macro on any ticket, and you maintain the library by editing, cloning, and pruning by usage. Just remember the golden rule: macros are manual. The moment you want something to happen on its own, you've crossed into triggers and automations. For the deeper concepts behind everything here — placeholders, personal vs. shared, and how macros fit the rest of Zendesk — see what Zendesk macros are.
Macro creation steps verified against Zendesk's official documentation, June 2026. Zendesk updates its product periodically — confirm labels in your own account before relying on them.


