 Zendesk
 Freshdesk
 Gorgias
 Front
Front Shopify
 Stripe
 Slack
Slack Notion
 Google Workspace
 Confluence
How to Customize Your Zendesk Help Center Theme (Step by Step)


A default Zendesk Help Center is perfectly functional — and perfectly generic. It looks like every other Help Center that ships with the Copenhagen theme: same layout, same fonts, same placeholder logo. If you want it to look like your brand instead of a stock template, you're looking for Zendesk help center customization — changing the theme. This guide walks through it step by step, from the no-code Theme Editor (logo, colors, fonts) all the way to editing the underlying templates, CSS, and JavaScript, then previewing and going live.

One scoping note before we start: this post is about customizing how your Help Center looks. If you still need to create the actual content — categories, sections, and articles — that's a different job, covered in our companion guide on how to build a Zendesk knowledge base. For the conceptual background on what a theme even is, see Zendesk Help Center themes explained. Every step below is verified against Zendesk's own documentation; Zendesk revises its UI periodically, so confirm labels in your own account.
Before you start: access, roles, and plans
A few things determine whether you can even open the theme editor:
- You need admin-level access to Guide. Theme management belongs to the Knowledge admin role — what Zendesk historically called a Guide manager (or Guide admin). If you're a regular agent, you won't see the customization tools. Terminology has shifted over the years, so the role label in your account may read "Knowledge admin."
- Your plan needs to include it. Help Center theming ships with the Zendesk Suite (Team, Growth, Professional, Enterprise, and Enterprise Plus) and with standalone Guide/Knowledge Professional and Enterprise. Some Zendesk docs phrase the requirement as "Knowledge Professional or Enterprise," so if you're on a lighter plan, confirm the Customize design tool is available before you plan a big redesign.
- A working Help Center. Guide has to be enabled and your Help Center activated. If it isn't yet, start with building the knowledge base first — there's no point theming an empty shell.
Where Help Center theming actually lives
This trips people up, because Zendesk's admin tools are split across two places. Most account-wide configuration lives in Admin Center. But Help Center theming does not — it lives inside Guide (now branded Knowledge admin). If you go hunting through Admin Center for a "theme editor," you won't find one; Admin Center routes you over to Guide for anything to do with the look of your Help Center.
The exact path is: open Knowledge admin, then click the Customize design icon (a paintbrush/palette) in the sidebar. That opens the Themes page — the home base for everything in this guide. From there you can edit branding, edit code, preview, switch the live theme, and import new ones.

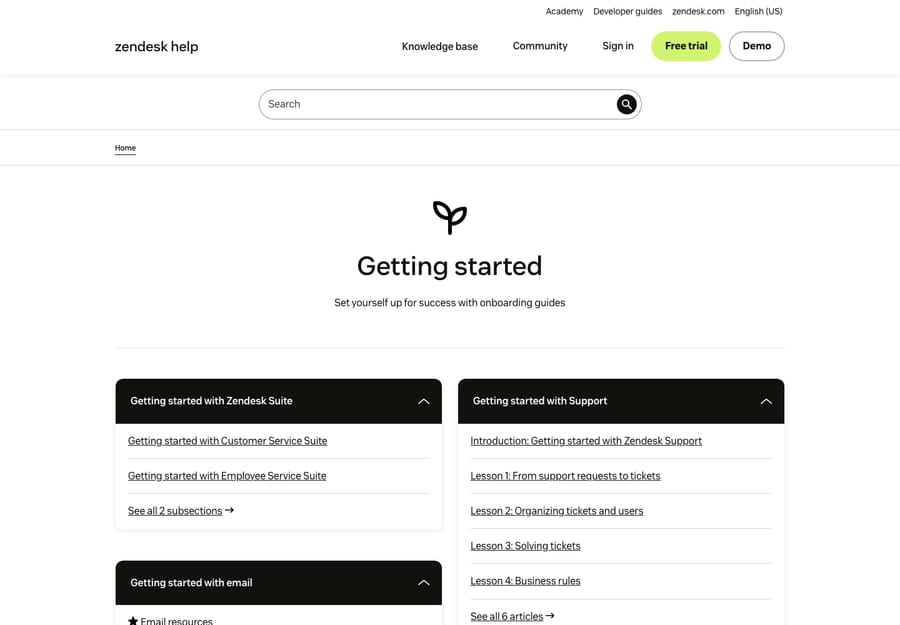
The screenshot above is a real, published Zendesk Help Center — the live output of a theme, which is exactly what your customers see. (A quick, honest note on visuals: the Guide theme admin editor on our test instance sits behind bot/human verification and can't be captured cleanly, so the Theme Editor and code editor below are described accurately from Zendesk's official docs rather than shown as a fabricated screenshot. The two images in this post are genuine public-facing Help Center pages — the result of a theme, not the editor.)
The Copenhagen theme (your starting point)
Every Help Center starts on the standard theme, which is Copenhagen — Zendesk's default theme, built for mobile responsiveness and accessibility out of the box. Copenhagen is also open-source; the full code lives on Zendesk's GitHub, which is handy if a developer wants to fork it as a clean starting point.
One important catch: the moment you edit the standard Copenhagen theme in the editor, Zendesk saves it as a custom theme. Custom themes are not automatically updated when Zendesk ships new Copenhagen features, and they aren't covered by Zendesk support the way the untouched standard theme is. That's not a reason to avoid customizing — it's a reason to keep a clean copy of the standard theme around and to budget for the occasional manual update.
Two ways to customize: the Theme Editor vs. the code
There are two distinct modes of Zendesk help center customization, and knowing which one you need saves a lot of time:
| Approach | Best for | Skills needed | What you change |
|---|---|---|---|
| Theme Editor (no-code) | Branding a stock theme to match your company | None | Logo, favicon, colors, fonts, brand name, default images, settings-panel options |
| Editing code | Custom layouts, new components, deep restructuring | HTML/Curlybars, CSS, JS | Page templates, style.css, script.js, the manifest |
Most teams only ever need the first one. You reach for code when the Settings panel can't express what you want — a different homepage layout, a custom block, a restructured article page. The steps below cover both, in order.
Step 1 — Open Customize design and choose your theme
In Knowledge admin, click Customize design in the sidebar to open the Themes page. You'll see your current themes, with the live one marked. To start customizing, click Customize on the theme you want to edit — usually Copenhagen to begin with. This opens the Theme Editor.
If you'd rather not edit your live theme directly (a good habit), duplicate it first from the theme's options menu, then customize the copy. That way your live Help Center stays untouched until you deliberately publish.
Step 2 — Customize branding in the Theme Editor (no code)
This is where most of the visible win happens, and none of it requires writing code. Inside the Theme Editor, the Settings panel on the left holds your branding controls. Click into each group:
- Brand — set your brand name and the high-level identity text that appears in the theme.
- Logo — upload your logo and favicon, plus any default/fallback images the theme uses (for example, the placeholder image for content blocks or article headers).
- Colors — set the primary brand color, text colors, background, and link/accent colors. The preview updates as you change them, so you can eyeball contrast immediately.
- Fonts — choose your heading and body fonts from the available options to match your site's typography.
- Other settings — depending on the theme, the panel may expose homepage layout toggles, the search bar's appearance, and which page elements show. These vary by theme because they're defined in the theme's manifest file.
As you adjust each setting, the changes appear automatically in the editor's preview pane. Branding edits are deliberately constrained — you can only change what the theme's author exposed as a setting — which is exactly why they're safe: you can't break the layout by picking a new brand color. Click Save when you're happy.
If the Settings panel doesn't offer a control you need — say, you want to move the search bar or add a section to the homepage — that's your cue to move to code.
Step 3 — Edit the code (templates, CSS, JS)
For anything the Settings panel can't do, open Edit code from the theme's options. This exposes the theme's full source: the page templates, the stylesheet (style.css), the script (script.js), assets, and the manifest. This is the part that genuinely requires a developer.
Zendesk Help Center templates are written in a templating language called Curlybars. Curlybars implements a large subset of Handlebars, with one key difference: it renders server-side rather than in the browser. You use Curlybars expressions — placeholders wrapped in double curly braces — to pull Help Center data such as article titles, category lists, breadcrumbs, and search results into the HTML.
Each page type has its own template. The ones you'll touch most often:
home_page— the Help Center landing page (search bar, category tiles, promoted content).category_page— a single category listing its sections.section_page— a single section listing its articles.article_page— the article reading view.search_results— the unified search results page.new_request_page— the request (ticket submission) form, if your Help Center accepts tickets.
(If you've read older guides referring to a "page finder" template, that's not a stock Zendesk template name — the real building blocks are the page templates above.) Alongside the templates, style.css controls all visual styling and script.js adds client-side behavior. After any code change, click Save. For the full reference, Zendesk maintains a help center templating cookbook with worked examples.
A practical caution: editing code on your live theme is risky because mistakes show up immediately to customers. Work on a duplicate, or better, in a sandbox, and publish only once it's tested.
Step 4 — Preview before you publish
Whether you changed branding or code, preview before going live. In the Theme Editor, click Preview to see your changes rendered across the different page templates, and use the preview-role options to check how the Help Center looks to different audiences (for example, an anonymous visitor vs. a signed-in user).
Know the limit, though: Zendesk states plainly that preview "is intended to show look-and-feel changes, but it is not intended for end-to-end testing of interactive theme functionality." In other words, preview confirms it looks right — it doesn't guarantee every interactive feature works. For real functional testing (forms submitting, JavaScript behaving), use a sandbox environment.
The category page above is, again, the live published result — the kind of page your category_page template produces once a theme is set live. Comparing your preview against pages like this is the quickest way to catch layout problems before customers do.
Step 5 — Set your theme live (only one at a time)
Your Help Center has exactly one live theme at any moment. All your customizing happens on draft/non-live themes until you deliberately promote one. When you're ready, go back to Customize design, open the options menu for the theme you want, and click Set as live theme. The theme moves to the top of the page and immediately applies to your public Help Center.
Because the switch is instant, do your final review first. And because you can keep multiple themes (more on that below), the safe pattern is: keep the current theme live, build and preview the new one separately, then flip the new one live in a single click — with the old one still sitting there as an instant rollback if something looks wrong.
Step 6 — Import or buy a third-party theme
You don't have to build from Copenhagen. You can install a ready-made theme — free or paid — from the Zendesk Marketplace, where themes from Zendesk and third-party developers offer a trial and a Buy now option, then Add to theme library. Or you can import a theme ZIP directly:
- In Knowledge admin, click Customize design.
- On the Themes page, click Add theme in the upper-right corner.
- Click Import theme and select your ZIP archive (the file name must be 30 characters or fewer). You can also drag and drop the ZIP onto the Themes page.
The ZIP contains the theme's templates, CSS, JavaScript, and assets. Once imported, it appears on your Themes page like any other theme — customize it, preview it, and set it live the same way. Note the ceiling: you can hold a maximum of 10 themes total per Help Center, so prune old experiments. This same import flow is how developers work on a theme locally and push it up.
Multiple brands mean multiple help centers
If your Zendesk account runs multiple brands, each brand gets its own Help Center — and therefore its own theme and its own live theme. Customizing one brand's Help Center doesn't touch the others. So a redesign in a multi-brand account is a per-brand job: switch to the brand's Help Center, open its Customize design, and theme it independently. Plan for that repetition up front rather than discovering it mid-project. (For how brands and Help Centers relate conceptually, see Zendesk Help Center explained.)
Responsiveness and accessibility tips
Copenhagen is responsive and accessible by default — but the moment you start editing code, you own those qualities. A few things to protect:
- Don't break mobile. Test every layout change at phone and tablet widths in preview. Custom CSS that looks great on a desktop monitor can collapse on a 375px screen.
- Keep color contrast accessible. When you pick brand colors, make sure text still meets WCAG contrast ratios against its background — branded but unreadable is a net loss.
- Preserve keyboard and screen-reader support. If you add custom components, keep semantic HTML, alt text on images, and visible focus states. Copenhagen does this well; custom code is where it tends to regress.
- Re-test after Copenhagen updates. Because a customized theme won't auto-update, periodically diff it against the latest Copenhagen on GitHub to pick up accessibility and feature fixes you'd otherwise miss.
Where AI fits in
Here's the honest limit of any theming project: a beautiful Help Center is still a self-service experience. Customers have to find it, land on the right article, and read it. Even a gorgeous, perfectly branded theme doesn't change the hardest part — that a lot of people won't search, won't read, or won't find the one article that answers their question. Theming improves the shelf; it doesn't guarantee anyone takes the book down.
That's the gap an AI agent like Macha fills. Macha isn't a help desk and it isn't a replacement for Zendesk Guide — it runs on top of your existing Zendesk and reads from the same Guide content you just themed. Instead of relying on a customer to browse to the right page, an AI agent on Zendesk surfaces and answers from that knowledge base directly in the conversation — turning passive self-serve articles into active, in-thread answers, and escalating to a human (with context) when it isn't confident. The cleaner and more complete your Guide knowledge base is, the better that AI layer performs, because it's drawing from the same well.
The honest framing: it's another integration to set up, and it's only as good as the content you point it at. On cost, Macha bills per AI action — any automated step it takes, like drafting an answer, tagging, or routing — not per resolution, because most useful automation isn't a tidy "resolution." If your themed Help Center is getting traffic but ticket volume isn't dropping, that's the signal the content needs an active layer on top, not just a nicer coat of paint. You can try it free — 7-day free trial, no credit card required.
Frequently asked questions
Where do I customize my Zendesk Help Center theme? In Knowledge admin (Guide), click the Customize design icon in the sidebar to open the Themes page, then click Customize on a theme. Theming lives in Guide, not in Admin Center — Admin Center routes you there for anything about your Help Center's look. You need an admin (Knowledge admin / Guide manager) role.
What is the Copenhagen theme? Copenhagen is Zendesk's default standard theme — responsive and accessible out of the box, and open-source on GitHub. Every Help Center starts on it. When you edit it in the Theme Editor, Zendesk saves your version as a custom theme, which won't auto-update with future Copenhagen releases.
Can I customize Zendesk without coding? Yes. The Theme Editor's Settings panel lets you change the logo, favicon, colors, fonts, brand name, and default images with no code. You only need code (HTML/Curlybars templates, style.css, script.js) for layout or component changes the Settings panel doesn't expose.
What templating language does Zendesk use? Curlybars — a large, server-side-rendered subset of Handlebars. You use Curlybars expressions (placeholders wrapped in double curly braces) to pull Help Center data into page templates like home_page, category_page, section_page, and article_page.
How many themes can I have, and how many can be live? You can store up to 10 themes per Help Center, but only one can be live at a time. Switch the live theme from a theme's options menu via Set as live theme — it applies instantly, which makes the previous theme a one-click rollback.
Can I use a third-party Zendesk theme? Yes. Install free or paid themes from the Zendesk Marketplace, or import your own ZIP via Customize design → Add theme → Import theme (file name ≤ 30 characters). Imported themes behave like any other theme.
Do multiple brands share one theme? No. Each brand has its own Help Center and its own live theme, so a multi-brand redesign means theming each brand's Help Center separately.
The bottom line
Zendesk help center customization is a clear sequence: open Knowledge admin → Customize design, pick a theme, brand it in the Theme Editor (logo, colors, fonts — no code) or edit the code (Curlybars templates, style.css, script.js) for deeper changes, preview across templates and roles, then Set as live theme — remembering you get exactly one live theme at a time and can hold up to ten, including imported or Marketplace themes. Keep the standard Copenhagen theme clean as a fallback, protect responsiveness and accessibility whenever you touch code, and theme each brand's Help Center separately. And remember the ceiling of any redesign: a polished theme makes self-service look better, but it's the content underneath — and increasingly an AI agent that answers from it — that actually deflects tickets. For the concepts behind all this, see Zendesk Help Center themes explained; to build the content you're theming, see how to build a Zendesk knowledge base.
Customization steps verified against Zendesk's official documentation, June 2026. Zendesk updates its product periodically — confirm labels in your own account before relying on them.


