





 Shopify
 Stripe
 Slack
Slack Notion
 Google Workspace
 Confluence

How Do You Set Up Tags and Auto-Tagging in Gorgias? (2026)


Gorgias tags decide which View a ticket lands in, which Rule fires next and what shows up in your reporting. Here is how to design a taxonomy, create the tags, auto-apply them with Rules and turn them into Views.
Key takeaways
- Setting up tags in Gorgias starts under Settings, Productivity, Tags, where only Admins and Lead agents can create, edit or delete them, though any agent can apply an existing tag.
- Gorgias tag names are case-sensitive according to its API reference, so wismo and WISMO register as two separate tags and a single casing convention prevents duplicates.
- A Gorgias auto-tag Rule uses a WHEN/IF/THEN structure, and its Add tags action keeps existing tags while Reset tags replaces all of them with the ones specified.
- Gorgias AI Agent tagging needs an active AI Agent subscription and only fills tags on tickets the AI Agent handles, with interactions past the bundle billed at $1.50 each.
- Macha classifies Gorgias tickets by intent on top of existing tags and Rules, billing per ticket from $299 a month for up to 750 tickets rather than per resolution.

To set up tags in Gorgias, an Admin or Lead agent creates them under Settings → Productivity → Tags, then a Rule with a WHEN / IF / THEN shape and an Add tags action applies them automatically, and a View filtered on the tag turns each one into a queue. Tag names are case-sensitive, so wismo and WISMO are two different tags.
| Step | Where in Gorgias | Who can do it |
|---|---|---|
| 1. Design the taxonomy | On paper, before any setting | Whoever owns the taxonomy |
| 2. Create tags | Settings → Productivity → Tags | Admins and Lead agents |
| 3. Auto-tag with a Rule | Workflows → Tools → Rules, action Add tags | Owner, Admins and Leads |
| 4. Build tag-based Views | Views, filtered on the tag | Depends on role |
| Optional: AI ticket tagging | AI Agent settings | Needs an active AI Agent subscription |
What do tags actually control in Gorgias?
A tag in Gorgias is a label you attach to a ticket, and its real value is that other parts of the platform can read it. Once a ticket carries a tag, you can filter for it in a View, target it in a Rule, and count it in your analytics. That makes tags the link between "a ticket came in" and "the right person saw it, in the right queue, with the right context." If you want the conceptual tour before the setup, we cover the whole model in Gorgias tags explained.
Three things are worth knowing before you touch a single setting. First, Gorgias' Tags 101 lists exactly three ways to add a tag: the + Add tag button on an individual ticket, a bulk action across a View, or a Rule. Second, tags are case-sensitive; Gorgias' API reference states that "tags' names are case sensitive," which is the most common way taxonomies end up with duplicates. Third, only Admins and Lead agents can create, edit, or delete tags; everyone else can apply existing ones but not invent new ones. That permission model is what keeps twelve agents from inventing twelve spellings of "refund."
How should you design a tag taxonomy before creating tags?
The mistake almost everyone makes is creating tags reactively, one ticket at a time, until the list is unmanageable. Design first. A clean ecommerce taxonomy usually groups into a handful of families:
| Family | Example tags | What it feeds |
|---|---|---|
| Intent / topic | wismo, return, exchange, subscription-cancel, damaged-item | Topic Views + routing Rules |
| Order lifecycle | pre-purchase, post-purchase, shipping, delivery | Team assignment |
| Priority / attention | vip, escalation, negative-sentiment | High-priority Views |
| Channel / brand | instagram, email, brand-a, brand-b | Per-brand or per-channel Views |
Pick one casing convention (lowercase with hyphens is the most forgiving) and one naming pattern, and write it down. The goal is that any agent can guess the tag name without checking. Don't tag everything: a tag only earns its place if a View, a Rule, or a report is going to consume it.
How do you create tags in Gorgias?
Tag management lives in one place. Per Gorgias' Create, edit, or delete Tags documentation, you'll work under Settings → Productivity → Tags.
- Go to Settings → Productivity → Tags. You'll see your existing tags (including any default tags Gorgias ships) listed here.
- Click Create Tag in the top right corner.
- Type the tag name, matching the casing convention you chose, and confirm with the checkmark button.
- To refine it, click the pencil icon beside the tag. Here you can set its name, description, and color, then click Save. The description is easy to skip, but write it: Gorgias' AI Agent reads it if you ever turn on AI tagging.
- To remove a tag, use the red trash icon. Gorgias won't delete a tag that a Rule still uses until you edit that Rule to drop it, a small guardrail against breaking your automations.
Only Admins and Lead agents see this menu, so decide upfront who owns the taxonomy.
How do you build an auto-tag Rule by keyword or intent?
Manual tagging is fine for edge cases, but the point of a taxonomy is to let a Rule do the work. A Gorgias Rule follows a WHEN / IF / THEN shape: WHEN a trigger fires, IF conditions match, THEN take an action. For tagging, the action you want is Add tags. If Rules are new to you, the mechanics (including the order Rules run in) are covered in Gorgias Rules explained.
Here's a WISMO ("where is my order?") auto-tag Rule, the workhorse of any ecommerce inbox:
- Open Rules from the top-left menu under Workflows → Tools → Rules and create a New Rule.
- Set the WHEN trigger, typically ticket created, so the tag lands the moment the message arrives.
- Add an IF condition that matches the intent. A keyword condition on the message body (contains
where is my order,tracking,hasn't arrived,shipping status) catches most WISMO tickets. Gorgias' auto-tag Rule best practices show the same pattern for intents like Cancel order and Urgent order edit, plus tagging by source integration and by customer language. - Add the THEN Add tags action and pick your
wismotag (typing a new name here creates it on the fly, but select the one you already designed). - Save and activate.
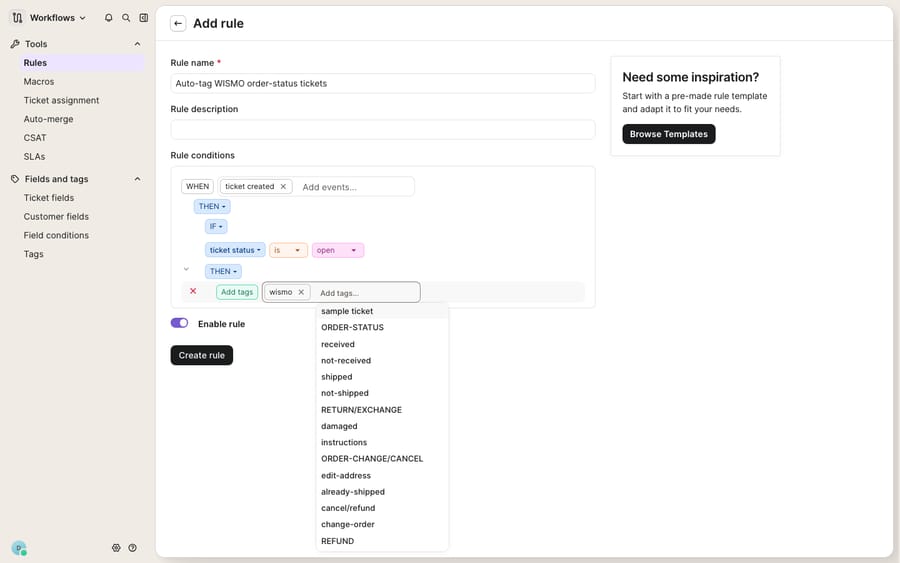
One distinction to keep straight, from the Rule Glossary: Actions: Add tags "adds one or more tags to the ticket without removing existing tags," while Reset tags "replaces all existing ticket tags with the specified ones." Use Add tags for accumulating intent labels; save Reset tags for a deliberate clean slate, because it wipes context an earlier Rule added. And because tags are case-sensitive, point your Rule at the exact tag you created; a stray capital letter quietly spawns a duplicate.
How do you turn tags into Views your team works from?
A tag is only as useful as the View that surfaces it. Once tickets are tagged, create a View filtered by that tag so the right queue assembles itself: a WISMO View for the shipping team, a Returns View for the returns desk, a Negative-sentiment View a lead skims twice a day. The full mechanics are in Gorgias Views explained, but the pattern is simple: filter a View by tag is wismo, and every auto-tagged ticket from your Rule flows straight into it.
You can also bulk-tag retroactively: tick the checkboxes next to tickets inside a View, click Add Tags, and apply a tag to the whole selection at once. That's the fastest way to clean up a backlog after you introduce a new tag.
Where does keyword tagging stop, and what does AI tagging cost?
Gorgias' native tagging is solid, and for a well-defined taxonomy it's hard to beat: it's deterministic, transparent, and carries no per-ticket AI cost. A keyword Rule that tags every message containing "return" will do exactly that, forever, without surprises.
But keyword matching has a ceiling. A Rule matches strings, not meaning. "Where is my order" gets tagged; "my parcel seems to have vanished into the void" does not, even though it's the same WISMO intent. Multilingual inboxes multiply the problem, since every phrasing in every language needs its own keyword list. And a Rule can't read a mixed-intent ticket ("I want to return the shirt but keep the subscription") and split it into two accurate tags. You end up maintaining a growing dictionary of phrases.
Gorgias' own answer is AI ticket tagging. Per its autofill documentation, the AI Agent fills tags and ticket fields across email and chat, reading the conversation and using each tag's description to pick values, and agents can override anything it sets. Three caveats from the same page: it needs an active AI Agent subscription, a Lead, Admin or Account Owner to switch it on, and it only tags tickets the AI Agent itself handles, so tickets your human agents answer still depend on your Rules. On cost, Gorgias' pricing page puts AI Agent on every plan as a bundle of interactions (30 on Starter up to 530 on Advanced) with $1.50 per interaction past the bundle, and Gorgias' billing docs say a ticket the AI Agent resolves carries both the helpdesk ticket fee and the automation fee. The incentive is worth naming: the vendor earns more per ticket the more the AI resolves, so the tagging comes bundled with a per-resolution meter.
That's the gap an AI agent layer fills, and it's worth weighing the build-versus-buy tradeoff before you reach for one. The broader category of AI agents for customer service exists to do the reasoning work a keyword Rule can't. Macha is one such layer: it runs on top of the Gorgias you already use as a native connector (it also runs on Zendesk, Freshdesk, Gorgias, Front, HubSpot or Intercom), and it doesn't replace Gorgias, your tags, your Rules, or your Views. It reads and writes the same tickets your taxonomy already organizes, classifying by intent rather than keyword (so the "vanished into the void" ticket still reads as WISMO), and it can look up an order or subscription status through a custom tool that turns a REST API into something the agent can call, so the tag and the answer arrive together. Macha bills per ticket, one conversation charged once however many messages it takes, never per resolution: plans start at $299 a month for up to 750 tickets, with setup and monitoring by the Macha team included. See pricing for the higher tiers.
The clean division of labor: keep Gorgias' tags and Rules as the deterministic backbone for what a ticket is and where it goes, and layer an agent on top for the meaning-heavy classification that string matching can't reach.
FAQ
Where do I create tags in Gorgias? Go to Settings → Productivity → Tags, click Create Tag in the top right, enter the name, and confirm with the checkmark. Use the pencil icon to add a description and color. Only Admins and Lead agents can create, edit, or delete tags; other users can apply existing ones.
How do I automatically tag tickets in Gorgias? Build a Rule with a WHEN trigger (for example, ticket created), an IF condition (for example, the message contains certain keywords), and a THEN Add tags action pointing at your chosen tag. Gorgias' auto-tag best practices show this for cancel-order, urgent order edit, integration and language tags.
What's the difference between Add tags and Reset tags? Add tags adds a tag without removing what's already on the ticket. Reset tags replaces all existing tags with the ones you specify. Use Add tags to accumulate intent labels; use Reset tags only when you deliberately want a clean slate.
Are Gorgias tags case-sensitive? Yes. Gorgias' API reference says tag names are case-sensitive, so wismo and WISMO are separate tags. Pick one casing convention and point your Rules at the exact tag you created to avoid silent duplicates.
Does Gorgias AI Agent tag every ticket? No. AI ticket tagging needs an active AI Agent subscription and only fills tags on tickets the AI Agent handles itself; tickets answered by human agents still rely on your Rules. Agents can edit or override any tag the AI Agent adds.
Can I add AI tagging without replacing Gorgias? Yes. Gorgias' own AI Agent can autofill tags on the tickets it handles, billed through AI Agent interaction bundles. Alternatively, an AI agent layer like Macha connects to Gorgias as a native connector and classifies tickets by intent on top of your existing tags, Rules, and Views. Gorgias stays the system of record, and Macha bills per ticket rather than per resolution.
Ready to tag by meaning instead of maintaining a keyword dictionary? Start a free trial of Macha and connect it to your Gorgias in minutes.