





 Shopify
 Stripe
 Slack
Slack Notion
 Google Workspace
 Confluence

How Do You Set Up a Shared Inbox in Front? (2026 Step-by-Step)


A Front shared inbox takes about ten minutes to set up: create the inbox, connect an email channel, add teammates and write one routing rule. Only an admin can do it, and a few plan limits decide how far it scales.
Key takeaways
- Setting up a Front shared inbox takes about ten minutes: an admin creates the inbox under Inboxes, connects a channel, adds teammates and writes a first rule.
- Only a Front administrator can create a shared inbox, edit its settings or change teammate access; regular teammates can read, reply, assign and comment but not reconfigure it.
- Front ticket IDs use a default prefix built from the first three letters of the workspace name, so a workspace called Support produces IDs like SUP-1042.
- Connecting an Office 365 shared mailbox to Front needs Read and manage (Full Access), Send as and Send on behalf of permissions set in the Exchange admin center.
- Front's pricing page lists up to 10 automation rules on Starter at $25 a seat, up to 20 on Professional at $65, and unlimited rules on Enterprise.

To set up a shared inbox in Front, a Front admin opens Settings (the gear icon), picks a workspace, clicks Inboxes → Create shared inbox, then connects a channel under Channels → Connect channel. After that you add teammates and write a first rule. The whole job takes about ten minutes and works on every Front plan, from Starter at $25 a seat a month billed annually (front.com/pricing, checked 24 September 2026). The limits that bite later are plan limits: Starter allows one channel type and up to 10 automation rules.
| Step | Where in Front | Who can do it |
|---|---|---|
| 1. Create the inbox | Gear icon → workspace → Inboxes → Create shared inbox | Admins only |
| 2. Connect email | Channels → Connect channel (Google, Microsoft or Other email account) | Admins; Office 365 also needs mailbox permissions |
| 3. Add teammates | Inbox settings → Teammates | Admins only |
| 4. First rule | Workspace settings → Rules and macros | Admins; 10 rules on Starter, 20 on Professional, unlimited on Enterprise |
What's the difference between an inbox and a channel in Front?
The idea that makes Front click is that an inbox and a channel are two different things. A shared inbox is the space your team works out of: the folder in the sidebar. A channel is a source of messages (a Gmail address, an Office 365 shared mailbox, an SMS number, a chat widget) that feeds conversations into that inbox. One shared inbox can have several channels flowing into it, which is how a support team keeps email, SMS and social in one place. You create the inbox first, then connect channels to it. The full model is in Front shared inbox explained.
One prerequisite: you need to be a Front administrator. Per Front's guide to adding and using shared inboxes, any admin can create a shared inbox, edit its settings and change teammate access; nobody else can. If you don't have admin rights, ask whoever owns your Front account to grant them or to do the setup with you.
How do you create a shared inbox in Front?
The create-inbox form is short, but two fields (Access and Ticketing) decide behavior you'll live with for a long time.
- Click the gear icon (settings) and select the workspace you want the inbox to live in.
- In the left menu, click Inboxes, then click Create shared inbox.
- Enter an inbox name. It displays in everyone's sidebar and in menus, so make it obvious (Billing & Refunds, Support, Sales), not a codename. A description is optional.
- Pick a color. Purely visual, but a distinct color per inbox makes a crowded sidebar readable at a glance.
- Set Access. Slow down here: choosing your workspace name makes the inbox open to everyone in the workspace, while Restricted limits it to the teammates or teammate groups you name. A billing or HR inbox almost always wants Restricted; a general support inbox is usually fine open.
- Decide Show this inbox in teammate sidebars. Turn it on to add the inbox to teammates' sidebars automatically, so they don't have to find and pin it.
- Leave Ticketing on. It gives every conversation a status and a ticket ID. Front's help center says the default ID prefix auto-populates from the first three letters of your workspace name (so a workspace called Support produces IDs like
SUP-1042), and you can edit it in the form, for example toBILfor a billing inbox. A short prefix is handy for referencing a conversation in Slack or on a call.
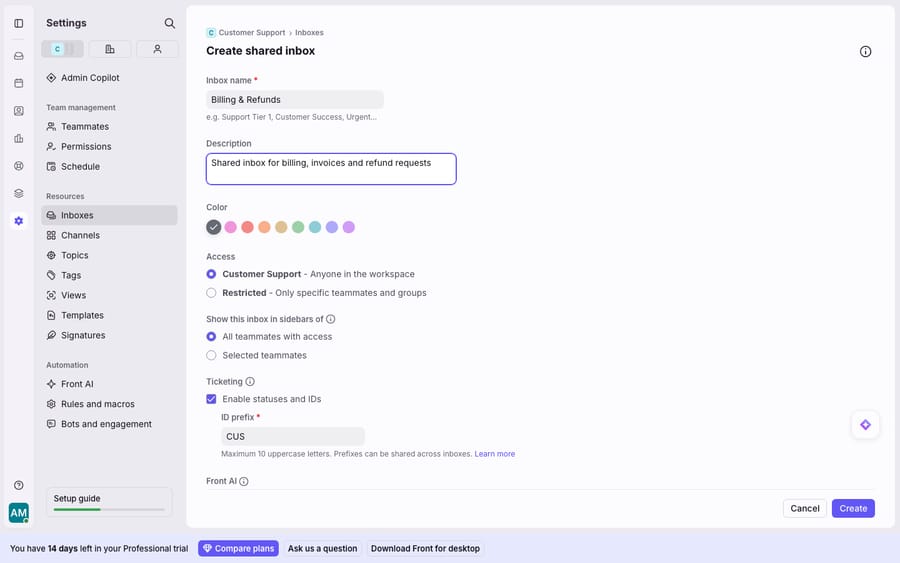
Click Create, and Front drops you into the inbox's settings, which is where you connect a channel next.
How do you connect Gmail, Office 365 or another email account?
An empty inbox does nothing until a channel feeds it. Most teams start with email, and Front connects it a few ways; the right one depends on where your mail lives.
- In the left menu, click Channels, then click Connect channel.
- Choose the provider that matches your setup.
The three email paths, and when to use each:
| Your email lives on | Choose | How it authenticates |
|---|---|---|
| Google Workspace / Gmail | OAuth: sign in with Google and grant access | |
| Microsoft 365 (Exchange Online) shared mailbox | Microsoft → Office 365 (Exchange Online) → Shared mailbox | OAuth: "Sign in with Microsoft" |
| Anything else / advanced routing | Other email account (forwarding / SMTP inbox) | Forwarding rule or SMTP relay |
For Office 365 shared mailboxes, Front's Exchange Online setup guide is specific about permissions: the account that authenticates must have Read and manage (Full Access), Send as and Send on behalf of on that mailbox, set in the Exchange admin center. If sending fails after connecting, a missing "Send as" permission is the usual culprit. The shared-mailbox channel works on all Front plans; on Starter, email has to be your account's one channel type.
For everything else (a legacy provider, a catch-all address, or a setup where you'd rather route mail in than give Front direct mailbox access), use "Other email account." This creates a forwarding (SMTP) inbox: you point your provider's forwarding or advanced mail routing at the address Front gives you. Front documents this pattern for Google Workspace advanced mail routing, where you redirect organization mail to Front's SMTP inbox instead of connecting the mailbox directly. It's the most flexible option and the fallback when OAuth isn't possible.
One channel setting to check while you're here: in the channel's Routing section, confirm the default inbox its messages land in. Make sure it points at the shared inbox you just created, not an individual one.
How do you add teammates and set permissions?
If you set Access to your workspace name in the first step, everyone in the workspace already has the inbox. If you chose Restricted, you grant access now.
- Open the inbox's settings and go to the Teammates (access) area.
- Add individual teammates or teammate groups. Groups are the sane choice for anything that changes as people join and leave, because you manage membership in one place instead of per inbox.
- Confirm sidebar visibility: an admin can push the inbox into all assigned teammates' sidebars from the Settings tab so nobody has to go hunting for it.
A note on roles: creating and editing shared inboxes, and changing who has access, is admin-only. Regular teammates can work in the inbox (read, reply, assign, comment) but can't change its configuration. That's deliberate: shared inboxes are shared infrastructure, so their wiring stays with admins. Seat caps also apply: Starter tops out at 10 seats and Professional at 50.
How do you write your first routing rule?
A new shared inbox works the moment mail flows in; teammates can already reply and assign. But the payoff of a shared inbox is automation: tagging, routing and assigning conversations as they arrive so nobody triages by hand. That's what rules do.
A simple, useful first rule: auto-assign incoming conversations round-robin so work is spread evenly instead of the fastest reader grabbing everything.
- Go to Workspace settings → Rules and macros and create a new rule.
- Set the trigger (When): an inbound message is received.
- Set the condition (If): conversation is in → your new shared inbox (and, optionally, narrow it: subject contains "refund", or from a specific domain).
- Set the action (Then): assign to your teammate group using round robin, or add a tag, or reply with a template, or several at once.
- Save, and send a test email to confirm it fires the way you expect.
That's the whole model: When → If → Then. Every automation in Front, from a one-line auto-tag to a multi-step escalation, is that same sentence. Rule scopes, ordering and the "stop processing other rules" switch are covered in Front rules explained.
What are the limits of a Front shared inbox?
Front's shared inbox is good at the job it's built for: consolidating channels, giving a team one place to collaborate, and moving conversations around predictably with rules. For most of setup, nothing is gated and nothing needs a workaround.
A few edges worth knowing before you scale:
- Rules and channels are capped by plan. Front's pricing page lists up to 10 automation rules on Starter ($25 a seat) and up to 20 on Professional ($65), with unlimited rules on Enterprise ($105). Starter also allows a single channel type (email, Front Chat or SMS) and one workspace. A busy team automating aggressively can hit those ceilings sooner than expected; our breakdown of Front's pricing tiers shows what unlocks where. Front's 14-day trial runs on Professional features, so a trial workspace can feel roomier than the Starter plan you might buy.
- Rules match patterns, not meaning. A rule can route subject contains "refund" to the billing inbox, but it can't read "I was double-charged and want my money back," recognize it as a refund, check the customer's invoice and write the answer. A template reply is the same fixed text for everyone who trips the trigger.
- The inbox routes; it doesn't resolve. Getting the right conversation to the right team is the shared inbox's whole value, but someone still has to read each one and reply.
Can you add an AI agent to a Front shared inbox?
Yes. That last gap is where an AI agent layer fits: not replacing the shared inbox, but doing the reasoning a keyword rule can't. The broader category of AI agents for customer service exists for this work. Macha is one such layer: it runs on top of the Front you already use through the live Macha–Front connector, and it doesn't replace Front, your shared inbox or your rules. Your inbox and rules keep getting the right conversation to the right place with the right tags. Macha's agent then reads that conversation, works out intent rather than keywords, and drafts or sends a grounded reply, pulling a real order or account status through a custom tool that turns your REST API into something the agent can call. For the mechanics, connecting Front to Macha to route conversations to AI walks through it. Macha bills per ticket, from $299 a month for up to 750 tickets: one conversation, charged once however many messages it takes, never per resolution, so the bill doesn't hang on an outcome definition you don't control.
The division of labor: the Front shared inbox is the predictable place work lives, and an agent on top handles the part a pattern match can't, reading the conversation and answering it well.
FAQ
Who can create a shared inbox in Front? Only a Front administrator. Any admin can create a shared inbox, edit its settings and change teammate access. Regular teammates can work in a shared inbox (reply, assign, comment) but can't change its configuration.
What's the difference between an inbox and a channel? An inbox is the space your team works out of (the folder in the sidebar). A channel is a message source, such as a Gmail address, an Office 365 shared mailbox or an SMS number, that feeds conversations into an inbox. One shared inbox can have multiple channels connected to it.
How do I connect a Gmail or Office 365 mailbox? Click Channels → Connect channel, then choose Google for Gmail/Google Workspace or Microsoft → Office 365 (Exchange Online) → Shared mailbox for Exchange Online; both use OAuth. For an Office 365 shared mailbox, the authenticating account needs Read and manage (Full Access), Send as and Send on behalf of permissions. For other providers, use Other email account to set up a forwarding/SMTP inbox.
What are ticket statuses and IDs on a shared inbox? They come with Ticketing, which you can turn on when you create the inbox. Each conversation gets a status and a ticket ID; the default ID prefix is the first three letters of your workspace name, and you can edit it, so you can reference a conversation (e.g. SUP-1042) in Slack or on a call.
How many rules can a Front shared inbox use? Front's pricing page lists up to 10 automation rules on Starter, up to 20 on Professional and unlimited rules on Enterprise, as of 24 September 2026.
Can I add AI to a Front shared inbox without replacing Front? Yes. An AI agent layer like Macha connects to Front as a live connector and runs on top of your existing inbox and rules without replacing them. Your inbox keeps routing predictably; the agent reads the conversation, works out intent, and drafts or sends a grounded reply.
Ready to turn "routed to the right inbox" into "actually answered"? Start a free trial of Macha and connect it to your Front in minutes.