



 Shopify
 Stripe
 Slack
Slack Notion
 Google Workspace
 Confluence

How Do You Set Up the Gorgias Chat Widget on Shopify? (2026)


Gorgias Chat installs on a Shopify storefront in a few clicks once a store is connected, and every chat it collects becomes a ticket in your help desk. Here is the install path, the appearance and availability settings that matter, what happens after hours, and which parts need an AI Agent subscription or Convert.
Key takeaways
- Setting up Gorgias Chat on Shopify starts at Settings, Channels, Chat, then New chat, where choosing Ecommerce platforms and connecting a Shopify store unlocks the install step.
- Quick install for Shopify deploys the Gorgias chat widget to every store page and keeps it live through theme edits, while manual install covers headless stores, specific pages and Google Tag Manager.
- A Gorgias chat home page logo must be a PNG, JPG or GIF file of at most 500 KB, and the launcher can sit in any of four screen corners.
- If the estimated Gorgias chat wait is over 15 minutes, shoppers can keep waiting or switch to the offline capture form and get a reply by email.
- Gorgias Chat is on all plans, but chat automation needs an AI Agent subscription billed per automated interaction, at $0.90 each on annual billing and $1.00 on monthly.

To set up the Gorgias chat widget on Shopify, go to Settings → Channels → Chat → + New chat, choose Ecommerce platforms, connect your Shopify store, then run Quick install for Shopify, which injects the widget into every page of your theme. Only account owners and admins can do this, and Chat itself is available on all Gorgias plans; the automation layered on top of it needs an AI Agent subscription.
| Step | Where | What to decide |
|---|---|---|
| 1. Create the chat | Settings → Channels → Chat → + New chat | Title, language, Ecommerce platforms, which Shopify store |
| 2. Install | Install & Launch step | Quick install (all pages) or manual install (specific pages, headless, GTM) |
| 3. Appearance | Your chat → Appearance | Brand color, launcher position, logo (500 KB max) |
| 4. Availability | Your chat → Preferences | Visibility toggles, one of three availability modes, wait-time message |
| 5. Automation (optional) | AI Agent deployment step | Needs an AI Agent subscription and a connected Shopify store |
What does the Gorgias chat widget actually do?
The Gorgias chat widget is a launcher that lives on your storefront and feeds directly into your help desk. When a shopper opens it and sends a message while your team is online, Gorgias opens a chat ticket an agent can pick up in real time. When your team is offline, the same widget shows an offline capture form that creates an email ticket instead, so a 2am "where's my order?" doesn't vanish; it lands in the queue for the morning. Every conversation becomes a ticket, which is the whole point: chat, email, and social all land in one timeline rather than in a separate inbox you have to babysit.
Chat is available on all Gorgias plans, but a few of the smarter layers are gated. Setting it up is limited to account owners and admins, per Gorgias' chat setup documentation, while every user except Observers can answer chat tickets. Chat automation and order management need an AI Agent subscription, and deploying AI Agent on chat also needs a connected Shopify store. If you want the conceptual tour before the wiring, Gorgias Chat explained and the Gorgias chat widget explained cover the shape of it; what follows is the hands-on install.
How do you create the chat and connect your Shopify store?
Everything starts in one place. Go to the Settings icon (bottom-left) → Channels → Chat → + New chat. This opens the New Chat wizard, which now runs in up to five steps: Basics, Branding, Order Management, Install & Launch, and an optional AI Agent deployment step. The Basics step is the fork in the road that trips people up.
- Enter a Chat title and pick your default language (add more with + Add language if you sell across regions).
- Under "Choose where you'll install your chat," select Ecommerce platforms. This is the option for Shopify, Magento, and BigCommerce.
- In the Connect a store step, select your Shopify store from the dropdown. This is required: the theme-embed install step stays locked until a store is connected.
- Choose your messaging type: Allow live chat messages for real-time chat, or offline capture for email-only.
- Click Continue to reach Branding, where you can set color, logo and launcher position now or later.
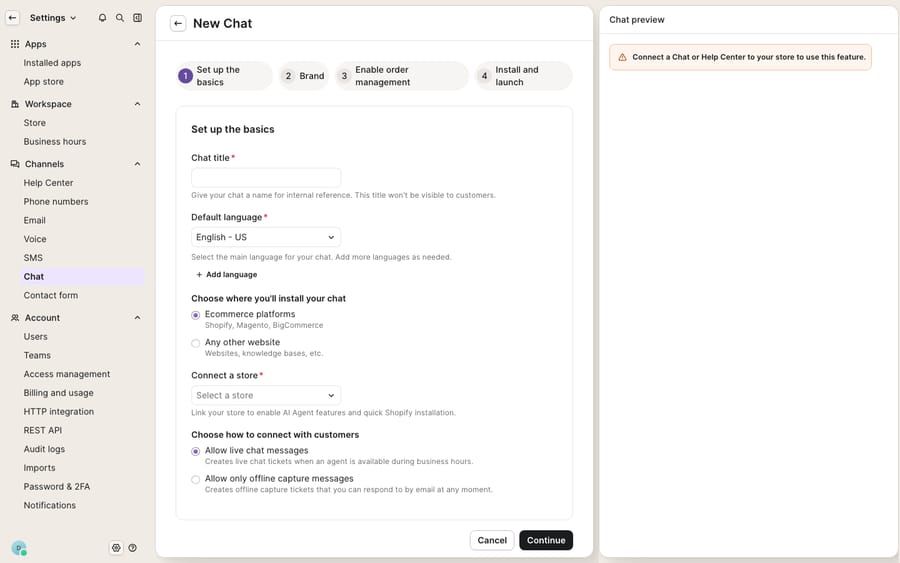
As the screenshot above shows, this is step 1 of the live install wizard, and the "Connect a store" requirement isn't a formality. Until Gorgias can see your Shopify store, it can't inject the widget into your theme, so if you're evaluating chat on a fresh account with no store attached, the install steps below will appear greyed out. Connect the store first.
Should you use quick install or manual install on your Shopify theme?
Once the store is connected, Gorgias offers two install paths, and the right one depends on how standard your storefront is.
- Quick install for Shopify (1-click) is the default and the one most stores should use. Select Quick install, click Install, and you'll be redirected to Shopify in a new tab where you approve the updated app permissions. Gorgias then deploys the widget to all store pages automatically; you can hide it on specific pages afterwards. Per Gorgias' 1-click installation notes (August 2023), this method means the chat "does not disappear from your website any time you touch your Shopify theme."
- Install manually is for the edge cases: showing chat only on specific Shopify pages, a Shopify Headless build, BigCommerce or Magento 2, or firing the script through Google Tag Manager. You drop the provided snippet into your theme's
theme.liquid(via Online Store → Themes → Edit code), just inside the<body>tags.
One gotcha worth flagging: if you've hand-tuned the widget with Advanced Customization Scripts, Gorgias' own migration notes tell you to verify them and move them to the newer method before you reinstall. Don't casually re-run the 1-click installer on a heavily customized widget and assume the custom code survives.
How do you set the widget's appearance?
With the widget live, tune how it looks under the Appearance tab of your chat integration (Settings → Channels → Chat → your chat → Appearance). Per Gorgias' appearance documentation:
- Set a Brand color (hex or picker). It's applied to both the widget header and the launcher button. Leave it blank or enter an invalid value and Gorgias defaults to blue.
- Choose a launcher position: bottom-right (default), bottom-left, top-right, or top-left, with pixel offsets in the Move horizontally and Move vertically fields if the default collides with a cart drawer or a cookie banner.
- Upload a Home page logo (PNG, JPG, or GIF, max 500 KB). A horizontal logo on a transparent background reads best.
Small things matter here. A launcher that overlaps your "Add to cart" button on mobile costs you conversions, so preview it on a phone before you call it done.
How do you control targeting, business hours, and offline behavior?
This is where a widget goes from "always on, always annoying" to "shows up at the right moment." Under the Preferences tab, Gorgias' chat preference settings give you three visibility toggles and an availability mode:
Where chat appears, three toggles:
- Show chat: the sitewide on/off switch.
- Show chat outside of business hours: hide the launcher entirely when you're closed, or keep it visible for offline capture.
- Show on mobile: control whether mobile shoppers see it at all.
Chat availability, three modes: live when agents are available (chat only goes live if staff are logged in), always live during business hours, or offline (capture messages only). Gorgias also sets the wait-time message: dynamic (based on your team's actual response times) or static ("in a few minutes" or "in a few hours"). If the estimated wait is over 15 minutes, shoppers get the option to wait for an agent or fill out the offline capture form and get a reply by email.
Offline appearance: older guides describe the launcher turning grey outside business hours, with a "Keep main color" checkbox to stop it. Neither the current appearance nor the preferences documentation mentions that setting, so check your own widget after hours rather than planning around it. If you'd rather not show a closed launcher at all, switch off Show chat outside of business hours.
For true page-level targeting, say showing chat only on product and cart pages, the clean route is the manual install on specific pages, since quick install deploys sitewide and only offers "Hide on specific pages" afterwards.
Where does the native widget stop, and where does an AI layer pick up?
Gorgias Chat is strong at what it does: it installs cleanly on Shopify, routes every conversation into your help desk as a ticket, and handles the online/offline handoff without fuss. But be clear about what the base widget is: a transport layer. It carries the message from storefront to agent; it doesn't, on its own, answer the message.
Two capabilities that make chat feel intelligent are add-on and Shopify-gated. Proactive chat campaigns (the on-site nudges like "free shipping over $50") on a Shopify-connected chat live inside Convert. And chat automation, including the self-service Flows and the AI Agent that resolve WISMO, returns, and subscription questions inside chat without an agent, requires an AI Agent subscription, and putting AI Agent on chat requires a connected Shopify store. Gorgias bills that AI per automated interaction: its pricing FAQ puts included interactions at $0.90 each on annual billing and $1.00 on monthly, the plan cards list $1.50 for each interaction past the bundle, and each AI interaction also counts as a helpdesk ticket. That couples your bill to automated volume twice over, which can surprise you at scale.
This is the seam where a dedicated AI agent layer fits, and it's worth understanding the broader category of AI agents for customer service before you commit. Macha is one such layer: it runs on top of the Gorgias you already use as a native connector. It doesn't replace Gorgias, your chat widget, or your help desk. You keep the Gorgias install exactly as configured above; Macha reads and writes the same tickets your chat creates. It drafts or sends grounded replies to WISMO, returns, and subscription questions by looking up live order and account status through a custom tool that turns your Shopify or ERP REST API into something the agent can call, so the after-hours offline form gets followed by an actual answer.
The billing contrast matters too: Macha bills per ticket, from $299 a month for up to 750 tickets with setup and monitoring by the Macha team included. One conversation is charged once however many messages it takes, and there's no per-resolution fee. Automation is messy: an agent might read an order, check a policy, and post a reply across several actions, or it might tee up a draft a human sends, so pricing the whole ticket is honest about what actually happened rather than assuming every touch is a clean "resolution." Keep Gorgias Chat as the storefront transport and system of record; layer an agent on top for the reasoning the widget can't do alone. New to the platform underneath all this? What is Gorgias is the primer.
FAQ
Where do I set up the Gorgias chat widget for Shopify? Go to Settings → Channels → Chat → + New chat. In the Basics step, choose Ecommerce platforms (the Shopify/Magento/BigCommerce option) and connect your Shopify store. The theme-embed install step stays locked until a store is connected, and only account owners and admins can set chat up.
Quick install or manual install: which should I use? Use Quick install for Shopify (1-click, approved through the app permissions prompt in Shopify) for a standard storefront; it deploys to every page and survives theme edits. Use manual install for specific-page targeting, Shopify Headless, BigCommerce/Magento, or Google Tag Manager. If you run Advanced Customization Scripts, verify them before reinstalling.
What happens when my team is offline? When chat is offline, the widget shows an offline capture form that creates an email ticket for your team to work later. You can also hide the launcher entirely outside business hours with the Show chat outside of business hours toggle, and during hours shoppers facing a wait over 15 minutes can switch to the same form.
Does every chat become a ticket? Yes. Every chat conversation creates a ticket in your Gorgias help desk, so chat, email, and social all land in one timeline rather than a separate inbox.
Is Gorgias Chat included on every plan? Yes. Gorgias' setup documentation says Chat is available on all plans. Chat automation and order management need an AI Agent subscription, and proactive campaigns on a Shopify-connected chat need Convert.
Can I add AI to Gorgias Chat without replacing Gorgias? Yes. An AI agent layer like Macha connects to Gorgias as a native connector and runs on top of your existing chat widget and help desk; it doesn't replace them. It answers WISMO, returns, and subscription questions with grounded replies, while Gorgias stays the system of record. Macha bills per ticket, a whole chat charged once however many messages it takes, not per resolution.
Want after-hours chats answered instead of parked in an offline form? Start a free trial of Macha and connect it to your Gorgias.