





 Shopify
 Stripe
 Slack
Slack Notion
 Google Workspace
 Confluence

How Do You Set Up Message Templates in Front? (2026)


Front message templates are available on every plan: you create one from the composer or from Settings, file it in folders up to 5 levels deep, and personalize it with variables. The only gated part is dynamic variables from third-party app data, which need the Enterprise plan or the Autopilot add-on.
Key takeaways
- Front message templates are created in Settings → Templates → Messages → Create or from a draft, and Front puts no hard limit on how many a team can save.
- Front template folders nest up to 5 layers deep, so a team can file a refund reply under Support, then Billing, then Refunds.
- Front's dynamic variables that pull third-party application data need the Enterprise plan or the Autopilot add-on, which bills $0.05 to $0.89 a conversation depending on the outcome (as of October 2026).
- A Front fallback such as recipient.first_name | 'there' fills in a default word when a contact's name is missing, and the fallback must sit in single quotes.
- Typing /template followed by a template's name and pressing Enter inserts a Front template without leaving the keyboard.

To set up a message template in Front, go to Settings → Templates → Messages → Create (or click the template icon in the composer and choose New from draft), give it a searchable name, add variables by typing {{, pick individual or shared, and save. Templates are available on every Front plan with no hard cap on how many you create, and folders nest up to 5 layers deep. The one gated piece is dynamic variables that pull third-party application data, which need the Enterprise plan or the Autopilot add-on.
| Step | Where in Front | Plan |
|---|---|---|
| 1. Create a template | Composer template icon → New from draft, or Settings → Templates → Messages → Create | All plans |
| 2. Organize in folders | Settings → Templates → Create → Folder (up to 5 levels) | All plans |
| 3. Add variables | Type {{ in the editor | Contact, account and user variables on all plans; dynamic app variables on Enterprise or with Autopilot |
| 4. Choose personal or shared | Individual vs shared, plus the "Make available for any inbox" setting | All plans |
| 5. Insert in a reply | Template icon, or type /template + name | All plans |
What is a message template in Front?
A message template in Front is a reusable, pre-written message. Front describes them as predetermined answers to common questions, so you respond faster and stop retyping the same FAQ reply. If you've used canned responses or saved replies in another tool, it's the same idea, with two features that make Front's version worth setting up properly: folders to keep a growing library organized, and variables that swap in real customer data at send time so a template never reads like a form letter.
Two facts shape everything below. First, per Front's guide to message templates and folders, message templates are available on all plans. Second, dynamic variables (auto-populating replies from third-party application data) are available on the Enterprise plan or with the Autopilot add-on, per Front's variables FAQ. We flag that clearly in step 3.
How do you create a template in Front?
You can build a template from two places, and it's worth knowing both.
- From the composer (fastest for capturing a good reply). When you've just written a reply you'll want again, click the template icon in the composer toolbar and choose New from draft. Front lifts your draft into the template form so you don't re-type it.
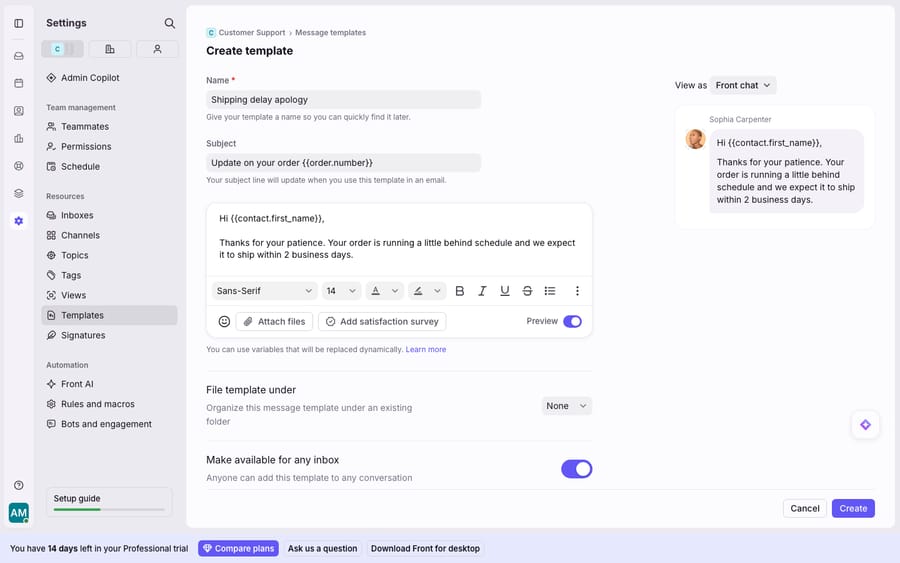
- From settings (best for building a library deliberately). Go to Settings → Templates, open the Messages tab, and click Create. You fill in a name, an optional subject, the text, a folder, and which inboxes can use it.
- Name it for how people will search. Templates are searchable in the composer, so a clear name ("Refund: approved", "Order status request", "Password reset steps") matters more than you'd think once the library grows.
- Save. The template is immediately available to insert (covered in step 5).
Regular members can save their own individual templates, so you don't need admin rights for personal shortcuts.
How do you organize Front templates into folders?
A handful of templates is fine loose. A hundred is chaos. Folders are how Front keeps a real library usable.
Create a folder under Settings → Templates → Create → Folder, then move templates into it by selecting them with the checkboxes and clicking Move. Front lets you nest folders up to 5 layers deep, which is plenty to model a team structure: a top-level Support folder, a Billing sub-folder inside it, and Refunds inside that.
A sensible starting taxonomy:
| Folder | What lives here | Example templates |
|---|---|---|
| Support → Orders | Order and shipping questions | Order status, Tracking link, Delivery delay |
| Support → Billing | Payment and refund replies | Refund approved, Invoice request, Double-charge |
| Sales → Outreach | First-touch and follow-up | Intro reply, Demo booking, Pricing overview |
| Ops → Internal | Handoffs and holding replies | Escalation note, On-hold notice |
Folders show up in the composer's template menu and are searchable, so the structure you build in settings is what your team navigates while replying. Front says there are no hard limits on the number of message templates, so the constraint is your own discipline, not the tool.
How do you add variables like a customer's name to a Front template?
A static template is fine for "here's our refund policy." But "Hi there, your order is on its way" reads better as "Hi Sarah, your order #10432 is on its way", and that's what variables do.
While editing a template, type two open curly brackets {{ and Front opens a menu of available variables. Per Front's guide to variables and application objects, the common built-ins include:
{{recipient.first_name}}      → the contact's first name
{{recipient.name}}            → full name
{{recipient.email}}           → email address
{{account.name}}              → the associated account/company
{{user.first_name}}           → the replying teammate's first name
{{conversation.id}}           → the Front conversation ID
You can also pull custom fields with {{recipient.custom.field_name}} (say, a Customer ID) and {{account.custom.field_name}}. Because a real name won't always be on file, add a fallback with the pipe syntax so the reply never renders blank. The fallback text must sit in single quotes:
Hi {{recipient.first_name | 'there'}},If the contact's first name is missing, Front substitutes there instead of leaving an awkward gap. Two caveats from Front's docs: when a message has multiple recipients, variables populate from the first recipient only; and {{user...}} variables come back blank in automatic replies sent by rules, because no teammate is tied to an auto-sent message.
Application object variables pull third-party data attached to the conversation. They carry two limits: a template can only use variables from one application object at a time, and the auto-populating dynamic variable behavior requires the Enterprise plan or the Autopilot add-on (Autopilot bills each conversation once at the highest level it reaches, $0.05 for triage, $0.39 for a handoff and $0.89 for a resolution, as of October 2026 per Front's Autopilot pricing). On other plans you still get the native contact, account and user variables.
Should a Front template be personal or shared, and which inboxes get it?
When you save a template, Front asks two questions that decide who can use it and where.
Individual vs shared. An individual template is visible only to you. A shared template is visible to teammates at the inbox level, so the whole team replies with the same approved wording. Rule of thumb: individual templates for your own shortcuts, shared templates for anything that speaks in the company's voice.
Which inboxes. The "Make available for any inbox" setting controls scope. Leave it off and you assign the template to specific inboxes; turn it on and it's available everywhere. A teammate needs access to the inbox to use a shared template in the composer. The exception: teammates with the "Templates - Create and edit" permission can view every shared template in workspace settings regardless of inbox access, which is how admins audit and maintain the library.
This is also how you keep tone consistent. When your refund reply, your escalation note and your "we're looking into it" holding message all live as shared templates, everyone sends the same measured wording. That's the difference between a team that sounds like one company and one that sounds like ten people having different days.
How do you insert a template while replying in Front?
Saving templates is half the value; inserting them fast is the other half. Front gives you two ways:
- Template menu. In the composer, click the template icon, search or browse your folders, and click to drop one in.
- Quick insert. Type
/templatefollowed by the template's name, then press Enter. The reply fills in without leaving the keyboard. This is the one power users live in.
Once inserted, variables render against the current conversation, so {{recipient.first_name}} becomes the actual contact's name, and you can edit the text before sending like any normal reply. For teams that also use Front's rule engine, a template can be sent automatically as a rule action; our Front rules explainer covers how that wiring works.
Where do Front templates stop, and what can an AI agent add?
Front's message templates are good at what they do, and the base feature isn't gated. A well-organized library with variables and shared folders removes a lot of repetitive typing and keeps a team's voice consistent. For the full conceptual model, see Front message templates explained.
But a template is still fixed text with a few merged fields. It can greet Sarah by name and slot in her order number, but it can't read Sarah's message, see that she's asking about a delay rather than a cancellation, check her real order status, and write an answer for her situation. Everyone who gets the same template gets the same paragraph. And replies that populate automatically from live application data need Enterprise or the Autopilot add-on. Front's pricing tiers lay out what unlocks where.
That's where an AI agent layer fits: not to replace templates, but to do the reasoning a merge field can't. The broader category of AI agents for customer service exists for the work that "insert canned text" can't cover. Macha is one such layer. It runs on top of the Front you already use through the live Macha–Front connector, and it does not replace Front, your shared inboxes or your templates. Keep templates for the fixed replies. For questions that need a real answer, Macha's agent reads the conversation, works out intent, pulls the customer's order or account status through a custom tool that turns your REST API into something the agent can call, and drafts or sends a grounded reply. A template says "Hi {{recipient.first_name}}, we've received your request"; an agent resolves the request. If you want the mechanics, connecting Front to Macha to route conversations to AI walks through it. Macha bills per ticket on one plan, from $299 a month for up to 750 tickets, with one charge per conversation however many messages it takes.
The clean split: let Front templates carry your standard, repeatable wording, and put an agent on top for the replies that need reading and reasoning. For how templates sit inside the wider workflow, see the Front shared inbox model.
FAQ
Where do I create a message template in Front? Two places. From the composer, click the template icon and choose New from draft to save the reply you've just written. Or go to Settings → Templates → Messages tab → Create to build one from scratch with a name, subject and text.
What's the difference between a personal and a shared template? An individual (personal) template is visible only to you. A shared template is visible to teammates at the inbox level, so the whole team can reply with the same approved wording. Use the "Make available for any inbox" setting to control which inboxes a template appears in.
How do I add a customer's name or order number to a template? Type {{ while editing the template to open the variable menu, then pick a variable like {{recipient.first_name}} or a custom field. Add fallback text with the pipe syntax, {{recipient.first_name | 'there'}}, so the reply never renders blank when a value is missing.
Are Front message templates free on all plans? Yes, the base feature is available on all Front plans, with no hard limit on how many you can create. Dynamic variables that pull from third-party application objects require the Enterprise plan or the Autopilot add-on.
How do I insert a template while replying? Either click the template icon in the composer and pick from your folders, or type /template followed by the template name and press Enter to drop it in without leaving the keyboard.
How deep can Front template folders go? Front lets you nest folders up to 5 layers deep, for example Support, then Billing, then Refunds.
Ready to turn "insert canned text" into "actually answered"? Start a free trial of Macha and connect it to your Front in minutes.